我就不貼我現在做項目的代碼,我直接把作者的示例搬過來,因為改動不大,只要做點修改,就能很好的滿足我們自己的需求。
原文地址 猛點這裡下載
作者官網 不過是英文的,英語好的話 可以看原文,生怕我表達錯誤。
不知道童鞋們在平時的開發用到用向導式開發這種方式沒有?有人問 什麼是向導式開發呢?其實,很簡單,就是讓用戶完成一個步驟,然後點擊下一步,完成一個步驟就點擊下一步,這樣 按照我師父的來說,可以很好的提升用戶體驗。
OK,廢話不說了,先來一個最簡單的例子:
例子1:
1.1當然咯,既然是JQuery 就少不了需要引用JQuery庫吧。在上面就能下到相關的類庫。
JQuery Class and Style
代碼如下:
<!-- jquery ui theme -->
<link rel="stylesheet" href="/path/to/jquery-ui.css" />
<!-- required CSS basics -->
<link rel="stylesheet" href="/path/to/jWizard.base.css" />
<!-- duh -->
<script type="text/javascript" src="/path/to/jquery.js"></script>
<!-- at least the widget factory -->
<script type="text/javascript" src="/path/to/jquery-ui.js"></script>
<!-- and the plugin itself -->
<script type="text/javascript" src="/path/to/jWizard.min.js"></script>
1.2 然後就開始寫 HTML代碼了,也很簡單。
HTML Code
代碼如下:
<form id="wizard-form" class="jWizard">
<fieldset>
<legend>Beginning</legend>
<p>Are you sure you want to begin? Press "Next" to proceed?</p>
</fieldset>
<fieldset>
<legend>Middle</legend>
<p>Are you sure you want to?</p>
<p>You can still go back. Or press "Next" again to confirm.</p>
</fieldset>
<fieldset>
<legend>End</legend>
<p>Done, click "Finish" to end</p>
</fieldset>
</form>
<!-- Can also just be divs with title attributes -->
<div id="wizard-div" class="jWizard">
<div title="Beginning">
<p>Are you sure you want to begin? Press "Next" to proceed?</p>
</div>
<div title="Middle">
<p>Are you sure you want to?</p>
<p>You can still go back. Or press "Next" again to confirm.</p>
</div>
<div title="End">
<p>Done, click "Finish" to end</p>
</div>
</div>
你可以在上面的HTML代碼了 進行添加相關的div,不過 可別忘記了給最外面的賦上title值哦。
1.3 js開始調用。
JS Call
代碼如下:
$(".jWizard").jWizard({
menuEnable: true,
counter: {
enable: true,
progressbar: true
},
effects: { enable: true }
});
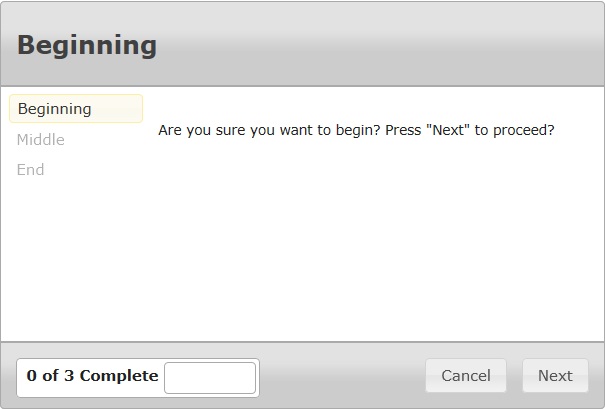
OK, 到此為止,上面的基本步驟就實現了,效果如下:
示例 2:給next添加事件
在我現在做的第一個版本裡,剛開始比如有上傳文件,驗證文件等等操作,很二的直接在頁面放了一個button,然後觸發它的javascript代碼。這樣做可以滿足基本功能的需求,可是也非常嚴重的損害了用戶的體驗。因為,現在的用戶非常的懶,能少做一點事情,它是絕對不會多做的。所以,如果你放一個button,用戶不想去點擊,然後就點擊next了,那麼就得不到需要的用戶,就會報錯。
因此,我們可以把一些操作都集成到Next中去,那這樣子就灰常灰常的方便了,而且頁面也變的灰常灰常的整潔大方。
其余代碼可以基本不變,現在我主要講一下js裡面的事件機制,代碼如下:
代碼如下:
var $w = $("#events-test");
$w.validate({ errorClass: "ui-state-error-text" });
$w
.jWizard({
buttons: {
cancelType: "reset", // 點擊”Cancel“按鈕的時候 觸發的動作,比如我在項目中,是跳到第一頁 重新開始。
finishType: "submit" // 在最後一步點擊”finish“的時候,出發的動作,也就是提交。
},
// 點擊”Cancel“按鈕的時候 觸發的動作,比如我在項目中,是跳到第一頁 重新開始。
cancel: function(event, ui) {
$w.jWizard("firstStep");
}, // 點擊previous的時候觸發的動作。比如在我項目中,因為當把所有的郵件都發送完畢的時候,就不能讓用戶上一頁了,所以我要把上一頁的功能給進禁止掉。很簡單,如下;
previous: function(event, ui) {
// if(ui.currentStepIndex==7){return false;} 就可以了。7 指的是你的div的順序數字,從0開始,哈這個會數吧。
},
next: function(event, ui) {
// 這裡同理哦,就是控制下一頁的情況,也是上面一樣。比如,在我項目中,有一個上傳數據的,要是沒有就不能讓它上傳。這種情況 你可以先設定一個bool值,然後,
if(fileUploadComplete){ $.get("@Url.Action("VerificationSchema", "Home")", // 這裡學習MVC的童鞋們應該很熟悉 其實也就是在action home 下面的方法 VerificationSchema function (data) { // 獲取成功後返回的數據 var newData = eval(data); // 因為用的json 所以用eval 進行轉換 schemaVerification=newData.HasErrors; if(newData.HasErrors) { var listing1 = document.getElementById("listing1"); listing1.innerHTML = "<font color='red' size='20px'>Congruations.Please go on.</font>"; } else { document.getElementById("ErrorNotification").innerHTML="Sorry.Your Schema wrong,please check it."; var listing1 = document.getElementById("listing1"); listing1.innerHTML = newData.Result; } },"json");} else { //這裡主要是當沒有選擇數據的時候 進行提示 alert("Please firstly Upload the Excel File you need"); return false; } break; },
finish: function(event, ui) {
alert("Thank you!");
}
})
/** The bindings below are event handlers, they will all be executed before proceeding to the callback */
/** ui = {
type: "previous|next|first|last|manual",
currentStepIndex: [int],
nextStepIndex: [int]
}; */
// This event handler is specifically used for form validation
.bind("jwizardchangestep", function (event, ui) {
// "manual" is always triggered by the user, never jWizard itself
if (ui.type !== "manual") {
var $currentStep = $w.find(".jw-step:eq(" + ui.currentStepIndex + ")"),
$inputs = $currentStep.find("input:text");
/** I am assuming you have `jquery.validate.js` running in this callback */
if ($inputs.length > 0 && !$inputs.valid()) {
$currentStep.find("label.error").effect("highlight");
return false;
}
}
})
// This event handler is for handling custom navigation through the wizard
.bind("jwizardchangestep", function (event, ui) {
// "manual" is always triggered by the user, never jWizard itself
if (ui.type !== "manual") {
// 這裡其實是比較重要的,因為這裡就是選擇對應div的實現方式的,你只需要把相應模塊的javascript代碼集成到這裡就可以了。
switch (ui.currentStepIndex) {
// on the first step, the user must agree to the terms and conditions
case 0:
if ($("#agree").is(":not(:checked)")) {
// use this effect to give the user feedback
$("#agree").parent().effect("pulsate");
return false;
}
break;
// on the 3rd step, (zero-index) the username being filled means we are skipping the openid step
case 2:
if ($("#username").val() != "") {
// by setting this value on the event object, I am telling jWizard to override the nextStepIndex
event.nextStepIndex = 4;
// you must at least call event.preventDefault(); in order for this to work
return false;
}
break;
}
}
// by using nextStepIndex, we can intercept the user when they are *about to start* on a particular step
switch (ui.nextStepIndex) {
// in this case, I am displaying a summary on the last step of the wizard
case 4:
var oFormValues = {
name: $("#name").val(),
email: $("#email").val(),
username: $("#username").val(),
openid: undefined
};
$("#summary-name").children("td").text(oFormValues.name);
$("#summary-email").children("td").text(oFormValues.email);
if (oFormValues.username != "") {
$("#summary-username").show().children("td").text(oFormValues.username);
$("#summary-openid").hide().children("td").text("");
} else {
var $openid = $w.find("input:radio:checked[name=openid]");
oFormValues.openid = ($openid.length === 1) ? $openid.val() : $("#openid-other").val();
$("#summary-username").hide().children("td").text("");
$("#summary-openid").show().children("td").text(oFormValues.openid);
}
break;
}
});
// if the user clicks the openid link on step 3, (zero-index) cause the wizard to jump to the openid step
$("#openid").click(function () {
$w.jWizard("changeStep", 3);
return false;
});
// if an openid radio button is checked, blank out the `other` textbox
$w.find("input:radio[name=openid]").change(function (event) {
$("#openid-other").val("");
});
// if the `other` openid textbox is used, blank out the radio buttons
$("#openid-other").change(function (event) {
if (this.value != "") {
$w.find("input:radio[name=openid]").removeAttr("checked");
}
});
sum,我的搜狗怎麼突然就沒有用了。
算了 以上就是我的一點點經驗,就不說了,吃飯時間到了,如果有需要的童鞋在做開發的時候,如果遇到問題,可以進行共同討論,呵呵 共同進步嘛。
具體效果在這裡 。
相關文章
- css width height同時設置
- css width百分比 css寬度百分比設置
- css padding與寬度width關系
- 封裝的dialog插件 基於bootstrap模態對話框的簡單擴展
- jQuery插件FusionWidgets實現的Cylinder圖效果示例【附demo源碼】
- jQuery插件FusionWidgets實現的Bulb圖效果示例【附demo源碼下載】
- jQuery插件FusionWidgets實現的AngularGauge圖效果示例【附demo源碼】
- js showModalDialog 彈出對話框的簡單實例(子窗體)
- js showModalDialog彈出窗口實例詳解
- js showModalDialog參數的使用詳解