源碼下載:http://xiazai.jb51.net/201509/yuanma/drag_sort1(jb51.net).rar
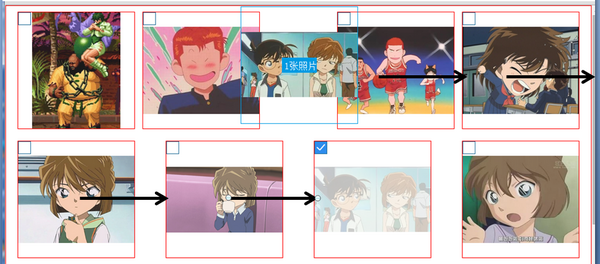
效果展示如下:
google plus
拖動+響應式效果:
要求
1. 兩邊對齊布局,即圖片間間距一致,但左右兩邊的圖片與邊界的間距不一定等於圖片間間距,兼容ie7,8,firefox,chrome.
2. 浏覽器尺寸變化,在大於一定尺寸時,每行自動增加或減少圖片,自動調整圖片間間距,以滿足兩邊對齊布局,這時每張圖片尺寸固定(這裡是200*200px);而小於一定尺寸時,每行圖片數量固定(這裡最小列數是3),這時圖片總是等比例拉伸或縮放。
3. 浏覽器不同尺寸下,仍然可以拖動排序。
4. 圖片,拖動代理裡的圖片始終保持等比例且水平垂直居中。
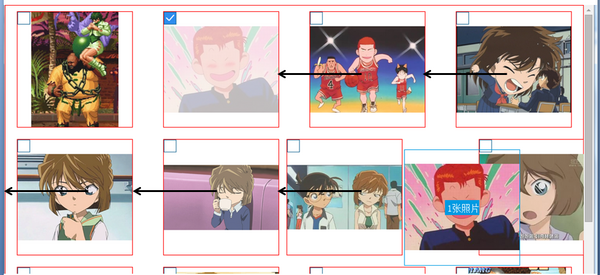
5. 拖動到相應位置時,位置左右的圖片發生一定偏移。如果在最左邊或最右邊,則只是該行的第一張圖片或最後一張圖片發生偏移。
6. 支持多張圖片拖動排序。
實現
布局及css
 <div id='wrap'>
  <ul class='justify'>
   <li>
    <a href="javascript:;" class="no_selected"></a>
    <div class='photo_mask'></div>
    <div>
     <div class="dummy"></div>
     <p><img><i></i></p>
    </div>
   </li>
   <li class='justify_fix'></li>
  </ul>
 </div>
inline-block+flex-box+text-align:justify
這裡要兼容低版本浏覽器,所以列表li布局用的是inline-block.而兩邊對齊布局
-低版本:inline-block+`text-align:justify`
-現代:inline-block+`flex-box`
具體參見本屌的模擬flexbox justify-content的space-between
這裡沒有用flex-box的`align-content:space-around`是因為無法通過`text-align:justify`兼容低版本浏覽器。
`text-align:justify`無法讓最左邊,最右邊文字自動調整與box邊的間距。即使在外面box添加padidng,比如:
li{
 margin:0 1%;
 ...
}
#wrap{
 padding:0 1%;
}
看起來好像是最左邊,最右邊與box邊界的間距和li之間的間距一樣,都是2%了。實際上,外面box設置的padding是永遠不會變的,而li之間的margin是它們之間間距的最小值。如果所有li之間的間距都是1%,這時,一行上仍然有多余的空白,這些li會把空白均分了,這時它們之間的間距會大於1%.
具體的實現
li{
 list-style-type: none;
 display:inline-block;
 *display: inline;
 zoom:1;
 max-width: 200px;
 max-height: 200px;
 width: 28%;
 border:1px solid red;
 position: relative;
 overflow: hidden;
 margin:10px 2%;
}
li[class='justify_fix']{
 border:none;
}
.justify {
 display: flex;
 align-items: flex-start;
 flex-flow: row wrap;
 justify-content: space-between;
 text-align: justify;
 text-justify: inter-ideograph;
 *zoom: 1;
 -moz-text-align-last: justify;
 -webkit-text-align-last: justify;
 text-align-last: justify;
}
@media (-webkit-min-device-pixel-ratio:0) {
 .justify:after {
  content: "";
  display: inline-block;
  width: 100%;
 }
}
這裡要加上`max-width`,`max-height`.後面可以看到單元格裡面都是百分比,需要在外面限定最大尺寸。
圖片響應式+水平垂直居中
具體參見本屌的css圖片響應式+垂直水平居中
選中圖片
google plus是按住ctrl,點擊圖片,完成多選,這裡是點擊"方框"(這裡的`<a class='no_selected'></a>`)。
點擊後,把當前圖片的index傳給保存選中圖片index的數組(這裡的selected_index)。如果該index不存在,則添加;已存在,則刪除。而"方框"此時根據數組中是否存在該index調整樣式。
<div id='wrap' ms-controller='photo_sort'>
  <ul class='justify'>
   <li ms-repeat='photo_list'>
    <a href="javascript:;" class="no_selected" ms-class-selected_icon='selected_index.indexOf($index)>-1' ms-click='select($index)'></a>
    ...
   </li>
   <li class='justify_fix'></li>
  </ul>
 </div>

var photo_sort=avalon.define({
 selected_index:[],//選中圖片的index列表,
 ...
 select:function(i){
  var selected_index=photo_sort.selected_index;
  if(selected_index.indexOf(i)==-1)//選中圖片的index列表不存在,添加
   photo_sort.selected_index.ensure(i);
  else
   photo_sort.selected_index.remove(i);
 }
});
mousedown
這裡用了遮罩層,並在上面綁定mousedown事件。
<a href="javascript:;" class="no_selected" ms-class-selected_icon='selected_index.indexOf($index)>-1' ms-click='select($index)'></a>
<div class='photo_mask' ms-mousedown='start_drag($event,$index)'></div>
  var photo_sort=avalon.define({
   $id:'photo_sort',
   photo_list:[],//圖片列表
   selected_index:[],//選中圖片的index列表
   drag_flag:false,
   sort_array:[],//范圍列表,
   cell_size:0,//每個單元格尺寸,這裡寬高比為1
   target_index:-1,//最終目標位置的index
   col_num:0,//列數
   x_index:-1,//當前拖動位置的x方向index
   ...
  });
start_drag:function(e,index){
 if(photo_sort.selected_index.size()){//有選中的圖片
  photo_sort.target_index=index;//避免用戶沒有拖動圖片,但點擊了圖片,設置默認目標即當前點擊圖片
  photo_sort.cell_size=this.clientWidth;
  var xx=e.clientX-photo_sort.cell_size/2,yy=e.clientY-photo_sort.cell_size/2;//點下圖片,設置代理位置以點擊點為中心
  $('drag_proxy').style.top=yy+avalon(window).scrollTop()+'px';
  $('drag_proxy').style.left=xx+'px';
  $('drag_proxy').style.width=photo_sort.cell_size+'px';
  $('drag_proxy').style.height=photo_sort.cell_size+'px';
  drag_proxy.select_num=photo_sort.selected_index.length;//設置代理中選擇圖片的數量
  if(drag_proxy.select_num>0){
   var drag_img=photo_sort.photo_list[photo_sort.selected_index[drag_proxy.select_num-1]];
   drag_proxy.src=drag_img.src;//將選中的圖片中最後一張作為代理對象的"封面"
   photo_sort.drag_flag=true;
   $('drag_proxy').style.display='block';
  }
  //cell_gap:圖片間間距,first_gap:第一張圖片和外部div間間距
  var wrap_width=avalon($('wrap')).width(),wrap_offset=$('wrap').offsetLeft,first_left=$('wrap_photo0').offsetLeft,
  second_left=$('wrap_photo1').offsetLeft,first_gap=first_left-wrap_offset,cell_gap=second_left-first_left;
  photo_sort.col_num=Math.round((wrap_width-2*first_gap+(cell_gap-photo_sort.cell_size))/cell_gap);
  for(var i=0;i<photo_sort.col_num;i++)//把一行圖片裡的每張圖片中心坐標x方向的值作為分割點,添加到范圍列表
   photo_sort.sort_array.push(first_gap+cell_gap*i+photo_sort.cell_size/2);
  var target=this.parentNode;
  avalon.bind(document,'mouseup',function(e){
   onMouseUp(target);
  });
  if(isIE)
   target.setCapture();//讓ie下拖動順滑
  e.stopPropagation();
  e.preventDefault();
 }
}
鼠標點下,選中的圖片的遮罩出現,這裡是對其添加`.photo_maskon`
<div class='photo_mask' ms-class-photo_maskon='drag_flag&&selected_index.indexOf($index)>-1'
ms-mousedown='start_drag($event,$index)'></div>
mousemove
drag_move:function(e){
 if(photo_sort.drag_flag){
  var xx=e.clientX,yy=e.clientY,offset=avalon($('wrap')).offset();
  var offsetX=xx-offset.left,offsetY=yy-offset.top;
  photo_sort.sort_array.push(offsetX);//把當前鼠標位置添加的范圍列表
  photo_sort.sort_array.sort(function(a,b){//對范圍列表排序
   return parseInt(a)-parseInt(b);//轉為數值類型,否則會出現'1234'<'333'
  });
  //從已排序的范圍列表中找出當前鼠標位置的index,即目標位置水平方向的index
  var x_index=photo_sort.sort_array.indexOf(offsetX),y_index=Math.floor(offsetY/(photo_sort.cell_size+20)),
  size=photo_sort.photo_list.size();
  photo_sort.x_index=x_index;
  photo_sort.target_index=photo_sort.col_num*y_index+x_index;//目標在所有圖片中的index
  if(photo_sort.target_index>size)//目標位置越界
   photo_sort.target_index=size;
  photo_sort.sort_array.remove(offsetX);//移除當前位置
  $('drag_proxy').style.top=avalon(window).scrollTop()+yy-photo_sort.cell_size/2+'px';
  $('drag_proxy').style.left=xx-photo_sort.cell_size/2+'px';
 }
 e.stopPropagation();
}
幾點說明
- 關於當前拖動到的位置判定
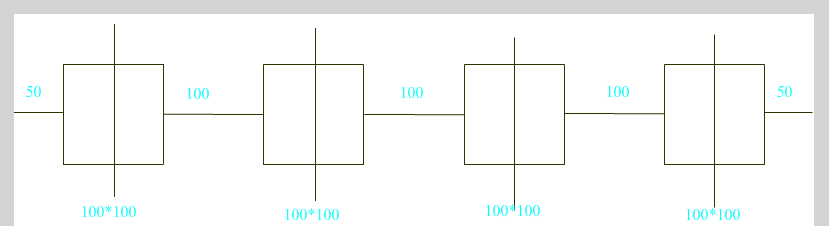
圖中每個單元格的豎線,在水平方向把單元格分為兩邊。每個豎線把一行分為5部分,判斷的時候,看鼠標當前的`e.clientX`在5個部分裡的哪一部分。
- 這裡在判斷的時候用了排序。具體的,把每個豎線的x坐標和當前鼠標位置的x坐標保存到數組(這裡的`sort_array`),排好序,然後`indexOf`看當前鼠標位置的x坐標在數組中的位置,即可得到當前拖動的目標位置。
如果不用排序的話,代碼會像這樣
var target;
if(x>50+50){
 if(x>3*100+3*100+50+50){//最後一部分
  target=4;
 }else{
  target=(x-50-50)/(50+100+50);
 }
}else
 target=0;
- 後面刪除當前鼠標位置的x坐標,空出位置,留給下一次mousemove事件的x坐標。
- 關於當前拖動的目標位置左右的圖片發生一定偏移,無非就是對目標位置左右的圖片加上相應的class.
.prev{
 right: 40px;
}
.next{
 left: 40px;
}
 <div id='wrap' ms-controller='photo_sort'>
  <ul class='justify' ms-mousemove='drag_move($event)'>
   <li ms-repeat='photo_list' ms-attr-id='wrap_photo{{$index}}' ms-class-prev='$index==target_index-1'
   ms-class-next='$index==target_index'>
   ...
   </li>
   <li class='justify_fix'></li>
  </ul>
 </div>
這裡需要注意,當代理拖動到最左邊或最右邊時,由於布局是`inline-block`,此時目標位置所在行的上一行(如果有)的最後一個單元格或下一行(如果有)的第一個單元格也會發生偏移。
解決方法是設置變量`x_index`,表示單元格在x方向的index.在添加偏移class的時候,增加判定條件
<li ms-repeat='photo_list' ms-attr-id='wrap_photo{{$index}}' ms-class-prev='$index==target_index-1&&x_index>0'
ms-class-next='$index==target_index&&x_index<col_num'>
...
</li>
mouseup
function onMouseUp(target){
   if(photo_sort.drag_flag){
    for(var i=0,len=photo_sort.selected_index.size();i<len;i++){//遍歷選中圖片
     var item_index=photo_sort.selected_index[i],data=photo_sort.photo_list,
     target_index=photo_sort.target_index,temp;
     if(item_index<target_index){//目標位置在選中圖片之後
      temp=data[item_index].src;
      for(var j=item_index;j<target_index;j++)
       data[j].src=data[j+1].src;
      data[target_index-1].src=temp;
     }else{//目標位置在選中圖片之前
      temp=data[item_index].src;
      for(var j=item_index;j>target_index;j--)
       data[j].src=data[j-1].src;
      data[target_index].src=temp;
     }
    }
    photo_sort.target_index=-1;//各種重置,初始化
    photo_sort.sort_array=[];
    photo_sort.col_num=0;
    photo_sort.x_index=-1;
    photo_sort.selected_index=[];
    $('drag_proxy').style.display='none';
    photo_sort.drag_flag=false;
    avalon.unbind(document,'mouseup');
    if(isIE)
     target.releaseCapture();
   }
  }
這裡主要就是對圖片列表的重排。
- 目標位置在選中圖片之前
先把原始圖片保存在`temp`,然後把從目標位置圖片到原始圖片前一位置的圖片,依次後移一個位置,最後把`temp`放到目標位置。
- 目標位置在選中圖片之後
和上面差不多,只不過這裡是把從目標位置圖片到原始圖片後一位置的圖片,依次前移一個位置。
注意
不能像`data[j]=data[j+1]`這樣賦值,因為avalon不支持單個轉換,如果想更新,需要將整個子VM重新賦以一個新的對象。也就是定義一個arr,然後從頭開始向裡面添加model,最後`photo_sort.photo_list.clear()`刪除所有圖片,`photo_sort.photo_list=arr`重新賦值,更新視圖。
後記
事實上,google plus在細節上還做了
- 框選圖片
- 如果有滾動條,且拖動位置快要超出當前界面,滾動條會自動上移或下移。
這兩個本屌就不做了,原理也是很簡單的。