本文總結它的使用方法和一些使用心得,內容不算很高深,純粹是入門內容,看看即可。不過要是你還沒有用過此類的javascript引擎庫,那麼本文還是值得你一讀的,相信在你了解完它強大的功能和簡單用法之後,一定會迫不及待地將之用於你的工作當中。
1. 從一個簡單真實的需求講起
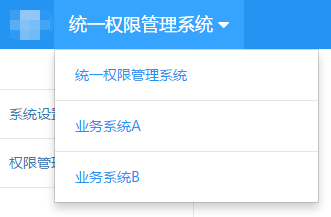
目前公司做了一個統一的開發平台,後台封裝了MVC的接口和數據增刪改查的接口,前端我自己用bootstrap+手寫各類組件的方式弄了一套開發框架;集成了CAS,在CAS的基礎上,首先做了一套統一權限管理系統,這個系統是我們開發平台的第一個子系統,用來管理配置所有子系統的菜單和授權以及管理整個公司的組織結構和用戶,後來我們又陸陸續續地開發了業務系統A和業務系統B。由於這三個子系統對應的是三個java工程,最終部署的時候,在tomcat裡部署了三個應用,現在有一個需求是:
- 1)在每個系統裡登錄之後,點擊系統名稱,可以展開一個下拉菜單,顯示所有有權限的子系統;
- 2)然後用戶點擊其它子系統,就可以切換到所選中的系統去,到了其它系統之後,由於都做了這個下拉菜單,所以也可以再從該系統切換回來;
- 3)如果用戶只有一個系統的權限,則不顯示下拉菜單。
需求其實挺簡單,原型大概是這個樣子:
功能實現方法是,在每個子系統登錄完成之後,調用獲取系統列表的接口,用js渲染一個下拉菜單出來,該接口返回的格式為:
data: [
 {
  "sortOrder": 1,
  "isCurrent": true,
"systemHttpUrl": "http://xxxx:8080/permission",
  "systemName": "統一權限管理系統"
 },
 {
  "sortOrder": 2,
  "isCurrent": false,
  "systemHttpUrl": "http://xxxx:8080/systemA",
  "systemName": "業務系統A"
 },
 {
  "sortOrder": 3,
  "isCurrent": false,
  "systemHttpUrl": "http://xxxx:8080/systemB",
  "systemName": "業務系統B"
 }
]
如果我們不采用模板引擎,那麼傳統的方式去解析這個數據並把它轉變成html串的方法通常是:
function data2Html(data) {
 data = data || [];
 var html = ['<ul class="nav navbar-nav navbar-left nav-system">',
   '  <li class="dropdown">',
   '  <a href="javascript:;" class="dropdown-toggle" data-toggle="dropdown" title="切換系統">'],
  l = data.length;

 if(l < 2) {
  l == 1 && html.push(data[0].systemName || '');
  html.push('</a></li></ul>');
  return html.join('');
 }

 var curSysAry = data.filter(function(s){ return s.isCurrent; });
 html.push(curSysAry[0].systemName + ' <i class="fa fa-caret-down"></i></a><ul class="dropdown-menu">');
 data.sort(function(a, b){ return a.sortOrder - b.sortOrder;});
 for(var i = 0; i < l; i++) {
  i && html.push('<li role="separator" class="divider"></li>');
  html.push('<li><a href="' + data[i].systemHttpUrl + '" target="_self">' +
   data[i].systemName + '</a></li>');
 }
 html.push('</ul></li></ul>');
 return html.join('');
}
這種拼接字符串的方式有諸多弊端:
- 1)麻煩,尤其是拼接邏輯復雜,拼接的串很長時;
- 2)不易維護,稍有不慎就會弄錯標簽的對應關系;
- 3)結構不清晰。
能夠簡化這個場景的工具就是模板引擎,模板引擎的技術後台最先有,如果你用過jsp,就一定知道jsp也就是一個模板,用來解析呈現數據用的,其它後台模板引擎還有velocity和freemarker等等。前端的模板引擎也有很多,mustache.js算是比較流行的一個,git上有8000多個贊,如果這個問題我們用mustache.js來做,就可以變成這樣:
//通過一些根據屬性名稱對應的標記定義模板
var _template = [
  '<ul class="nav navbar-nav navbar-left nav-system">',
  ' <li class="dropdown">',
  ' <a href="javascript:;" class="dropdown-toggle" data-toggle="dropdown" title="切換系統">',
  '  {{curSystemName}} {{#multiple}}<i class="fa fa-caret-down"></i>{{/multiple}}',
  ' </a>',
  ' {{#multiple}}<ul class="dropdown-menu">',
  '  {{#systems}}',
  '   {{^first}}<li role="separator" class="divider"></li>{{/first}}',
  '   <li>',
  '    <a href="{{{systemHttpUrl}}}" target="_self">{{systemName}}</a>',
  '   </li>',
  '  {{/systems}}',
  ' </ul>{{/multiple}}',
  ' </li>',
  '</ul>'
 ].join('');

//初始化這個模板
Mustache.parse(_template);
function data2Html(data) {
 data = data || [];
 var curSysAry = data.filter(function(s){ return s.isCurrent; });
 data.sort(function(a, b){ return a.sortOrder - b.sortOrder;});
 data = data.map(function(s, i){s.first = i == 0; return s});

 //模板渲染成字符串
 return Mustache.render(_template, {
  curSystemName: curSysAry.length ? curSysAry[0].systemName : '',
  multiple: !!data.length,
  systems: data
 });
}
對比兩個代碼,會發現後面的代碼,相對於前面的有以下這些優點:
- 1)結構清晰,所有待渲染的html都定義在一個位置,而且沒有任何拼接的現象;
- 2)邏輯清晰,那些在模板裡的標記,實際上與模板渲染時傳進去的對象的屬性名稱都是對應的;
- 3)易維護,要增刪標簽都只用調整模板對應的數組就行了。
通過這個例子,應該能對模板引擎有了一個大概的認識,這類工具在前端開發中越來越普遍,尤其是前後端分離的應用中用的更多,已經是這類應用的基礎架構的內容了。mustache.js是一個非常簡單易用的引擎實現,接下來的內容將會對這個工具常用的模板配置一一介紹並配合實用的例子說明,希望能讓你更喜歡這個工具:)
2. mustache的用法
mustache的使用非常簡單,先通過script標簽引入它的js文件,然後按下面的步驟操作:
1)定義模板字符串
定義模板有2種方式,方式一就是在前面部分中看到的,直接用[...].join('')的方式在js代碼中定義,方式二直接把模板內容用script定義在html中:
<script id="tpl" type="text/html">
 Hello {{name}}!
</script>
然後在編譯模板之前,通過獲取tpl的innerHTML定義原始模板串:
var tpl = document.getElementById('tpl').innerHTML.trim();
具體要用哪種方式來定義模板,可以參考下面的建議:
如果這個模板要用於多個頁面,推薦把模板定義在js代碼中;如果這個模板只用於當前頁面,推薦直接定義到script標簽中,管理更方便。
2)預編譯模板
假設原始模板串已經定義好,並用tpl變量來引用,就可以通過下面的代碼來預編譯模板:
Mustache.parse(tpl);
要注意的是,經過預編譯之後的tpl已經不再是原來的模板串了,連數據類型都變成數組類型了,這都是預編譯的結果。
3)渲染模板
渲染方式很簡單:
var htmlAfterRendered = Mustache.render(tpl1, obj);
obj引用的是一個數據源對象,mustache會把模板中那些屬性標簽,根據約定的規則,替換成對象的內容。htmlAfterRendered就是替換之後的字符串,你可以用它完成你需要的DOM操作。
3. mustache的思想
mustache的核心是標簽和logic-less。從前面的代碼中可以看到定義模板時,使用了{{name}}這樣的標記,還有{{#systems}}{{/systems}},這就是mustache的標簽,只不過它用{{}}替代了<>,以免跟html標簽的<>混淆。logic-less,可以翻譯為輕邏輯,因為在定義模板的時候不會用到if-else,不會有循環式的編碼,一切都用標簽來解決,它的標簽非常簡單,但是能應付所有場景,閱讀完本文之後,你會驚訝地發現,只要用以下幾個標簽幾乎就能解決所有的問題:
{{prop}}
{{{prop}}}
{{#prop}}{{/prop}}
{{^prop}}{{/prop}}
4. {{prop}}標簽
這個標簽是mustache模板裡用的最多的,可以將數據源對象上prop屬性對應的值,轉換成字符串進行輸出,以下是同一個屬性,對應不同類型的值,在經過mustache渲染之後輸出結果的測試(前後那根短橫線的作用是為了讓這個標簽的渲染結果看起來更清楚):
<script id="tpl1" type="text/html">
 -{{prop}}-
</script>
<script>
 var tpl1 = document.getElementById('tpl1').innerHTML.trim();
 Mustache.parse(tpl1);
 //測試falsy值
 console.log(Mustache.render(tpl1, {prop: ''}));//--
 console.log(Mustache.render(tpl1, {prop: 0}));//-0-
 console.log(Mustache.render(tpl1, {prop: null}));//--
 console.log(Mustache.render(tpl1, {prop: undefined}));//--
 console.log(Mustache.render(tpl1, {prop: false}));//-false-
 console.log(Mustache.render(tpl1, {prop: NaN}));//-NaN-

 //測試簡單對象
 console.log(Mustache.render(tpl1, {prop: {name: 'jason'}}));//-[object Object]-
 //測試數組
 console.log(Mustache.render(tpl1, {prop: [{name: 'jason'}, {name: 'frank'}]}));//-[object Object],[object Object]-
 //測試日期對象
 console.log(Mustache.render(tpl1, {prop: new Date()}));//-Mon Jan 18 2016 15:38:46 GMT+0800 (中國標准時間)-
 //測試自定義toString的簡單對象
 var obj1 = {name: 'jason'};
 obj1.toString = function () {
  return this.name;
 };
 console.log(Mustache.render(tpl1, {prop: obj1}));//-jason-

 //測試boolean number string
 console.log(Mustache.render(tpl1, {prop: true}));//-true-
 console.log(Mustache.render(tpl1, {prop: 1.2}));//-1.2-
 console.log(Mustache.render(tpl1, {prop: 'yes'}));//-yes-

 //測試function
 console.log(Mustache.render(tpl1, {
  prop: function () {
  }
 }));//--
 console.log(Mustache.render(tpl1, {
  prop: function () {
   return 'it\'s a fun'
  }
 }));//-it's a fun-
 console.log(Mustache.render(tpl1, {
  prop: function () {
   return false;
  }
 }));//-false-
 console.log(Mustache.render(tpl1, {
  prop: function(){
   return function (text, render) {
    return "<b>" + render(text) + "</b>"
   };
  }
 }));
 //-function (text, render) {
 // return "<b>" + render(text) + "</b>"
 //}-

</script>
mustache渲染{{prop}}標簽的邏輯是:
- 1)如果prop引用的值是null或undefined,則渲染成空串;
- 2)如果prop引用的是一個函數,則在渲染時自動執行這個函數,並把這個函數的返回值作為渲染結果,假如這個返回值為null或者undefined,那麼渲染結果仍然為空串,否則把返回值轉成字符串作為渲染結果(注意最後一個用例,直接把函數代碼渲染出來了);
- 3)其它場景,直接把prop引用的值轉成字符串作為渲染結果。
由於默認情況下,mustache在渲染prop時,都是對prop的原始值進行url編碼或者html編碼之後再輸出的,所以有一個用例的渲染結果,把英文的單引號,轉成了html實體符:
console.log(Mustache.render(tpl1, {
  prop: function () {
   return 'it\'s a fun'
  }
}));//-it's a fun-
如果要阻止這種編碼行為,只要把標簽形式改成{{{prop}}}就可以了:
<script id="tpl1" type="text/html">
 -{{{prop}}}-
</script>
console.log(Mustache.render(tpl1, {
 prop: function () {
  return 'it\'s a fun'
 }
}));//-it's a fun-
5. {{#prop}}{{/prop}}標簽
這對標簽的作用非常強大,可以同時完成if-else和for-each以及動態渲染的模板功能。在這對標簽之間,可以定義其它模板內容,嵌套所有標簽。接下來看看mustache如何利用這個對標簽完成這三個模板功能。
1) if-else渲染
只有prop屬性在數據源對象上存在,並且不為falsy值(javascript 6個falsy值:null,undefined,NaN,0,false,空字符串),並且不為空數組的情況下,標簽之間的內容才會被渲染,否則都不會被渲染:
<script id="tpl2" type="text/html">
 -{{#prop}}content{{/prop}}-
</script>
<script>
 var tpl2 = document.getElementById('tpl2').innerHTML.trim();
 Mustache.parse(tpl2);
 //測試falsy值
 console.log(Mustache.render(tpl2, {prop: ''}));//--
 console.log(Mustache.render(tpl2, {prop: 0}));//--
 console.log(Mustache.render(tpl2, {prop: null}));//--
 console.log(Mustache.render(tpl2, {prop: undefined}));//--
 console.log(Mustache.render(tpl2, {prop: false}));//--
 console.log(Mustache.render(tpl2, {prop: NaN}));//--
 //測試空數組
 console.log(Mustache.render(tpl2, {prop: []}));//--
 //測試不存在的屬性
 console.log(Mustache.render(tpl2, {prop2:
true
}));//--
 //測試function
 console.log(Mustache.render(tpl2, {
  prop: function () {
  }
 }));//--
 console.log(Mustache.render(tpl2, {
  prop: function () {
   return false;
  }
 }));//--
 console.log(Mustache.render(tpl2, {
  prop: function() {
   return [];
  }
 }));//--

 //測試簡單對象
 console.log(Mustache.render(tpl2, {prop: {name: 'jason'}}));//-content-
 //測試日期對象
 console.log(Mustache.render(tpl2, {prop: new Date()}));//-content-
 //測試boolean number string
 console.log(Mustache.render(tpl2, {prop: true}));//-content-
 console.log(Mustache.render(tpl2, {prop: 1.2}));//-content-
 console.log(Mustache.render(tpl2, {prop: 'yes'}));//-content-
 //測試返回非falsy,非空數組的function
 console.log(Mustache.render(tpl2, {
  prop: function () {
   return 'it\'s a fun'
  }
 }));//-content-
</script>
以上用例中特殊點的就是prop屬性引用的是一個函數的時候,{{#prop}}會自動調用這個函數,並把函數的返回值作為if-else渲染邏輯的判斷依據,也就是說如果這個函數返回的是falsy值或者是空數組的時候,那麼這對標簽之間的內容還是不會顯示。
2)for-each渲染
當prop屬性所引用的是一個非空數組時,這對標簽之間的內容將會根據數組大小進行迭代,並且當數組元素為對象時,還會把該對象作為每一次迭代的上下文,以便迭代時的標簽可以直接引用數組元素上的屬性:
<script id="tpl2" type="text/html">
 -{{#prop}}{{name}},{{/prop}}-
</script>
<script>
  var tpl2 = document.getElementById('tpl2').innerHTML.trim();
  Mustache.parse(tpl2);
  console.log(Mustache.render(tpl2, {prop: [{name: 'jason'}, {name: 'frank'}]}));//-jason,frank,-
</script>
從這個測試結果中可以看到,{{#prop}}{{/prop}}之間的模板內容根據prop所引用的數組迭代了兩次,並且在這對標簽內部直接通過{{name}}標簽,輸出了數組元素對象上的name屬性對應的值。
如果prop屬性所引用的是一個函數,但是這個函數返回值是一個數組類型,那麼仍然會進行for-each渲染:
<script id="tpl2" type="text/html">
 -{{#prop}}{{name}},{{/prop}}-
</script>
<script>
  var tpl2 = document.getElementById('tpl2').innerHTML.trim();
  Mustache.parse(tpl2);
  console.log(Mustache.render(tpl2, {
   prop: function(){
    return [{name: 'jason'}, {name: 'frank'}];
   }
  }));//-jason,frank,-
</script>
3) 動態渲染
當prop屬性所引用的是一個函數,並且這個函數的返回值還是一個函數的話,mustache會再次調用這個返回的函數,並給它傳遞2個參數:text表示原來的模板內容,render表示mustache內部的執行渲染的對象,以便在這個函數內部可以通過這render對象,結合原來的模板內容,自定義渲染的邏輯,並把函數的返回值作為渲染結果(這個返回值渲染的邏輯跟{{prop}}標簽完全一樣):
<script id="tpl2" type="text/html">
 -{{#prop}}content{{/prop}}-
</script>
<script>
  var tpl2 = document.getElementById('tpl2').innerHTML.trim();
  Mustache.parse(tpl2);
  console.log(Mustache.render(tpl2, {
  prop: function(){
   return function (text, render) {
    return "<b>" + render(text) + "</b>"
   };
  }
 }));//-<b>content</b>-
</script>
6. {{^prop}}{{/prop}}標簽
這對標簽,與{{#prop}}{{/prop}}的if-else渲染執行相反邏輯,即只有在prop屬性不存在,或者引用的是一個falsy值,或者是一個空數組的時候才會顯示標簽之間的內容,否則不會顯示:
<script id="tpl2" type="text/html">
 -{{^prop}}content{{/prop}}-
</script>
<script>
 var tpl2 = document.getElementById('tpl2').innerHTML.trim();
 Mustache.parse(tpl2);
 //測試falsy值
 console.log(Mustache.render(tpl2, {prop: ''}));//-content-
 console.log(Mustache.render(tpl2, {prop: 0}));//-content-
 console.log(Mustache.render(tpl2, {prop: null}));//-content-
 console.log(Mustache.render(tpl2, {prop: undefined}));//-content-
 console.log(Mustache.render(tpl2, {prop: false}));//-content-
 console.log(Mustache.render(tpl2, {prop: NaN}));//-content-
 // 測試空數組
 console.log(Mustache.render(tpl2, {prop: []}));//-content-
 // 測試不存在的屬性
 console.log(Mustache.render(tpl2, {prop2: true}));//-content-
 //測試function
 console.log(Mustache.render(tpl2, {
  prop: function () {
  }
 }));//-content-
 console.log(Mustache.render(tpl2, {
  prop: function () {
   return false;
  }
 }));//-content-
 console.log(Mustache.render(tpl2, {
  prop: function () {
   return [];
  }
 }));//-content-


 //測試簡單對象
 console.log(Mustache.render(tpl2, {prop: {name: 'jason'}}));//--
 //測試日期對象
 console.log(Mustache.render(tpl2, {prop: new Date()}));//--
 // 測試非空數組
 console.log(Mustache.render(tpl2, {prop: [{name: 'jason'},{name: 'tom'}]}));//--

 //測試boolean number string
 console.log(Mustache.render(tpl2, {prop: true}));//--
 console.log(Mustache.render(tpl2, {prop: 1.2}));//--
 console.log(Mustache.render(tpl2, {prop: 'yes'}));//--

 //測試返回非falsy,非空數組的function
 console.log(Mustache.render(tpl2, {
  prop: function () {
   return 'it\'s a fun'
  }
 }));//--

 //測試返回function的function
 console.log(Mustache.render(tpl2, {
  prop: function () {
   return function(text,render){
    return '<b>' + render(text) +'</b>'
   }
  }
 }));//--
</script>
7. 渲染上下文
mustache有一個渲染上下文棧的概念,在模板渲染的開始的時候,把數據源對象作為當前的渲染上下文 ,並壓入上下文棧。在遇到{{#prop}}標簽的時候,如果prop引用的是一個對象或者是一個非空的對象數組,或者prop引用的是一個函數,並且這個函數返回的是一個對象或者是一個非空的對象數組,就會把這個對象或者數組的元素作為當前渲染上下文,並壓入上下文棧,當這個標簽渲染完畢的時候,才會把該上下文彈出,恢復上一層標簽所使用的上下文。由於{{#prop}}標簽可以多層嵌套,所以在有的模板渲染的時候,會有多層上下文存在。mustache在解析標簽時,根據標簽名稱查找當前上下文對象是否存在該屬性,如果不存在就會到上層上下文對象中查找,只要在某一層找到,就會用該層上下文對象的值來渲染。
<script id="tpl2" type="text/html">
 -{{#person}}{{#student}}{{#address}}address: {{home}},age: {{age}}{{/address}}{{/student}}{{/person}}-
</script>
<script>
 var tpl2 = document.getElementById('tpl2').innerHTML.trim();
 var obj2 = {
  age: 20,
  person: {
   student: {
    address: {
     home: 'xxxxx'
    }
   }
  }
 };
 console.log(Mustache.render(tpl2, obj2));//-address: xxxxx,age: 20-
</script>
上面這個例子中,在渲染{{#address}}{{/address}}時,上下文對象已經變成了obj2.person.student.address所引用的對象,所以{{home}}渲染時用到的就是obj2.person.student.address.home屬性,而{{age}}渲染時,由於obj2.person.student.address不存在age屬性,所以就會到上層上下文中查找,一直到obj2對象才找到,於是就把obj2.age當成了渲染結果。
還有一種方法,不用通過{{#prop}}創建新的上下文,也可以做到遞歸渲染屬性的屬性:
<script id="tpl2" type="text/html">
 -address: {{person.student.address.home}},age: {{age}}-
</script>
<script>
 var tpl2 = document.getElementById('tpl2').innerHTML.trim();
 var obj2 = {
  age: 20,
  person: {
   student: {
    address: {
     home: 'xxxxx'
    }
   }
  }
 };
 console.log(Mustache.render(tpl2, obj2));//-address: xxxxx,age: 20-
</script>
這種方法其實很好理解,只要知道當前的上下文對象,再根據屬性操作串person.student.address.home,當然就能找到需要的值了。
本文介紹了一個非常好用的前端模板引擎,涵蓋的內容包含了在日常工作肯定會用到的知識點,希望大家喜歡。