什麼是組件:組件是Vue.js最強大的功能之一。組件可以擴展HTML元素,封裝可重用的代碼。在較高層面上,組件是自定義的元素,Vue.js的編譯器為它添加特殊功能。在有些情況下,組件也可以是原生HTML元素的形式,以is特性擴展。
如何注冊組件?
需要使用Vue.extend方法創建一個組件,然後使用Vue.component方法注冊組件。Vue.extend方法格式如下:
var MyComponent = Vue.extend({
 // 選項...後面再介紹
})
如果想要其他地方使用這個創建的組件,還得個組件命個名:
Vue.component('my-component', MyComponent)
命名之後即可在HTML標簽中使用這個組件名稱,像使用DOM元素一樣。下面來看看一個完整的組件注冊和使用例子。
html代碼:
<div id="example">
 <my-component></my-component>
</div>
js代碼:
// 定義
var MyComponent = Vue.extend({
 template: '<div>A custom component!</div>'
})

// 注冊
Vue.component('my-component', MyComponent)

// 創建根實例
new Vue({
 el: '#example'
})
輸出結果:
 <div id="example">
 <div>A custom component!</div>
</div
嵌套組件
組件本身也可以包含組件,下面的parent組件就包含了一個命名為child-component組件,但這個組件只能被parent組件使用:
var child = Vue.extend({
 template: '<div>A custom component!</div>'
});
var parent = Vue.extend({

 template: '<div>Parent Component: <child-component></child-component></div>',
 components: {
  'child-component': child
 }
});
Vue.component("parent-component", parent);
上面的定義過程比較繁瑣,也可以不用每次都調用Vue.component和Vue.extend方法:
// 在一個步驟中擴展與注冊
Vue.component('my-component', {
template: '<div>A custom component!</div>'
})

// 局部注冊也可以這麼做
var Parent = Vue.extend({
 components: {
  'my-component': {
   template: '<div>A custom component!</div>'
  }
 }
})
動態組件
多個組件可以使用同一個掛載點,然後動態的在他們之間切換。使用保留的<component>元素,動態地綁定到它的is特性。下面的列子在同一個vue實例下掛了home、posts、archive三個組件,通過特性currentView動態切換組件顯示。
html代碼:
<div id="dynamic">
 <button id="home">Home</button>
 <button id="posts">Posts</button>
 <button id="archive">Archive</button>
 <br>
 <component :is="currentView"></component>
</div>
js代碼:
var vue = new Vue({
 el:"#dynamic",
 data: {
  currentView: "home"
 },
 components: {
  home:{
   template: "Home"
  },
  posts: {
   template: "Posts"
  },
  archive: {
   template: "Archive"
  }
 }
});
document.getElementById("home").onclick = function(){
vue.currentView = "home";
};
document.getElementById("posts").onclick = function(){
vue.currentView = "posts";
};
document.getElementById("archive").onclick = function(){
vue.currentView = "archive";
};
組件和v-for
<my-component v-for="item in items"></my-component>
不能傳遞數據給組件,因為組件的作用域是獨立的。為了傳遞數據給組件,應當使用props:
<my-component
v-for="item in items"
:item="item"
:index="$index">
</my-component>
不自動把 item 注入組件的原因是這會導致組件跟當前 v-for 緊密耦合。顯式聲明數據來自哪裡可以讓組件復用在其它地方。
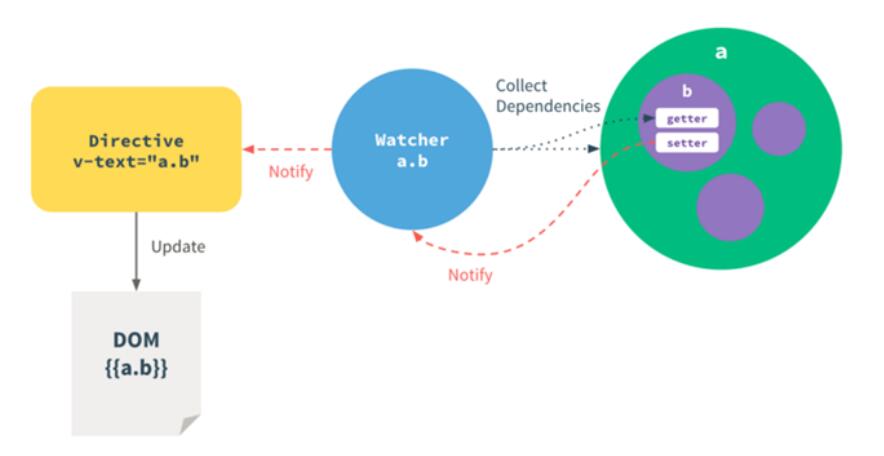
深入響應式原理
在組件綁定數據時,如何綁定才能夠有效,並且可動態修改、添加屬性?看看下面的原理介紹。
如何追蹤變化:把一個不同對象傳給vue實例作為data的選項,vue.js將遍歷它的屬性,用Object.defineProperty將它轉換為getter/setter。這是ES5特性,所有vue.js不支持IE8或更低版本。
模板中每個指令/數據綁定都有一個對應的watcher對象,在計算過程中它把屬性記錄為依賴。之後當依賴的setter被調用時 ,會觸發watcher重新計算。流程如下所示:
變化檢測問題:vue.js不能檢測到對象屬性的添加或刪除,屬性必須在data上才能讓vue.js轉換它為getter/setter模式,才能有響應。例如:
var data = { a: 1 };
var vm = new Vue({
data: data
});
// `vm.a` 和 `data.a` 現在是響應的
vm.b = 2
// `vm.b` 不是響應的
data.b = 2
// `data.b` 不是響應的
不過,也有辦法在實例創建後添加屬性並且讓它是相應的。可以使用set(key,value)實例方法:
vm. set('b', 2)
// `vm.b` 和 `data.b` 現在是響應的
對於普通對象可以使用全局方法:Vue.set(object, key, value):
Vue.set(data, 'c', 3)
// `vm.c` 和 `data.c` 現在是響應的
初始化數據:盡管Vue.js提供動態的添加相應屬性,還是推薦在data對象上聲明所有的相應屬性。
不這麼做:
var vm = new Vue({
 template: '<div>{{msg}}</div>'
})
// 然後添加 `msg`
vm.$set('msg', 'Hello!')
應該這麼做:
var vm = new Vue({
 data: {
  // 以一個空值聲明 `msg`
  msg: ''
 },
 template: '<div>{{msg}}</div>'
})
// 然後設置 `msg`
vm.msg = 'Hello!'
組件完整案例
下面介紹的例子實現了模態窗口功能,代碼也比較簡單。
html代碼:
<!-- 實現script定義一個模板 -->
<script type="x/template" id="modal-template">
 <!--模板是否顯示通過v-show="show"來設置, transition設置動畫效果-->
 <div class="modal-mask" v-show="show" transition="modal">
  <div class="modal-wrapper">
   <div class="modal-container">
    <div class="modal-header">
     <!--slot 相當於header占位符-->
     <slot name="header">
      default header
     </slot>
    </div>
    <div class="modal-body">
     <!--slot 相當於body占位符-->
     <slot name="body">
      default body
     </slot>
    </div>
    <div class="modal-footer">
     <!--slot 相當於footer占位符-->
     <slot name="footer">
      default footer
     </slot>
     <button class="modal-default-button" @click="show = false">OK</button>
    </div>
   </div>
  </div>
 </div>
</script>
<div id="app">
 <!--點擊按鈕時設置vue實例特性showModal的值為true-->
 <button id="show-modal" @click="showModal = true">show modal</button>
 <!--modal是自定義的一個插件,插件的特性show綁定vue實例的showModal特性-->
 <modal :show.sync="showModal">
  <!--替換modal插件中slot那麼為header的內容-->
  <h3 slot="header">Custom Header</h3>
 </modal>
</div>
js代碼:
//定義一個插件,名稱為modal
Vue.component("modal", {
 //插件的模板綁定id為modal-template的DOM元素內容
 template: "#modal-template",
 props: {
  //特性,類型為布爾
  show:{
   type: Boolean,
   required: true,
   twoWay: true
  }
 }
});
//實例化vue,作用域在id為app元素下,
new Vue({
 el: "#app",
 data: {
  //特性,默認值為false
  showModal: false
 }
});
css代碼:
.modal-mask {
 position: fixed;
 z-index: 9998;
 top: 0;
 left: 0;
 width: 100%;
 height: 100%;
 background-color: rgba(0, 0, 0, .5);
 display: table;
 transition: opacity .3s ease;
}

.modal-wrapper {
 display: table-cell;
 vertical-align: middle;
}

.modal-container {
 width: 300px;
 margin: 0px auto;
 padding: 20px 30px;
 background-color: #fff;
 border-radius: 2px;
 box-shadow: 0 2px 8px rgba(0, 0, 0, .33);
 transition: all .3s ease;
 font-family: Helvetica, Arial, sans-serif;
}

.modal-header h3 {
 margin-top: 0;
 color: #42b983;
}

.modal-body {
 margin: 20px 0;
}

.modal-default-button {
 float: right;
}

/*
* the following styles are auto-applied to elements with
* v-transition="modal" when their visiblity is toggled
* by Vue.js.
*
* You can easily play with the modal transition by editing
* these styles.
*/

.modal-enter, .modal-leave {
 opacity: 0;
}

.modal-enter .modal-container,
.modal-leave .modal-container {
 -webkit-transform: scale(1.1);
 transform: scale(1.1);
}
本文已被整理到了《Vue.js前端組件學習教程》,歡迎大家學習閱讀。
由於自己在項目中還沒怎麼深入使用組件的功能,所以自己對組件的理解也不深入,介紹的比較膚淺,謝謝大家的閱讀。
- 上一頁:前端框架Vue.js構建大型應用淺析
- 下一頁:超詳細的JS彈出窗口代碼大全