HTML5 Canvas陰影使用方法實例演示
編輯:HTML5詳解
context.shadowColor = “red” 表示設置陰影顏色為紅色
context.shadowOffsetX = 0表示陰影相對TEXT的水平距離,0表示兩者水平位置重合
context.shadowOffsetY = 0表示陰影相對TEXT的垂直距離,0表示兩者垂直位置重合
context.shadowBlur = 10 陰影模糊效果,值越大模糊越厲害。
一個最簡單的帶有陰影的矩形代碼如下:
context.shadowColor = "RGBA(127,127,127,1)";
context.shadowOffsetX = 3;
context.shadowOffsetY = 3;
context.shadowBlur = 0;
context.fillStyle = "RGBA(0, 0, 0, 0.8)";
context.fillRect(10, hh+10, 200,canvas.height/4-20);
效果如下:
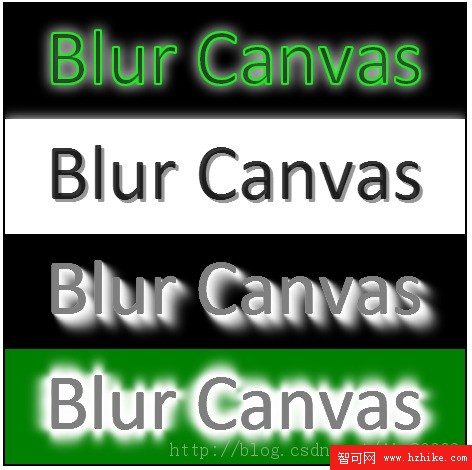
陰影文字:
只要設置shadowOffsetX與shadowOffsetY的值,當值都正數時,陰影相對文字的右下
方偏移。當值都為負數時,陰影相對文字的左上方偏移。
3D拉影效果:
在同一位置不斷的重復繪制文字同時改變shadowOffsetX、shadowOffsetY、shadowBlur
的值,從小到大不斷偏移不斷增加,透明度也不斷增加。就得到了拉影效果文字。
邊緣模糊效果文字:
在3D拉影效果的基礎上在四個方向重復,就得到了邊緣羽化的文字效果。
運行效果:
序代碼:
復制代碼代碼如下:
<!DOCTYPE Html>
<Html>
<head>
<meta http-equiv="X-UA-Compatible" content="Chrome=IE8">
<meta http-equiv="Content-type" content="text/Html;charset=UTF-8">
<title>Canvas Clip Demo</title>
<link href="default.CSS" rel="stylesheet" />
<script>
var ctx = null; // global variable 2d context
var imageTexture = null;
window.onload = function() {
var canvas = document.getElementById("text_canvas");
console.log(canvas.parentNode.clIEntWidth);
canvas.width = canvas.parentNode.clIEntWidth;
canvas.height = canvas.parentNode.clIEntHeight;
if (!canvas.getContext) {
console.log("Canvas not supported. Please install a Html5 compatible browser.");
return;
}
var context = canvas.getContext('2d');
// section one - shadow and blur
context.fillStyle="black";
context.fillRect(0, 0, canvas.width, canvas.height/4);
context.font = '60pt Calibri';
context.shadowColor = "white";
context.shadowOffsetX = 0;
context.shadowOffsetY = 0;
context.shadowBlur = 20;
context.fillText("Blur Canvas", 40, 80);
context.strokeStyle = "RGBA(0, 255, 0, 1)";
context.lineWidth = 2;
context.strokeText("Blur Canvas", 40, 80);
// section two - shadow font
var hh = canvas.height/4;
context.fillStyle="white";
context.fillRect(0, hh, canvas.width, canvas.height/4);
context.font = '60pt Calibri';
context.shadowColor = "RGBA(127,127,127,1)";
context.shadowOffsetX = 3;
context.shadowOffsetY = 3;
context.shadowBlur = 0;
context.fillStyle = "RGBA(0, 0, 0, 0.8)";
context.fillText("Blur Canvas", 40, 80+hh);
// section three - down shadow effect
var hh = canvas.height/4 + hh;
context.fillStyle="black";
context.fillRect(0, hh, canvas.width, canvas.height/4);
for(var i = 0; i < 10; i++)
{
context.shadowColor = "RGBA(255, 255, 255," + ((10-i)/10) + ")";
context.shadowOffsetX = i*2;
context.shadowOffsetY = i*2;
context.shadowBlur = i*2;
context.fillStyle = "RGBA(127, 127, 127, 1)";
context.fillText("Blur Canvas", 40, 80+hh);
}
// section four - fade effect
var hh = canvas.height/4 + hh;
context.fillStyle="green";
context.fillRect(0, hh, canvas.width, canvas.height/4);
for(var i = 0; i < 10; i++)
{
context.shadowColor = "RGBA(255, 255, 255," + ((10-i)/10) + ")";
context.shadowOffsetX = 0;
context.shadowOffsetY = -i*2;
context.shadowBlur = i*2;
context.fillStyle = "RGBA(127, 127, 127, 1)";
context.fillText("Blur Canvas", 40, 80+hh);
}
for(var i = 0; i < 10; i++)
{
context.shadowColor = "RGBA(255, 255, 255," + ((10-i)/10) + ")";
context.shadowOffsetX = 0;
context.shadowOffsetY = i*2;
context.shadowBlur = i*2;
context.fillStyle = "RGBA(127, 127, 127, 1)";
context.fillText("Blur Canvas", 40, 80+hh);
}
for(var i = 0; i < 10; i++)
{
context.shadowColor = "RGBA(255, 255, 255," + ((10-i)/10) + ")";
context.shadowOffsetX = i*2;
context.shadowOffsetY = 0;
context.shadowBlur = i*2;
context.fillStyle = "RGBA(127, 127, 127, 1)";
context.fillText("Blur Canvas", 40, 80+hh);
}
for(var i = 0; i < 10; i++)
{
context.shadowColor = "RGBA(255, 255, 255," + ((10-i)/10) + ")";
context.shadowOffsetX = -i*2;
context.shadowOffsetY = 0;
context.shadowBlur = i*2;
context.fillStyle = "RGBA(127, 127, 127, 1)";
context.fillText("Blur Canvas", 40, 80+hh);
}
}
</script>
</head>
<body>
<h1>Html5 Canvas Clip Demo - By Gloomy Fish</h1>
<pre>Fill And Stroke Clip</pre>
<div id="my_painter">
<canvas id="text_canvas"></canvas>
</div>
</body>
</Html>
小編推薦
熱門推薦