對於H5來說,canvas可以說是它最有特色的一個地方了,有了它之後我們可以隨意的在網頁上畫各種各樣的圖形,做一些小游戲啊什麼的。canvas這個標簽的用法,在網上也有特別多的教程了,這裡就不作介紹了。今天我們就用canvas來做一個小小的時鐘。完整的代碼在這裡https://github.com/wwervin72/HTML5-Clock。
那麼首先在這個頁面裡面我使用了兩個canvas,一個用來繪制靜態的時鐘表盤和刻度,另一個用來繪制時鐘的三個指針,然後用定位讓他們重合到一起。然後這裡沒什麼好說的,下面附上代碼。
<canvas id="plate">
        畫表盤
</canvas>
<canvas id="needles">
        畫時針
</canvas>
var plate=document.getElementById('plate');
var needles=document.getElementById('needles');
needles.setAttribute('style','position:absolute;top:8px;left:8px;');  //這裡因為chrome裡面,body的magin值為8px,所以我這裡就沒設為0了。
var cntP=plate.getContext('2d');
var cntH=needles.getContext('2d');
plate.width=800;
plate.height=500;
needles.width=800;
needles.height=500;
到了這裡准備工作就做完了,下面就准備繪制時鐘了。我先定義了一個繪制時鐘表盤的構造函數。
        function drawclock(cnt,radius,platelen,linewidth,numLen,NUMLEN){
            this.cnt=cnt;
            this.radius=radius;
            this.platelen=platelen;
            this.linewidth=linewidth;
            this.numLen=numLen;
            this.NUMLEN=NUMLEN;
            this.getCalibCoor=function(i){
                //獲得表盤刻度兩端的坐標
                var X=200+this.radius*Math.sin(6*i*Math.PI/180);
                var Y=200-this.radius*Math.cos(6*i*Math.PI/180);
                var x=200+(this.radius-this.platelen)*Math.sin(6*i*Math.PI/180);
                var y=200-(this.radius-this.platelen)*Math.cos(6*i*Math.PI/180);

                // 獲得分鐘數字的坐標
                var numx=200+(this.radius-this.platelen-this.numLen)*Math.sin(6*i*Math.PI/180);
                var numy=200-(this.radius-this.platelen-this.numLen)*Math.cos(6*i*Math.PI/180);
                //獲得小時數字的坐標
                var numX=200+(this.radius-this.platelen-this.NUMLEN)*Math.sin(6*i*Math.PI/180);
                var numY=200-(this.radius-this.platelen-this.NUMLEN)*Math.cos(6*i*Math.PI/180);
                return {X:X,Y:Y,x:x,y:y,numx:numx,numy:numy,numX:numX,numY:numY};
            };
            this.drawCalibration=function(){ //畫刻度
                for(var i=0,coorObj;i<60;i++){
                    coorObj=this.getCalibCoor(i);
                    this.cnt.beginPath();
                    this.cnt.moveTo(coorObj.X,coorObj.Y);
                    this.cnt.lineTo(coorObj.x,coorObj.y);
                    this.cnt.closePath();

                    this.cnt.lineWidth=this.linewidth;
                    this.cnt.strokeStyle='#ddd';
                    i%5==0&&(this.cnt.strokeStyle='#aaa')
                    &&(this.cnt.lineWidth=this.linewidth*2);
                    i%15==0&&(this.cnt.strokeStyle='#999')
                    &&(this.cnt.lineWidth=this.linewidth*3);
                    this.cnt.stroke();

                    this.cnt.font='10px Arial';
                    this.cnt.fillStyle='rgba(0,0,0,.2)';
                    this.cnt.fillText(i,coorObj.numx-7,coorObj.numy+3);
                    i%5==0&&(this.cnt.fillStyle='rgba(0,0,0,.5)')
                        &&(this.cnt.font='18px Arial')
                        &&(this.cnt.fillText(i/5,coorObj.numX-5,coorObj.numY+5));
                }
            };
        }
var clock=new drawclock(cntP,200,5,1,10,25); //實例化一個表盤對象
clock.drawCalibration();
這裡最重要的部分就應該是獲得刻度和數字繪制的坐標了。我把繪制刻度的起始點放在了表盤的邊緣上,然後從表盤的半徑上減去刻度的長度,就可以得到刻度終點的位置,然後利用角度和三角函數得到兩個點的坐標。最後就可以繪制出表盤的刻度了。下面繪制出表盤上的數字也是一樣的方法。我這裡吧表盤的中心放在了(200,200)這裡位置。到了這裡我們就已經繪制好了一個靜態的時鐘表盤。
下面我又定義了一個繪制時鐘指針的構造函數。
        function clockNeedle(cnt,R,lineWidth,strokeStyle,lineCap,obj){
            this.R=R;
            this.cnt=cnt;
            this.lineWidth=lineWidth;
            this.strokeStyle=strokeStyle;
            this.lineCap=lineCap;
            this.obj=obj;
            this.getNeedleCoor=function(i){
                var X=200+this.R*0.8*Math.sin(i); //起點的坐標
                var Y=200-this.R*0.8*Math.cos(i);

                var x=200-20*Math.sin(i); //終點的坐標
                var y=200+20*Math.cos(i);
                return {X:X,Y:Y,x:x,y:y};
            };
            this.drawNeedle=function(){
                var d=new Date().getTime();
                var angle;
                switch(this.obj){
                    case 0:
                    angle=(d/3600000%24+8)/12*360*Math.PI/180;
                    break;
                    case 1:
                    angle=d/60000%60/60*360*Math.PI/180;
                    break;
                    case 2:
                    angle=d/1000%60/60*360*Math.PI/180;
                    break;
                }
                var coorobj=this.getNeedleCoor(angle);
                this.cnt.beginPath();
                this.cnt.moveTo(coorobj.x,coorobj.y);
                this.cnt.lineTo(coorobj.X,coorobj.Y);
                // this.cnt.closePath();

                this.cnt.lineWidth=this.lineWidth;
                this.cnt.strokeStyle=this.strokeStyle;
                this.cnt.lineCap=this.lineCap;
                this.cnt.stroke();
            }
        }
這裡有兩個地方需要說一下:1、在我們獲得當前時間的的毫秒數,然後轉換為小時的時候,對24取模計算出當天的小時數的時候,這裡需要加上8。2、如果想要使用lineCap這個屬性嗎,那麼上面在設置路徑的時候,不要用closePath()。
到了這裡我們還需要一個來繪制指針的方法,並且讓指針看起來能夠轉動:
function draw(){
            cntH.clearRect(0,0,needles.width,needles.height);
            var mzneedle=new clockNeedle(cntH,200,1,'rgba(0,0,0,.5)','round',2);
            //最後一個參數0代表畫時針,1畫分針,2畫秒針
            var fzneedle=new clockNeedle(cntH,80,3,'rgba(0,0,0,.4)','round',0);
            var szneedle=new clockNeedle(cntH,140,2,'rgba(0,0,0,.3)','round',1);
            mzneedle.drawNeedle();
            fzneedle.drawNeedle();
            szneedle.drawNeedle();
            cntH.arc(200,200,5,0,2*Math.PI);
            cntH.fillStyle='rgba(0,0,0,.5)';
            cntH.fill();
 }
 setInterval(draw,1);
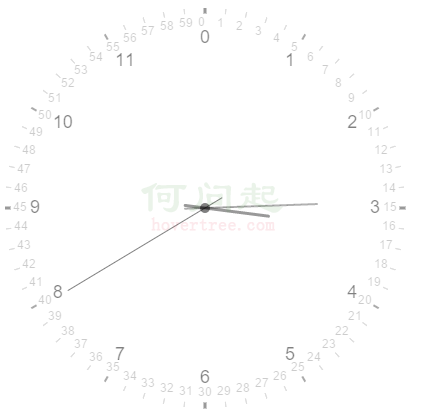
下面附上該時鐘的圖片: