DIV+CSS佈局教程網 >> 網頁腳本 >> JavaScript入門知識 >> jQuery入門知識 >> JQuery特效代碼 >> JQuery.uploadify 上傳文件插件的使用詳解 for ASP.NET
JQuery.uploadify 上傳文件插件的使用詳解 for ASP.NET
編輯:JQuery特效代碼
後來朋友推薦了一個這個叫uploadify的上傳插件,似乎挺好,就到官方下了個示例運行,感覺挺好,自己再稍加美化一下就OK 了..!
接下來就講講使用過程吧:
1. 下載
官方網站:http://www.uploadify.com/
直接下載:jquery.uploadify-v2.1.0.rar
下載解壓後:
說明:它裡面有demo 但是是PHP的,還有一個幫助文檔:uploadify v2.1.0 Manual.pdf.
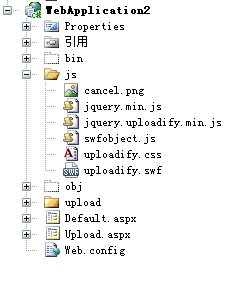
2.創建工程:
結構如圖>>
文件說明:
A.js文件夾下的所有文件:必需,從下載下來的包裡解壓復制過來,名字可以自己改改
B.Default.aspx:測試頁,後台沒有代碼
<%@ Page Language="C#" AutoEventWireup="true" Codebehind="Default.aspx.cs" Inherits="WebApplication2._Default" %>
<!DOCTYPE html PUBLIC "-//W3C//DTD XHTML 1.0 Transitional//EN" "http://www.w3.org/TR/xhtml1/DTD/xhtml1-transitional.dtd">
<html xmlns="http://www.w3.org/1999/xhtml">
<head runat="server">
<title>jquery.uploadify 上傳插件的使用</title>
<link rel="Stylesheet" href="js/uploadify.css" />
<script type="text/javascript" src="js/jquery.min.js"></script>
<script type="text/javascript" src="js/swfobject.js"></script>
<script type="text/javascript" src="js/jquery.uploadify.min.js"></script>
<script type="text/javascript">
$(document).ready(function() {
$("#uploadify").uploadify({
'uploader': 'js/uploadify.swf',
'script': 'Upload.aspx',
'cancelImg': 'js/cancel.png',
'folder': 'upload',
'queueID': 'fileQueue',
'auto': false,
'multi': true,
});
});
</script>
</head>
<body>
<form id="form1" runat="server">
<input type="file" name="uploadify" id="uploadify" />
<a href="javascript:$('#uploadify').uploadifyUpload()">上傳</a>| <a href="javascript:$('#uploadify').uploadifyClearQueue()"> 取消上傳</a>
<div id="fileQueue"></div>
</form>
</body>
</html>
C.Upload.aspx: 處理上傳文件
代碼如下:
<%@ Page Language="C#" AutoEventWireup="true" CodeBehind="Upload.aspx.cs" Inherits="WebApplication2.Upload" %>
代碼
代碼如下:
using System;
using System.Data;
using System.Configuration;
using System.Collections;
using System.Web;
using System.Web.Security;
using System.Web.UI;
using System.Web.UI.WebControls;
using System.Web.UI.WebControls.WebParts;
using System.Web.UI.HtmlControls;
using System.IO;
namespace WebApplication2
{
public partial class Upload : System.Web.UI.Page
{
protected void Page_Load(object sender, EventArgs e)
{
HttpPostedFile file = Request.Files["FileData"];
string uploadpath = Server.MapPath(Request["folder"] + "\\");
if (file != null)
{
if (!Directory.Exists(uploadpath))
{
Directory.CreateDirectory(uploadpath);
}
file.SaveAs(uploadpath + file.FileName);
Response.Write("1");
}
else
{
Response.Write("0");
}
}
}
}
D.upload這個文件加也是必需
3.運行結果:
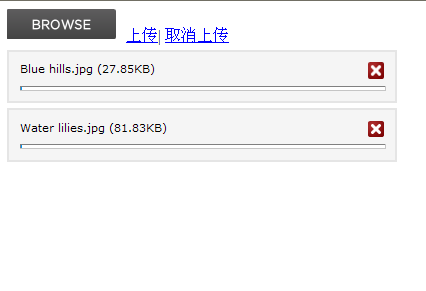
4.最後說說:這個只是一個簡單的入門例子,至於界面可以根據自己的需要去改
小編推薦
熱門推薦