昨晚看了用svg如何制作富有動態的tooltip,於是今天就心血來潮學著做一下,於是也成功做出來,也明白其中的原理,收獲頗多阿!接下來要多去學習svg,這是個好東西。
這其中也注意了一些平時糾結的細節應該怎麼去做,比如:
<article>
<section id="sound1">
</section>
<section id="sound2">
</section>
</article>
article標簽長度為600px,section 分別是300px,然後設置其為display:inline-block;然後是下面的效果:

本來按常理來說的話,應該是頭像水平排列,這是因為display:inline-block;會將article標簽和section標簽之間空白渲染成空格,空格展位,所以會導致圖片不在同一排,解決的辦法是給article標簽和section標簽添加如下的css代碼:
article{
width:600px;
margin:200px;
font-size:0;
}
article section{
display:inline-block;
width:300px;
font-size:14px;
position:relative;
}
於是空白去掉了!
另外對於svg的web圖像,我們可以對其進行修改,使其圖像的樣式可進行修改,它的格式大概如下(舉一例子):
<?xml version="1.0" encoding="utf-8"?>
<!-- Generator: Adobe Illustrator 17.0.0, SVG Export Plug-In . SVG Version: 6.00 Build 0) -->
<!DOCTYPE svg PUBLIC "-//W3C//DTD SVG 1.1//EN" "http://www.w3.org/Graphics/SVG/1.1/DTD/svg11.dtd">
<svg version="1.1" id="Layer_1" xmlns="http://www.w3.org/2000/svg" xmlns:xlink="http://www.w3.org/1999/xlink" x="0px" y="0px"
width="600px" height="300px" viewBox="0 0 600 300" enable-background="new 0 0 600 300" xml:space="preserve">
<polygon points="89.571,6.648 513.333,6.648 590.25,75.342 553.002,215.306 313.065,273.358 300,293.352 288.876,272.71
48.936,215.306 9.75,75.342 "/>
</svg>
於是我們不可能將其引入到html文件裡面,如果說有很多這種svg圖像,修改起來很麻煩!
於是使用的是ajax來加載這個圖片:
html的dom:<svg data-src="bubble1.svg" width="280" height="140"></svg>
// 問題二:對於svg圖像我們要如何引入,不可能將整個svg都引入吧,不便於修改編輯
// 技巧二:使用js進行加載
$('svg[data-src]').each(function(index, svg) {
var src = $(svg).data('src'); //data用於獲取data-*屬性的路徑
$.ajax({
url: src,
dataType: 'xml',
success: function(content) {
var doc = content.documentElement;
$(doc).attr({
width: $(svg).attr('width'),
height: $(svg).attr('height')
});
$(svg).after(doc).remove();
}
})
});
還有對於圖片的描邊動畫效果,這裡又怎麼個好的方法,只針對svg圖像:
使用stroke-dasharray(虛線描邊,可以不斷嘗試,使其調至適應大小,完成實現整個描邊的效果)stroke-dashoffset(虛線間隔,調至整個svg沒有描邊的效果),然後使用transition實現這個動畫
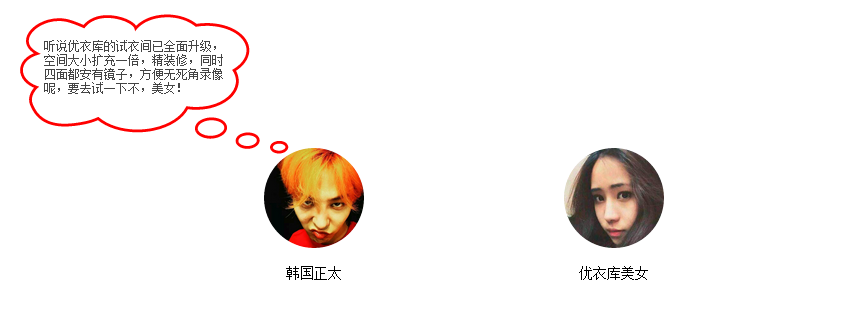
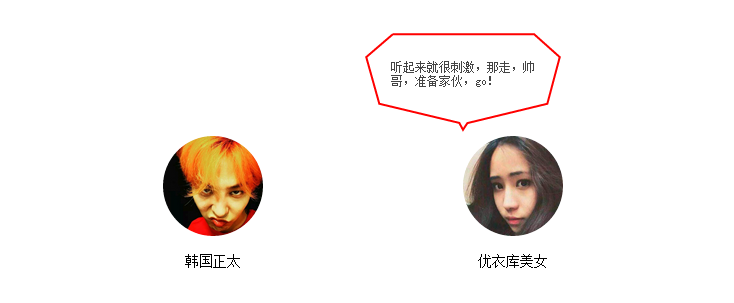
最終效果(如圖,沒有在線演示,動畫效果出不來,不過下面貼的代碼直接復制,再去下載兩個svg圖片和頭像就可以使用)
代碼如下:
<!DOCTYPE html>
<html lang="zh-cn">
<head>
<title>toolTip聊天對話框制作</title>
<meta charset="utf-8"/>
<meta name="keywords" content="" />
<meta name="description" content="" />
<script type="text/javascript" src="jquery.js"></script>
<style type="text/css">
h1{
color:red;
font-size:18px;
}
article{
width:600px;
margin:200px;
font-size:0;
}
article section{
/*問題一:對於display:inline-block;會出現兩個section無法並排排列,由於使用此屬性會將article與section之間的空白處渲染成空格,於是無法並排*/
/*技巧一: 父元素設置 font-size:0;清除空白*/
display:inline-block;
width:300px;
font-size:14px;
position:relative;
}
.text-center{
text-align:center;
}
#sound1,#sound2{
cursor:pointer;
}
#sound1 img,#sound2 img{
width:100px;
height:100px;
border-radius:100%;
}
.sound_1,.sound_2{
position:absolute;
top:-104px;
width:200px;
height:100px;
box-sizing: border-box;
opacity:1;
}
.sound_2{
padding:28px;
}
.sound_1{
padding: 25px 68px 25px 30px;
left: -150px;
top: -134px;
width: 280px;
height: 140px;
}
.sound_1 svg ,.sound_2 svg{
position:absolute;
top:0;
left:0;
}
.sound_1 p,.sound_2 p{
position:relative;
margin:0;
color:#444;
font-size:12px;
}
.sound_1 svg path, .sound_2 svg polygon{
fill:#fff;/*填充的顏色*/
stroke:red;/*描邊的顏色*/
stroke-width: 6px;/*邊的寬度*/
}
.sound_1 svg #path1 {
transform: scale(0, 0);
transform-origin: center;
opacity: 0;
transition-duration: .3s;
transition-delay: 0;
}
.sound_1 svg #path2 {
transform: scale(0, 0);
transform-origin: center;
opacity: 0;
transition-duration: .3s;
transition-delay: .1s;
}
.sound_1 svg #path3 {
transform: scale(0, 0);
transform-origin: center;
opacity: 0;
transition-duration: .3s;
transition-delay: .2s;
}
.sound_1 svg #path4 {
transform: scale(0, 0);
transform-origin: center;
opacity: 0;
transition-duration: .3s;
transition-delay: .25s;
}
.sound_1 p {
transition: .2s .35s;
opacity: 0;
transform: translate(0, -10px);
}
#sound1:hover .sound_1 svg #path1,#sound1:hover .sound_1 svg #path2,#sound1:hover .sound_1 svg #path3,#sound1:hover .sound_1 svg #path4{
transform: scale(1, 1);
opacity: 1;
transition-delay: 0;
}
#sound1:hover .sound_1 p{
opacity: 1;
transform: translate(0, 0);
}
/*問題三:對於圖片的描邊動畫效果,這裡又怎麼個好的方法,只針對svg圖像*/
/*技巧三:使用stroke-dasharray(虛線描邊,可以不斷嘗試,使其調至適應大小,實現描邊的效果)stroke-dashoffset(虛線間隔,調至整個svg沒有描邊的效果),然後使用transition實現這個動畫 */
.sound_2 svg polygon{
stroke-dasharray: 1500;
stroke-dashoffset: 1500;
fill-opacity: 0;
transition: .6s;
}
.sound_2 p {
transition: .4s;
transform: scale(-0.5);
opacity: 0;
transform: translate(0, -10px);
}
#sound2:hover .sound_2 svg polygon{
stroke-dashoffset: 0;
fill-opacity: 1;
}
#sound2:hover .sound_2 p {
transform: scale(0);
opacity: 1;
transform: translate(0, 0);
}
</style>
</head>
<body>

<h1>toolTip聊天對話框制作</h1>

<article>
<section id="sound1">
<div class="text-center"><img src="nan.jpg" /></div>
<p class="text-center">韓國正太</p>
<div class="sound_1">
<svg data-src="bubble1.svg" width="280" height="140"></svg>
<p>聽說優衣庫的試衣間已全面升級,空間大小擴充一倍,精裝修,同時四面都安有鏡子,方便無死角錄像呢,要去試一下不,美女!</p>
</div>
</section>
<section id="sound2">
<div class="text-center"><img src="nv.jpg" /> </div>
<p class="text-center">優衣庫美女</p>
<div class="sound_2">
<svg data-src="bubble2.svg" width="200" height="100"></svg>
<p>聽起來就很刺激,那走,帥哥,准備家伙,go!</p>
</div>
</section>
</article>
<script type="text/javascript">
$(document).ready(function() {
// 問題二:對於svg圖像我們要如何引入,不可能將整個svg都引入吧,不便於修改編輯
// 技巧二:使用js進行加載
$('svg[data-src]').each(function(index, svg) {
var src = $(svg).data('src'); //data用於獲取data-*屬性的路徑
$.ajax({
url: src,
dataType: 'xml',
success: function(content) {
var doc = content.documentElement;
$(doc).attr({
width: $(svg).attr('width'),
height: $(svg).attr('height')
});
$(svg).after(doc).remove();
}
})
});
})
</script>
</body>
</html>
以上所述就是本文的全部內容了,希望大家能夠喜歡。