Bootstrap 粘頁腳,說得具體一點就是“將固定高度的頁腳緊貼頁面底部”。由於項目的實際情況和模板有所區別,所以參照模板,小編不能確保快速的完成“粘頁腳”的效果,那麼還是要給大家分享本教程,寫的不好還請各位大俠海涵!
一、頁面效果
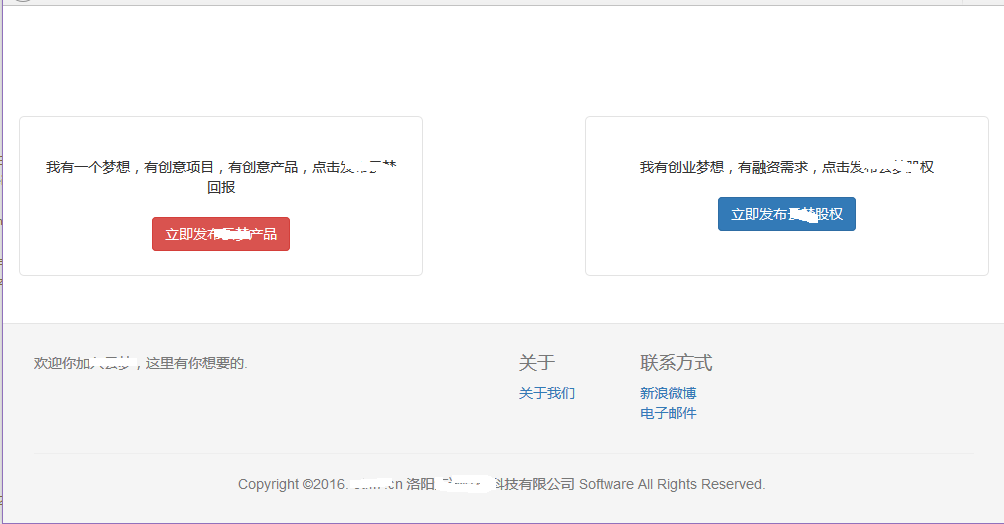
頁面非常簡單,注意亮線為火狐邊緣,可以很清楚的看到,頁腳灰色部分沉浸在頁面底部。
二、實例講解
①、代碼
<!DOCTYPE html PUBLIC "-//W3C//DTD XHTML 1.0 Transitional//EN" "http://www.w3.org/TR/xhtml1/DTD/xhtml1-transitional.dtd">
<html xmlns="http://www.w3.org/1999/xhtml">
<link type="text/css" rel="stylesheet" href="/ymeng/components/bootstrap/css/bootstrap.css" />
<style type="text/css">
html,body {
height: 100%;
}
#wrap {
min-height: 100%;
height: auto !important;
margin: 0 auto -200px;
}
#push
height: 200px;
}
.footer {
border-top: 1px solid #e5e5e5;
color: #777;
padding: 19px 0;
background-color: #f5f5f5;
}
</style>
<head>
<title>發布項目</title>
</head>
<body>
<div id="wrap">
<div class=" container project_choose">
<div class="row">
<div class="col-md-5 project_general">
<span class="f14">我有一個夢想,有創意項目,有創意產品,點擊發布回報</span>
<div class="blank20"></div>
<div>
<a type="button" class="btn btn-danger" href="/ymeng/deal/initDealCaluseConfirm">立即發布產品</a>
</div>
</div>
<div class="col-md-2"></div>
<div class="col-md-5 project_agency">
<span class="f14">我有創業夢想,有融資需求,點擊發布股權</span>
<div class="blank20"></div>
<div>
<button type="button" class="btn btn-primary">立即發股權</button>
</div>
</div>
</div>
</div>
<div id="push"></div>
</div>
<div class="footer ">
<div class="container">
<div class="row footer-top">
<div class="col-sm-6 col-lg-6">
<h4></h4>
<p>歡迎你加入,這裡有你想要的.</p>
</div>
<div class="col-sm-6 col-lg-5 col-lg-offset-1">
<div class="row about">
<div class="col-xs-3">
<h4>關於</h4>
<ul class="list-unstyled">
<li>
<a href="">關於我們</a>
</li>
</ul>
</div>
<div class="col-xs-3">
<h4>聯系方式</h4>
<ul class="list-unstyled">
<li>
<a target="_blank" title="雲夢網官方微博" href="">新浪微博</a>
</li>
<li>
<a href="">電子郵件</a>
</li>
</ul>
</div>
</div>
</div>
</div>
<hr>
<div class="row footer-bottom">
<ul class="list-inline text-center">
<li>Copyright ©2016. n 洛陽限公司 Software All Rights Reserved.</li>
</ul>
</div>
</div>
</div>
</body>
</html>
②、頁面body布局
<body>
<div id="wrap">
<div class=" container">
</div>
<div id="push"></div>
</div>
<div class="footer ">
</div>
</body>
body中第一級元素,兩個div,分別為wrap和footer
第二級元素中,兩個div,分別為container和push(如果你忘記了push這個div,ok,你的頁面在縮放時會錯亂的)
以上列出的元素自然粘頁腳必不可少的。
③、css分析
html,body {
height: 100%;
}
#wrap {
min-height: 100%;
height: auto !important;
margin: 0 auto -200px;
}
#push
height: 200px;
}
.footer {
border-top: 1px solid #e5e5e5;
color: #777;
padding: 19px 0;
background-color: #f5f5f5;
}
html,body的高度必須是100%,也就是充滿浏覽器窗口高度
#wrap div的min-height必須是100%,height呢,就自動適應。
關鍵點在於margin,top的外邊距為0,而bottom的外邊距則為-200px。
注意,就是-200px,理論上是footer高度(你可以通過firebug調試最佳高度)的負數,這一點也很關鍵!為什麼要為負數呢?因為warp的高度本來就是100%,為負數的話,就可以為footer留出顯示完整的高度,否則footer將出現在頁面滾動條下部。
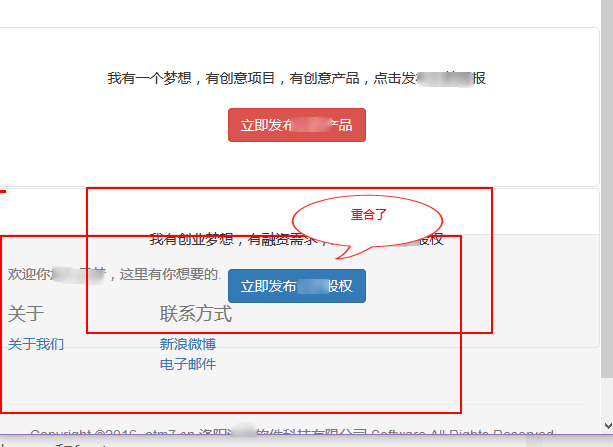
#push元素,頁面完整顯示的時候,似乎看不出來push元素的作用,但當你頁面縮放時,如果沒有push,footer元素就會和container中的元素重合,之前圖上也有說明,那麼其具體作用如何呢?

通過firebug我們選中push的div,可以看到其正好包含著footer元素內容,如此將會阻止footer和container元素重合。
如此,以上關鍵點就介紹完了,你只要注意以下元素的分布,就可以輕松搞定bootstrap的粘頁腳效果!
warp
push
有關本文給大家介紹的Bootstrap 粘頁腳效果小編就給大家介紹這麼多,希望對大家有所幫助!