PhotoSwipe.js官網:http://photoswipe.com/ ,在這個網站上可以下載到PhotoSwipe的文件以及相關的例子。
這個組件主要是用來展示圖片、相冊用的,還是很實用的。
一、使用這個組件需要引入兩個js文件
1 <script type="text/javascript" src="simple-inheritance.min.js">
2 <script type="text/javascript" src="code-photoswipe-1.0.11.min.js"> <!--當前最新版的應該是1.0.11 -->
二、然後頁面結構可以是這樣子的
<div id="Gallery">
  <div class="gallery-row">
    <div class="gallery-item"><a href="images/full/01.jpg"><img src="images/thumb/01.jpg" alt="Image 01" /></a></div>
    <div class="gallery-item"><a href="images/full/02.jpg"><img src="images/thumb/02.jpg" alt="Image 02" /></a></div>
    <div class="gallery-item"><a href="images/full/03.jpg"><img src="images/thumb/03.jpg" alt="Image 03" /></a></div>
  </div>
  <div class="gallery-row">
    <div class="gallery-item"><a href="images/full/04.jpg"><img src="images/thumb/04.jpg" alt="Image 04" /></a></div>
    <div class="gallery-item"><a href="images/full/05.jpg"><img src="images/thumb/05.jpg" alt="Image 05" /></a></div>
    <div class="gallery-item"><a href="images/full/06.jpg"><img src="images/thumb/06.jpg" alt="Image 06" /></a></div>
  </div>
</div>
其實在這段html代碼中除了頁面結構外,真正有用的只有 id="Gallery"和<a href="圖片路徑"></a>(在後面會有說明),其他的class神馬的只是起到美化最初的頁面結構的作用(和你真正想要的效果的頁面不同,也就是說,你只要按照上述頁面的結構進行排版,你想要的頁面效果是插件js自身完成的,是不需要你寫效果布局的)。
頁面需要的js和頁面結構都有了,下面就是使用插件了。
三、你可以采用兩種方式進行插件的聲明
1、是用浏覽器默認的方式addEventListener()的方式進行
document.addEventListener("DOMContentLoaded",function(){
  Code.photoSwipe('a','#Gallery');

//此處就涉及到上述頁面結構中的 id="Gallery"和<a href="..."></a>,其中id="Gallery"是容器

//<a href="圖片路徑"></a>,此處href中一定是當前所指向的圖片的路徑
},false);
2、使用Jquery的方式:
$(document).ready(function(){
  $("#Gallery a").photoSwipe();
});
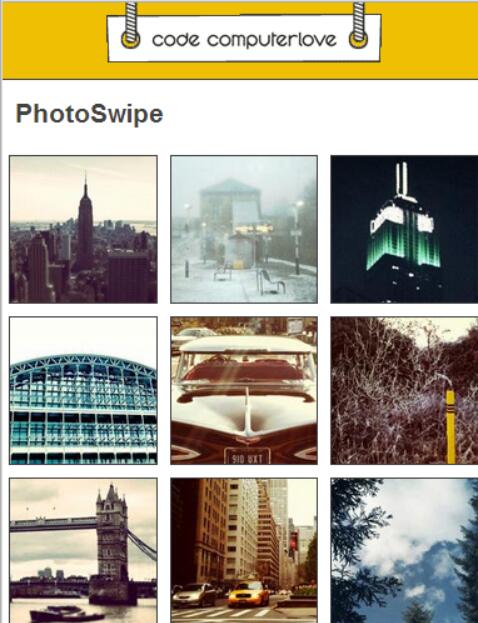
四、通過這樣的設置你的頁面大概會是這樣的
一開始的頁面效果:
點擊任意一張圖片後頁面的形式變成如下(這個頁面其實才是我真正想要的頁面):
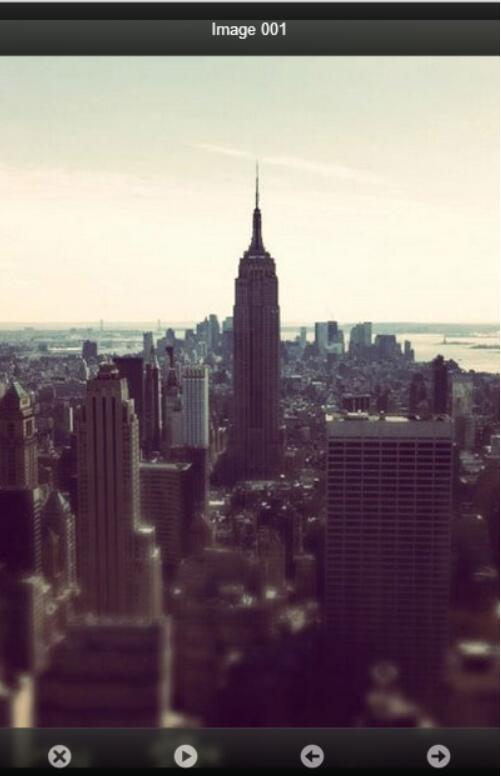
可以明顯的看到頁面上方<img />中的alt中的內容,下方會有四個按鈕,依次代表:關閉頁面回到最初顯示的樣子(就是上上圖)、自動播放、上一頁圖片、下一頁圖片。
這樣一個相冊的效果就出現了。當然在這個頁面可以使用鼠標左右滑動進行切換,如果在手持設備上還可以通過手指的左右滑動進行。
這個插件還有很多自己的屬性:
allowUserZoom: 允許用戶雙擊放大/移動方式查看圖片. 默認值 = true
autoStartSlideshow: 當PhotoSwipe激活後,自動播放幻燈片. 默認值 = false
allowRotationOnUserZoom: 只有 iOS 支持 - 允許用戶在縮放/平移模式下 用手勢旋轉圖像. 默認值 = false
backButtonHideEnabled: 按返回鍵隱藏相冊幻燈片. 主要是 Android 和 Blackberry使用. 支持 BB6, Android v2.1, iOS 4 以及更新版本. 默認值 = true
captionAndToolbarAutoHideDelay: 標題欄和工具欄自動隱藏的延遲時間. 默認值為 = 5000(毫秒). 如果設為 0 則不會自動隱藏(tap/單擊切換顯隱)
captionAndToolbarFlipPosition: 標題欄和工具欄切換位置(讓 caption顯示在底部而 toolbar顯示在頂部). 默認值 = false
captionAndToolbarHide: 隱藏 標題欄和工具欄. 默認值 = false
captionAndToolbarOpacity: 標題欄和工具欄 的透明度(0-1). 默認值 = 0.8
captionAndToolbarShowEmptyCaptions: 即使當前圖片的標題是空,也顯示標題欄. 默認值 = true
cacheMode: 緩存模式,Code.PhotoSwipe.Cache.Mode.normal (默認,正常) 或者 Code.PhotoSwipe.Cache.Mode.aggressive(激進,積極). 決定 PhotoSwipe 如何管理圖片緩存 cache.
Aggressive 模式將會積極地地設置非 "當前,上一張,下一張"的圖片為空的類型. 對於老版本iOS 浏覽器下的大圖片內存溢出將會很有用. 大多數情況下,normal模式就可以了。
doubleTapSpeed: 雙擊的最大間隔. 默認值 = 300(毫秒)
doubleTapZoomLevel: 當用戶雙擊的時候,放大的倍數, 默認的 "zoom-in"(拉近) 級別. 默認值 = 2.5
enableDrag: 允許拖動上一張/下一張圖片到當前界面. 默認值 = true
enableKeyboard: 允許鍵盤操作(左右箭頭切換,Esc退出,Enter自動播放,空格鍵 顯/隱標題欄/退出). 默認 = true
enableMouseWheel: 允許鼠標滾輪操作. 默認 = true
fadeInSpeed: 淡入效果元素的速度(持續時間),毫秒. 默認 = 250
fadeOutSpeed: 淡出效果元素的速度(持續時間),毫秒. 默認 = 250
imageScaleMethod: 圖片縮放方法(模式). 可選值: "fit", "fitNoUpscale" 和 "zoom". 模式"fit" 保證圖像適應屏幕. "fitNoUpscale" 和 "fit"類似但是不會放大圖片. "zoom"將圖片全屏, 但有可能圖片縮放不是等比例的. 默認 = "fit"
invertMouseWheel: 反轉鼠標滾輪。默認情況下,鼠標向下滾動將切換到下一張,向上切換到上一張 . 默認 = false
jQueryMobile: 指示 PhotoSwipe 是否集成進了 jQuery Mobile 項目. 默認情況下, PhotoSwipe will try and work this out for you
jQueryMobileDialogHash: jQuery Mobile的window,dialog頁面 所使用的hash標簽。 默認值 = "&ui-state=dialog"
loop: 相冊是否自動循環. 默認 = true
margin: 兩張圖之間的間隔,單位是像素. 默認 = 20
maxUserZoom: 最大放大倍數. 默認 = 5.0 (設置為0將被忽略)
minUserZoom: 圖像最小的縮小倍數. 默認 = 0.5 (設置為0將會忽略)
mouseWheelSpeed: 響應鼠標滾輪的靈敏度. 默認 = 500(毫秒)
nextPreviousSlideSpeed: 當點擊上一張,下一張按鈕後,延遲多少毫秒執行切換. 默認 = 0 (立即切換)
preventHide: 阻止用戶關閉 PhotoSwipe. 同時也會隱藏 工具欄上的"close"關閉按鈕. 在獨享的頁面使用 (示例是源碼中的 examples/08-exclusive-mode.html). 默認 = false
preventSlideshow: 阻止自動播放模式. 同時也會隱藏工具欄裡的播放按鈕. 默認 = false
slideshowDelay: 自動播放模式下,多長時間播放下一張. Default = 3000(毫秒)
slideSpeed: 圖片滑進視圖的時間. 默認 = 250(毫秒)
swipeThreshold: 手指滑動多少像素才觸發一個 swipe 手勢事件. 默認 = 50
swipeTimeThreshold: 定義觸發swipe(滑動)手勢的最大毫秒數,太慢了則不會觸發滑動,只會拖動當前照片的位置. 默認 = 250
slideTimingFunction: 滑動時的 Easing function . 默認 = "ease-out"
zIndex: 初始的zIndex值. 默認 = 1000
enableUIWebViewRepositionTimeout: 檢查設備的方向是否改變。默認 = false
uiWebViewResetPositionDelay: 定時檢查設備的方向是否改變的時間 默認 = 500(毫秒)
preventDefaultTouchEvents: 阻止默認的touch事件,比如頁面滾動。 默認 = true
target: 必須是一個合法的DOM元素(如DIV)。默認是window(全頁面)。而如果是某個低級別的DOM,則在DOM內顯示,可能非全屏。
如果不需要展示第一個頁面直接展示第二個頁面,可以這樣設置:
$(document).ready(function(){
  // Set up PhotoSwipe, setting "preventHide: true"
  var thumbEls = Code.photoSwipe('a', '#Gallery', { preventHide: true });
  Code.PhotoSwipe.Current.show(0);
});
當然這個插件還有很多其他的監聽函數:
document.addEventListener('DOMContentLoaded',function(){
  //onBeforeShow 在gallery將要展示之前調用該方法
 Code.PhotoSwipe.Current.addEventListener(Code.PhotoSwipe.EventTypes.onBeforeShow,function(e){
  console.log("onBeforeShow");
});

// onshow 在gallery展示的時候調用
Code.PhotoSwipe.Current.addEventListener(Code.PhotoSwipe.EventTypes.onShow,function(e){
  console.log("onShow");
});

// onBeforeHide 在gallery隱藏之前
Code.PhotoSwipe.Current.addEventListener(Code.PhotoSwipe.EventTypes.onBeforeHide, function(e){
  console.log('onBeforeHide');
});

// onHide 在Gallery隱藏的時候
Code.PhotoSwipe.Current.addEventListener(Code.PhotoSwipe.EventTypes.onHide, function(e){
  console.log('onHide');
});

// onShowNext 在展示下一個的時候
Code.PhotoSwipe.Current.addEventListener(Code.PhotoSwipe.EventTypes.onShowNext, function(e){
  console.log('onShowNext');
});

// onShowPrevious 在展示上一個的時候
Code.PhotoSwipe.Current.addEventListener(Code.PhotoSwipe.EventTypes.onShowPrevious, function(e){
  console.log('onShowPrevious');
});

// onDisplayImage 在圖片展示
Code.PhotoSwipe.Current.addEventListener(Code.PhotoSwipe.EventTypes.onDisplayImage, function(e){
  console.log('onDisplayImage');
});

// onResetPosition 當Gallery的大小和位置發生變化時或者設備的方向或者窗口大小改變時,出發該方法
Code.PhotoSwipe.Current.addEventListener(Code.PhotoSwipe.EventTypes.onResetPosition, function(e){
  console.log('onResetPosition');
});

// onSlideshowStart 當gallery開始滑動展示的時候(此方法可能是我理解有誤,實驗過程中一直沒有觸發過
的),原文是:When the gallery has started the slideshow
Code.PhotoSwipe.Current.addEventListener(Code.PhotoSwipe.EventTypes.onSlideshowStart, function(e){
  console.log('onSlideshowStart');
});

// onSlideshowStop 當Gallery活動結束的時候
Code.PhotoSwipe.Current.addEventListener(Code.PhotoSwipe.EventTypes.onSlideshowStop, function(e){
  console.log('onSlideshowStop');
});

// onBeforeCaptionAndToolbarShow 在頂部狀態欄和底部的工具欄展示之前觸發
Code.PhotoSwipe.Current.addEventListener(Code.PhotoSwipe.EventTypes.onBeforeCaptionAndToolbarShow, function(e){
  console.log('onBeforeCaptionAndToolbarShow');
});

// onBeforeCaptionAndToolbarHide 在頂部狀態欄和底部的工具欄隱藏之前觸發
Code.PhotoSwipe.Current.addEventListener(Code.PhotoSwipe.EventTypes.onBeforeCaptionAndToolbarHide, function(e){
  console.log('onBeforeCaptionAndToolbarHide');
});

// onViewportClick 在gallery中點擊屏幕的時候觸發,此時一般會觸發onBeforeCaptionAndToolbarShow
或者onBeforeCaptionAndToolbarHide 方法
Code.PhotoSwipe.Current.addEventListener(Code.PhotoSwipe.EventTypes.onViewportClick, function(e){
  console.log('onViewportClick');
});

},false);
由於在photoSwipe官網中沒有發現api接口的調用方式,且現在的js水平也不咋地,所以它的一些api接口基本上不是很了解,但是我在查看它的例子的時候發現有個變量會經常出現,Code.PhotoSwipe或者Code.PhotoSwipe.Current,所有我就在控制台中進行了一些實驗,當我輸入Code.PhotoSwipe的時候,出現了如下內容:

雖然不能完全看懂裡面是什麼,但是能看到其中有Current這個元素,接著在控制台輸入Code.PhotoSwipe.Current,得到下面的內容:
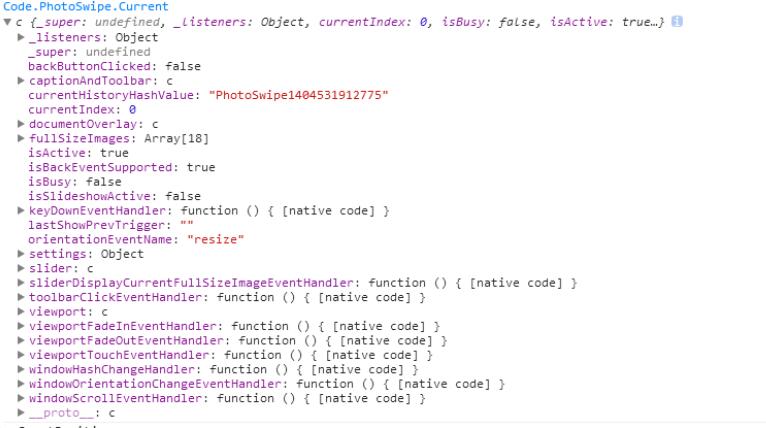
在這裡面可以發現更多的信息,比如:currentIndex表明當前所處的圖片是在列表中的索引位置,整個連接起來就是 Code.PhotoSwipe.Current.currentIndex 代表當前圖片所處的索引位置,這個信息對我來說很重要,我們可以通過這個信息在不同的頁面中展示不同的頁面信息。
以上就是本文的全部內容,希望對大家的學習有所幫助,也希望大家多多支持。