前端js彈出框組件使用方法
編輯:關於JavaScript
下面分享一個js 彈出窗, 分 toast , dialog , load 三種彈窗 , 下面用js css 來實現以下:
首先是js代碼 | 采用了 es6 的寫法
//公共彈窗加載動畫

const DIALOG_TOAST = '1',
  DIALOG_DIALOG = '2',
  DIALOG_LOAD = '3',

class Dialog {

 constructor(type = DIALOG_DIALOG,
    dialogContent = '請求失敗',
    wrapClassName = 'common-dialog-wrap',
    dialogWrapClassName = 'common-dialog-content-wrap',
    contentClassName = 'common-dialog-content',
    btnClassName = 'common-btn',
    btnContent = '確定') {


  this.type = type;

  //吐司
  if (type == DIALOG_TOAST) {
   this.dialog = document.createElement('div');
   this.dialog.className = 'common-toast';
   this.dialog.innerHTML = dialogContent;

  }
  //加載動畫
  else if (type == DIALOG_LOAD) {
   this.dialog = document.createElement('div');
   this.dialog.className = wrapClassName;
   this.figure = document.createElement('figure');
   this.figure.className = 'common-loadGif';
   this.img = document.createElement('img');
   this.img.src = getAbsolutePath() + '/fenqihui/static/bitmap/travel/loadgif.gif';
   this.figure.appendChild(this.img);
   this.dialog.appendChild(this.figure);

  } else if (type == DIALOG_DIALOG) {
   this.dialog = document.createElement('div');
   this.dialog.className = wrapClassName;
   this.dialogWrap = document.createElement('div');
   this.dialogWrap.className = dialogWrapClassName;
   this.conetent = document.createElement('p');
   this.conetent.innerHTML = dialogContent;
   this.conetent.className = contentClassName;
   this.confirmButton = document.createElement('p');
   this.confirmButton.innerHTML = btnContent;
   this.confirmButton.className = btnClassName;
   this.dialogWrap.appendChild(this.conetent);
   this.dialogWrap.appendChild(this.confirmButton);
   this.dialog.appendChild(this.dialogWrap);
   this.bindEvent();
  }


 }


 bindEvent() {
  this.confirmButton.addEventListener('click', ()=> {
   this.hide();
  })
 }

 show(time) {
  document.querySelector('body').appendChild(this.dialog);
  $(this.dialog).css('display', 'block');

  if (this.type == DIALOG_TOAST) {

   setTimeout(()=> {
    $(this.dialog).css('display', 'none');
   }, time);
  }

 }

 hide() {
  $(this.dialog).css('display', 'none');
 }

}
css 文件如下:
/*公共彈窗*/
.common-dialog-wrap {
 position: fixed;
 background: rgba(0,0,0,.7);
 z-index: 100;
 height: 100%;
 width: 100%;
 top: 0;
}

.common-dialog-content {
 height: 2rem;
 border-bottom: 1px solid #ccc7c7;
 line-height: 2rem;
 text-align: center;
 font-size: .65rem;
}

.common-btn {
 text-align: center;
 height: 2rem;
 color: orange;
 line-height: 2rem;
}

.common-dialog-content-wrap{
 background: #fff;
 width: 10rem;
 height: 4rem;
 border-radius: 5px;
 position: fixed;
 left: 0;
 top:0;
 right: 0;
 bottom: 0;
 margin: auto;
}

/*吐司樣式*/
.common-toast{
 height: 1.6rem;
 width: 4rem;
 box-sizing: content-box;
 color: #fff;
 padding: 0 10px;
 position: fixed;
 left: 0;
 top:0;
 bottom: 0;
 right: 0;
 text-align: center;
 line-height: 1.6rem;
 margin: auto;
 background: rgba(0,0,0,.7);
 border-radius: 2rem;
}

.common-loadGif{
 height: 4rem;
 width: 4rem;
 position: fixed;
 top:0;
 left: 0;
 bottom: 0;
 right: 0;
 margin: auto;
}

.common-loadGif img{
 height: 100%;
 width: 100%;
 border-radius: 10px;
}
使用方式
new Dialog(DIALOG_DIALOG).show() | hide()
new Dialog(DIALOG_LOAD).show() | hide()
new Dialog(DIALOG_TOAST).show(time : number) | hide()
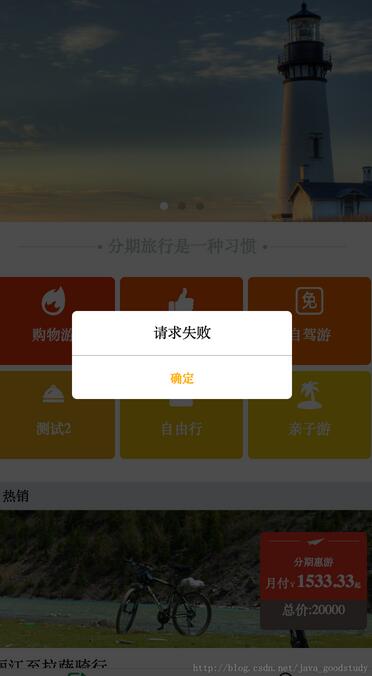
效果如下


以上就是本文的全部內容,希望對大家的學習有所幫助,也希望大家多多支持。
小編推薦
熱門推薦