要了解和熟悉 Html5 中的新的語義元素,最好的方式就是拿一經典的 HTML 文檔作例子,然後把 Html5 的一些新鮮營養充實進入。如下就是我們要改造的頁面,該頁面很簡單,只包含一篇文章。
ApocalypsePage_Original.Html,這是一個格式非常規范的頁面,所有的樣式均來自於外部樣式表。
XML/Html Code復制內容到剪貼板- <!DOCTYPE Html>
- <Html lang="zh-CN">
- <head>
- <meta charset="utf-8">
- <title>Apocalypse Now</title>
- <link rel="stylesheet" href="ApocalypsePage_Original.CSS">
- </head>
- <body>
- <div class="Header">
- <h1>How the World Could End</h1>
- <p class="Teaser">ScenariOS that spell the end of life as we know</p>
- <p class="Byline">by Ray N. Carnation</p>
- </div><!-- end Header -->
- <div class="Content">
- <p><span class="LeadIn">Right now</span>, you're probably feeling pretty good. After all, life in the developed world is comfortable<span class="style1">—</span>probably more comfortable than it's been for the average human being throughout all of recorded history.</p>
- <p>But don't get too smug. There's still plenty of horrific ways it could all fall apart. In this article, you'll learn about a few of our favorites.</p>
- <h2>Mayan Doomsday</h2>
- <p>Skeptics suggest that the Mayan calendar simply rolls to a new 5,126-year era after 2012, and doesn't actually predict a life-ending apocalypse. But given that the long-dead Mayans were wrong about virtually everything else, why should we trust them on this?</p>
- <h2>Robot Takeover</h2>
- <p>Not quite as frightening as a Vampire Takeover or Living-Dead Takeover, a robot rebellion is still a disquIEting thought. We are already outnumbered by our technological gadgets, and even Bill Gates fears the day his Japanese robot slave turns him over by the ankles and asks (in a suitably robotic voice) "Who's your daddy now?"</p>
- <h2>Unexplained Singularity</h2>
- <p>We don't know how the universe started, so we can't be sure it won't just end, maybe today, and maybe with nothing more exciting than a puff of anti-matter and a slight fizzing noise.</p>
- <h2>Runaway Climate Change</h2>
- <p>Dismissed by some, Al Gore's prophecy of doom may still come true. If it does, we may have to contend with vicious storms, widespread food shortages, and surly air conditioning repairmen.</p>
- <h2>Global Epidemic</h2>
- <p>Some time in the future, a lethal virus could strike. Predictions differ about the source of the disease, but candidates include monkeys in the African jungle, bioterrorists, birds and pigs with the flu, warriors from the future, an alIEn race, hospitals that use too many antibiotics, vampires, the CIA, and unwashed brussel sprouts. Whatever the source, it's clearly bad news.</p>
- </div><!-- end Content -->
- <div class="Footer">
- <p class="Disclaimer">These apocalyptic predictions do not reflect the vIEws of the author.</p>
- <p>
- <a href="AboutUs.Html">About Us</a>
- <a href="Disclaimer.Html">Disclaimer</a>
- <a href="ContactUs.Html">Contact Us</a>
- </p>
- <p>Copyright © 2014</p>
- </div><!-- end Footer -->
- </body>
- </Html>
在不增加任何 CSS 樣式表之前,效果如下: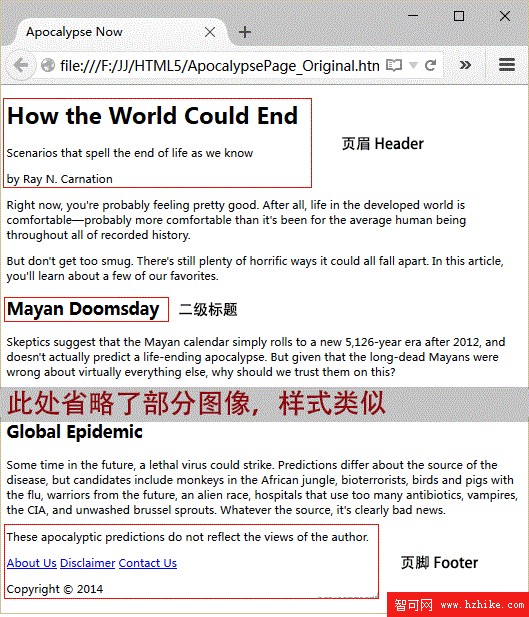
上面通過三個 <div> 將頁面分成了三個部分,頂部的頁眉,中部的內容和底部的頁腳。
這個例子中的樣式表很簡單,整個頁面最大寬度設置為 800 像素,避免文本在寬屏顯示器上顯示過長。頁眉位於一個帶有藍色邊框的盒子中,內容區的兩側都增加了內邊距,而頁腳在整個頁面的底部居中。
ApocalypsePage_Original.CSS樣式文件內容如下:
XML/Html Code復制內容到剪貼板- @charset "utf-8";
- /* CSS Document */
- body{
- /*font-family 要使用安全字體,按照先特殊後一般的原則,
- 先給出你想要的字體,然後是保險一些的字體,
- 最後以 sans-serif 字體結尾*/
- font-family: "Lucida sans Unicode", "Lucida Grande", Geneva, sans-serif;
- max-width: 800px; /*最大寬度不超過 800 像素*/
- }
- /*頁面頂部的標題區樣式*/
- .Header {
- background-color: #7695FE; /*可接受任何顏色值*/
- border: thin #336699 solid; /*多合一的 border 屬性*/
- padding: 10px; /* 10像素的內邊距,邊框與內容之間的距離*/
- margin: 10px; /* 10像素的外邊距,邊框與周圍元素之間的距離*/
- text-align: center; /*頭部文本居中*/
- }
- /*頁眉中標題<h1>樣式*/
- .Header h1{
- margin: 0px;
- color: white;
- font-size: xx-large; /*精確控制可以用像素或者em單位*/
- }
- /*頁眉中子標題樣式*/
- .Header .Teaser{
- margin: 0px;
- font-weight: bold;
- }
- /*頁眉中署名行樣式*/
- .Header .Byline{
- font-style: italic;
- font-size: small;
- margin: 0px;
- }
- .Content{
- font-size: medium;
- font-family: Cambria, Cochin, Georgia, "Times New Roman", Times, serif;
- /*左右內邊距最大*/
- padding-top: 20px;
- padding-right: 50px;
- padding-bottom: 5px;
- padding-left: 50px;
- line-height: 120%; /*相鄰兩個文本行之間的距離*/
- }
- .Content .LeadIn{
- font-weight: bold;
- font-size: large;
- font-variant: small-caps;
- }
- .Content .h2{
- color: #24486C;
- margin-bottom: 2px;
- font-size: medium;
- }
- .Content p{
- margin-top: 0px;
- }
- .Footer{
- text-align: center;
- font-size: x-small;
- }
- .Footer .Disclaimer{
- font-style: italic;
- }
- .Footer p{
- margin: 3px;
- }
這樣我們的樣式表就彎沉過了,現在去看看結果會怎樣呢?如下圖: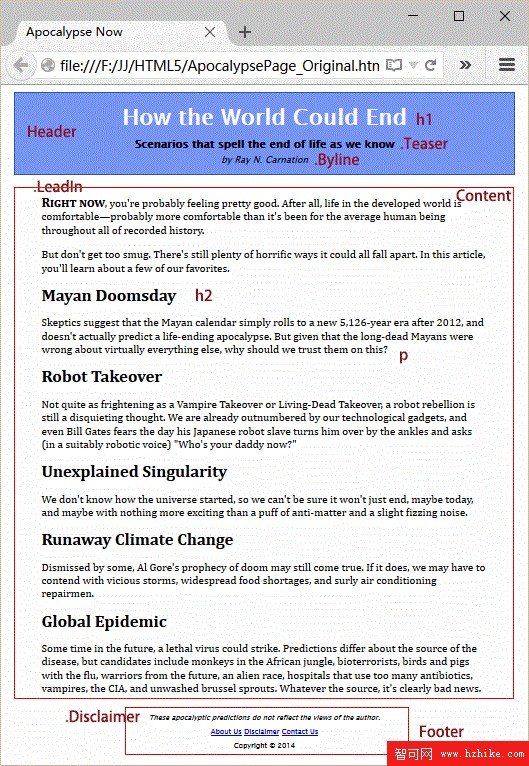
使用 Html5 來構造頁面
<div> 目前仍舊是 Web 設計的必備元素,它是一個直觀、多用途的容器,可以通過它為頁面中的任何區塊應用樣式。但 <div> 的問題在於,它本身不反映與頁面相關的任何信息。
要通過 Html5 改進這種情況,可以把 <div> 替換成更具有描述性語義的元素。
ApocalypsePage_Revised.Html中已經將 class 屬性為 Header 和 Footer 兩個 <div> 替換為 <header> 和 <footer>, 部分代碼如下:
XML/Html Code復制內容到剪貼板- <header>
- <h1>How the World Could End</h1>
- <p class="Teaser">ScenariOS that spell the end of life as we know</p>
- <p class="Byline">by Ray N. Carnation</p>
- </header>
- ...
- <footer>
- <p class="Disclaimer">These apocalyptic predictions do not reflect the vIEws of the author.</p>
- <p>
- <a href="AboutUs.Html">About Us</a>
- ...
- </p>
- <p>Copyright © 2014</p>
- </footer>
當然,對應的 ApocalypsePage_Revised.CSS 文件也需要進行修改,將其中的 .Header 和 .Footer 替換為 header 和 footer 。部分代碼如下:
XML/Html Code復制內容到剪貼板- /*頁面頂部的標題區樣式*/
- header {
- background-color: #7695FE; /*可接受任何顏色值*/
- border: thin #336699 solid; /*多合一的 border 屬性*/
- padding: 10px; /* 10像素的內邊距,邊框與內容之間的距離*/
- margin: 10px; /* 10像素的外邊距,邊框與周圍元素之間的距離*/
- text-align: center; /*頭部文本居中*/
- }
- /*頁眉中標題<h1>樣式*/
- header h1{
- margin: 0px;
- color: white;
- font-size: xx-large; /*精確控制可以用像素或者em單位*/
- }
最後還有一個元素需要用在示例文件中,就是 <article> 元素,表示一個完整的、自成一體的內容。
<ariticle>元素應該包含新聞報道或文章的內容,包括標題、署名和正文。因此添加了 <article> 元素後的結構如下:
XML/Html Code復制內容到剪貼板- <article>
- <header>
- <h1>How the World Could End</h1>
- <p class="Teaser">ScenariOS that spell the end of life as we know</p>
- <p class="Byline">by Ray N. Carnation</p>
- </header>
- <div class="Content">
- <p><span class="LeadIn">Right now</span>, you're probably feeling pretty good. After all, life in the developed world is comfortable<span class="style1">—</span>probably more comfortable than it's been for the average human being throughout all of recorded history.</p>
- ...
- </div><!-- end Content -->
- </article>
重新設計後,頁面結構如下: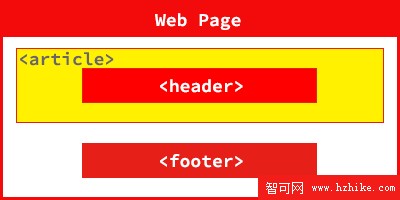
用 <figure> 添加插圖
很多頁面都是包含圖片的。但是,插圖 (figure) 與圖片的概念還不完全一樣。插圖雖然獨立於文本,但是文本中會提到它。
一般來說插圖應該是浮動的,還會有浮動圖題。下面是在文章中添加插圖的 Html 標記,在正文的第一段和第二段之間的位置,部分代碼如下:
XML/Html Code復制內容到剪貼板- ...
- <div class="Content">
- <p><span class="LeadIn">Right now</span>, you're ...</p>
- <div class="FloatFigure">
- <img src="human_skull.jpg" alt="Human skull">
- <p>Will you be the last person standing if one of these apocalyptic
- scenariOS plays out?</p>
- </div>
- <p>But don't get too smug. There's...</p>
- ...
相應的 樣式表規則如下:
- .FloatFigure{
- float: left;
- margin: 0px 20px 0px 0px;
- }
- .FloatFigure p{
- max-width: 300px;
- font-size: small;
- font-style: italic;
- margin-bottom: 5px;
- }
下圖展示了這個示例的外觀,插圖恰好在第一段文本之後,浮動在後面文本的左側,圖題的文本的寬度我們限制住了,讓圖題顯示很充實、很優雅。
Html5 中提供了一個 <figure> 元素,圖題可以放在 <figure> 中的 <figcaption> 元素裡,經過改造,代碼如下:
XML/Html Code復制內容到剪貼板- <figure class="FloatFigure">
- <img src="human_skull.jpg" alt="Human skull">
- <figcaption>Will you be the last person standing if one of these apocalyptic
- scenariOS plays out?</figcaption>
- </figure>
當然樣式表中的選擇符,相應修改一下即可。
- .FloatFigure{
- float: left;
- margin: 0px 20px 0px 0px;
- }
- .FloatFigure figcaption{
- max-width: 300px;
- font-size: small;
- font-style: italic;
- margin-bottom: 5px;
- }
最後還有就是 <img> 元素中的 alt 屬性可以刪除掉,因為圖題中包含了圖片的完整說明。
用 <aside> 添加附注
新的 <aside> 元素表示與它周圍的文本沒有密切關系的內容。可以通過它介紹另一個相關的話題,或者對主文檔中提出的某個觀點進行解釋。還可以用來放置廣告、相關內容鏈接。
下面的示例中將用作醒目引文(pull quote),使用 <div> 元素可以創造這種效果,但是用 <aside> 元素讓標記更有意義: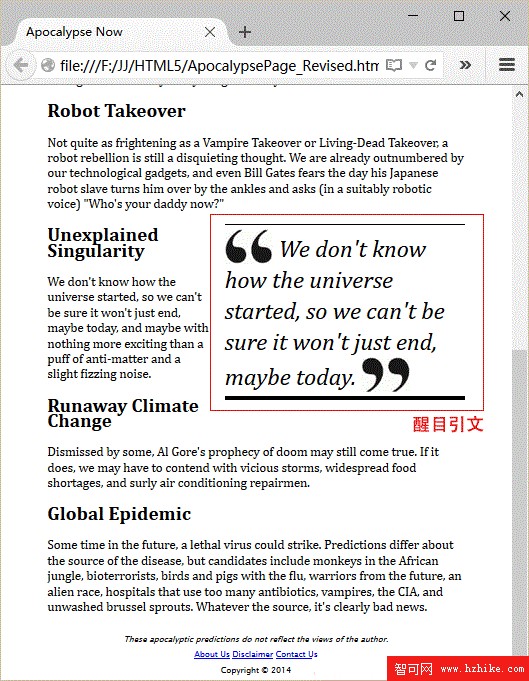
部分代碼如下:
- <p>... (in a suitably robotic voice) "Who's your daddy now?"</p>
- <aside class="PullQuote">
- <img src="quotes_start.png" alt="Quote">
- We don't know how the universe started, so we can't be sure it won't just end, maybe today.
- <img src="quotes_end.png" alt="End quote">
- </aside>
- <h2>Unexplained Singularity</h2>
對應的樣式表內容如下:
- .PullQuote{
- float: right;
- max-width: 300px;
- border-top: thin black solid;
- border-bottom: thick black solid;
- font-size: 30px;
- line-height: 130%;
- font-style: italic;
- padding-top: 5px;
- padding-bottom: 5px;
- margin-left: 15px;
- margin-bottom: 10px;
- }
- .PullQuote img{
- vertical-align: bottom;
- }