Html5火的正熱,最近有個想法也是要用到Html的相關功能,所以也要好好學習一把。
好好看了一下Canvas的功能,感覺Html5在客戶端交互的功能性越來越強了,今天看了一下Canvas繪圖,下邊是幾個實例,記下以備後用。
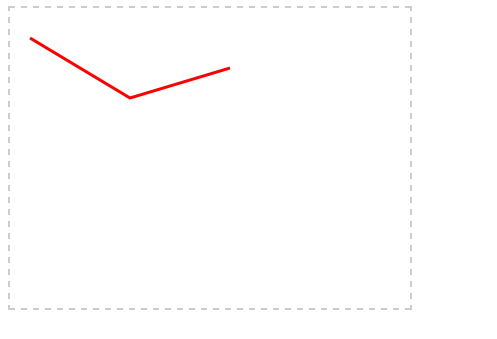
1、使用Canvas繪制直線:
- <!doctype Html>
- <Html>
- <head>
- <meta charset="UTF-8">
- </head>
- <style type="text/CSS">
- canvas{border:dashed 2px #CCC}
- </style>
- <script type="text/Javascript">
- function $$(id){
- return document.getElementById(id);
- }
- function pageLoad(){
- var can = $$('can');
- var cancans = can.getContext('2d');
- cans.moveTo(20,30);//第一個起點
- cans.lineTo(120,90);//第二個點
- cans.lineTo(220,60);//第三個點(以第二個點為起點)
- cans.lineWidth=3;
- cans.strokeStyle = 'red';
- cans.stroke();
- }
- </script>
- <body onload="pageLoad();">
- <canvas id="can" width="400px" height="300px">4</canvas>
- </body>
- </Html>
這裡用到的兩個API方法,moveTo和lineTo分別是線段的起點和終點坐標,變量為(X坐標,Y坐標),strokeStyle、stroke分別路徑繪制樣式和繪制路徑。
2、繪制漸變線條
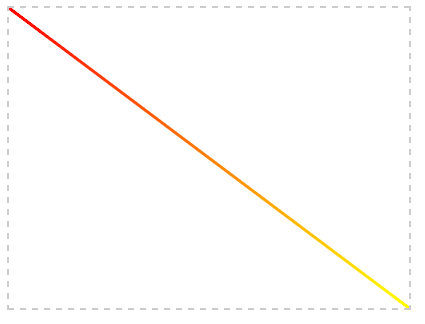
漸變線條就是顏色有漸變的效果,當然漸變的樣式可以遵循路徑的方向也可以不遵循路徑的方向:
XML/Html Code復制內容到剪貼板- <!doctype Html>
- <Html>
- <head>
- <meta charset="UTF-8">
- </head>
- <style type="text/CSS">
- canvas{border:dashed 2px #CCC}
- </style>
- <script type="text/Javascript">
- function $$(id){
- return document.getElementById(id);
- }
- function pageLoad(){
- var can = $$('can');
- var cancans = can.getContext('2d');
- cans.moveTo(0,0);
- cans.lineTo(400,300);
- var gnt1 = cans.createLinearGradIEnt(0,0,400,300);//線性漸變的起止坐標
- gnt1.addColorStop(0,'red');//創建漸變的開始顏色,0表示偏移量,個人理解為直線上的相對位置,最大為1,一個漸變中可以寫任意個漸變顏色
- gnt1.addColorStop(1,'yellow');
- cans.lineWidth=3;
- cans.strokeStyle = gnt1;
- cans.stroke();
- }
- </script>
- <body onload="pageLoad();">
- <canvas id="can" width="400px" height="300px">4</canvas>
- </body>
- </Html>
3、繪制矩形或正方形:
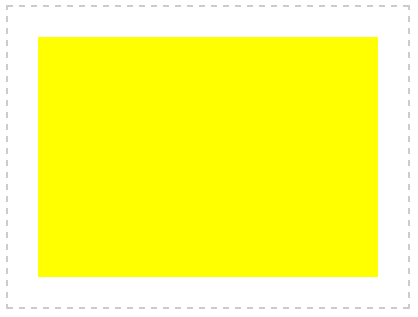
這種矩形框如果使用HTML4只能使用後台代碼才能生成了,現在Html5提供的Canvas功能卻很容易就能繪制,所以說Html5的優越性是相當高的。
XML/Html Code復制內容到剪貼板- <!doctype Html>
- <Html>
- <head>
- <meta charset="UTF-8">
- </head>
- <style type="text/CSS">
- canvas{border:dashed 2px #CCC}
- </style>
- <script type="text/Javascript">
- function $$(id){
- return document.getElementById(id);
- }
- function pageLoad(){
- var can = $$('can');
- var cancans = can.getContext('2d');
- cans.fillStyle = 'yellow';
- cans.fillRect(30,30,340,240);
- }
- </script>
- <body onload="pageLoad();">
- <canvas id="can" width="400px" height="300px">4</canvas>
- </body>
- </Html>
這裡使用了一個方法——fillRect()從字面意思也能知道這個就是填充一個矩形,這裡的參數值得說明一下fillRect(X,Y,Width,Height),這個和數學裡的坐標是不一樣的,具體請看
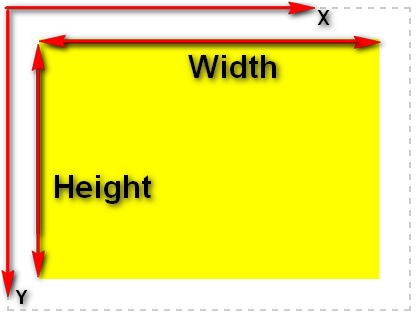
這裡的X,Y是相對Canvas左上角的起點開始的,謹記!!
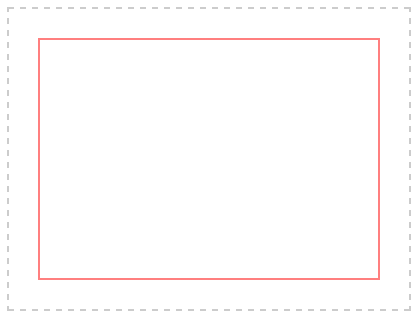
4、繪制一個簡單的矩形框
上例中講到要繪制一個矩形塊,填充了顏色,這個例子只是簡單地繪制一個矩形而不實現填充效果。
- <!doctype Html>
- <Html>
- <head>
- <meta charset="UTF-8">
- </head>
- <style type="text/CSS">
- canvas{border:dashed 2px #CCC}
- </style>
- <script type="text/Javascript">
- function $$(id){
- return document.getElementById(id);
- }
- function pageLoad(){
- var can = $$('can');
- var cancans = can.getContext('2d');
- cans.strokeStyle = 'red';
- cans.strokeRect(30,30,340,240);
- }
- </script>
- <body onload="pageLoad();">
- <canvas id="can" width="400px" height="300px">4</canvas>
- </body>
- </Html>
這個很簡單,和上例一樣,就是將fill替換成了stroke,具體詳見上例。
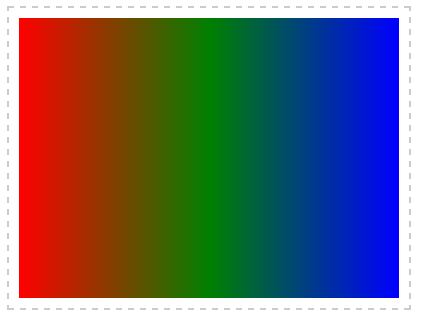
5、繪制一個線性漸變的矩形
漸變是填充的一種相當不錯的效果,結合實例2和實例3,我們可以創建一個漸變的矩形
- <!doctype Html>
- <Html>
- <head>
- <meta charset="UTF-8">
- </head>
- <style type="text/CSS">
- canvas{border:dashed 2px #CCC}
- </style>
- <script type="text/Javascript">
- function $$(id){
- return document.getElementById(id);
- }
- function pageLoad(){
- var can = $$('can');
- var cancans = can.getContext('2d');
- var gnt1 = cans.createLinearGradIEnt(10,0,390,0);
- gnt1.addColorStop(0,'red');
- gnt1.addColorStop(0.5,'green');
- gnt1.addColorStop(1,'blue');
- cans.fillStyle = gnt1;
- cans.fillRect(10,10,380,280);
- }
- </script>
- <body onload="pageLoad();">
- <canvas id="can" width="400px" height="300px">4</canvas>
- </body>
- </Html>
不解釋了,記住fillRect(X,Y,Width,Height)就行了。
6、填充一個圓形
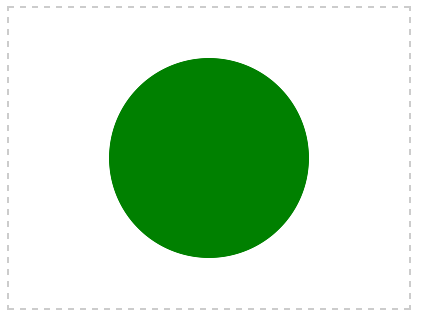
圓形的用途很廣,當然也包含了橢圓。
- <!doctype Html>
- <Html>
- <head>
- <meta charset="UTF-8">
- </head>
- <style type="text/CSS">
- canvas{border:dashed 2px #CCC}
- </style>
- <script type="text/Javascript">
- function $$(id){
- return document.getElementById(id);
- }
- function pageLoad(){
- var can = $$('can');
- var cancans = can.getContext('2d');
- cans.beginPath();
- cans.arc(200,150,100,0,Math.PI*2,true);
- cans.closePath();
- cans.fillStyle = 'green';//本來這裡最初使用的是red,截圖一看,傻眼了,怕上街被愛國者打啊,其實你懂的~~
- cans.fill();
- }
- </script>
- <body onload="pageLoad();">
- <canvas id="can" width="400px" height="300px">4</canvas>
- </body>
- </Html>
這裡的arc方法的用法是 arc(X,Y,Radius,startAngle,endAngle,anticlockwise),意思是(圓心X坐標,圓心Y坐標,半徑,開始角度(弧度),結束角度弧度,是否按照順時針畫);
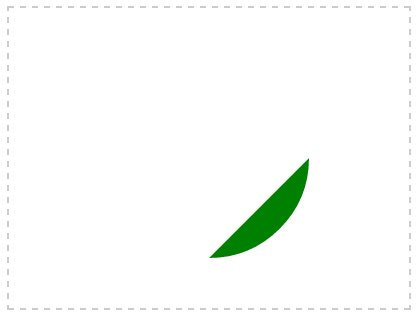
arc中各參數比較:
a、cans.arc(200,150,100,0,Math.PI,true);
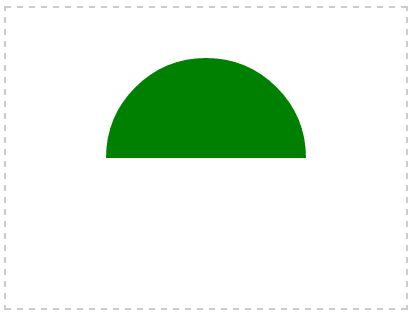
c、cans.arc(200,150,100,0,Math.PI/2,true);
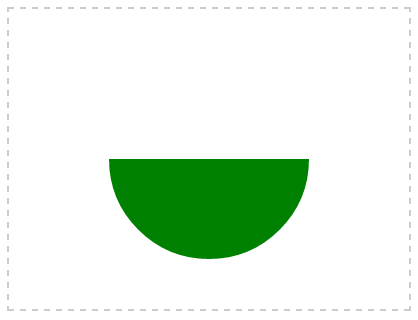
c、cans.arc(200,150,100,0,Math.PI/2,true);
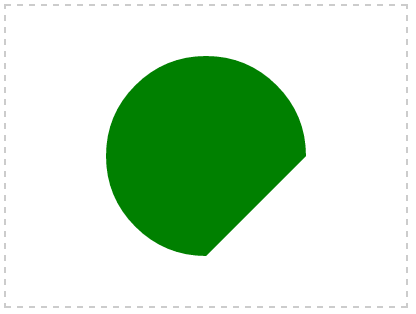
d、cans.arc(200,150,100,0,Math.PI/2,false);
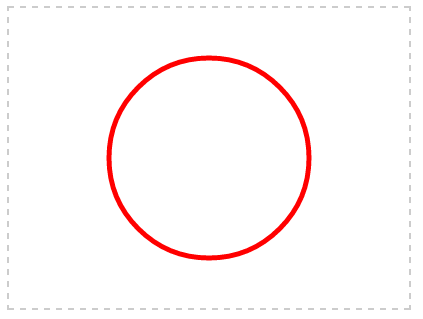
7、圓形區塊
- <!doctype Html>
- <Html>
- <head>
- <meta charset="UTF-8">
- </head>
- <style type="text/CSS">
- canvas{border:dashed 2px #CCC}
- </style>
- <script type="text/Javascript">
- function $$(id){
- return document.getElementById(id);
- }
- function pageLoad(){
- var can = $$('can');
- var cancans = can.getContext('2d');
- cans.beginPath();
- cans.arc(200,150,100,0,Math.PI*2,false);
- cans.closePath();
- cans.lineWidth = 5;
- cans.strokeStyle = 'red';
- cans.stroke();
- }
- </script>
- <body onload="pageLoad();">
- <canvas id="can" width="400px" height="300px">4</canvas>
- </body>
- </Html>
這裡不解釋了,和上邊的例子相同,lineWidth是控制線條的寬度的。
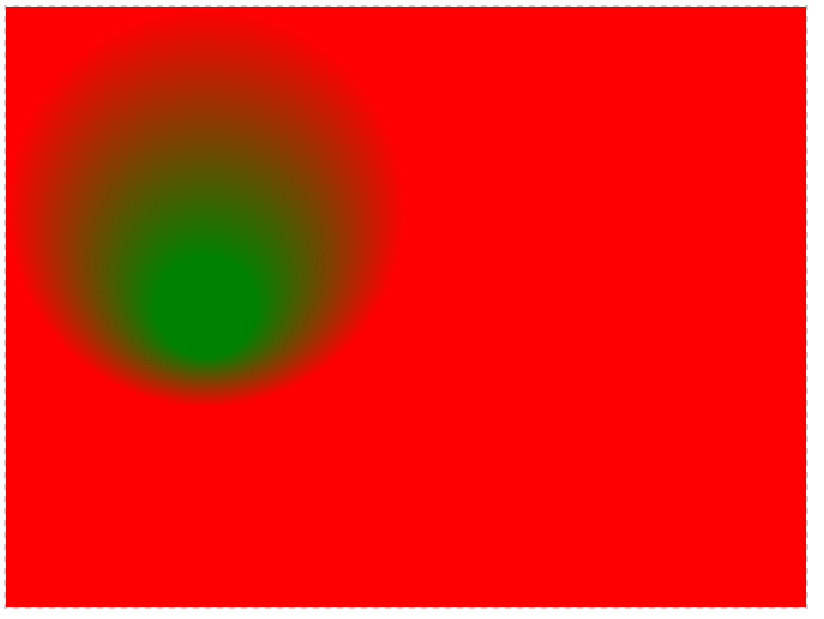
8、圓形漸變
- <!doctype Html>
- <Html>
- <head>
- <meta charset="UTF-8">
- </head>
- <style type="text/CSS">
- canvas{border:dashed 2px #CCC}
- </style>
- <script type="text/Javascript">
- function $$(id){
- return document.getElementById(id);
- }
- function pageLoad(){
- var can = $$('can');
- var cancans = can.getContext('2d');
- var gnt = cans.createRadialGradIEnt(200,300,50,200,200,200);
- gnt.addColorStop(1,'red');
- gnt.addColorStop(0,'green');
- cans.fillStyle = gnt;
- cans.fillRect(0,0,800,600);
- }
- </script>
- <body onload="pageLoad();">
- <canvas id="can" width="800px" height="600px">4</canvas>
- </body>
- </Html>
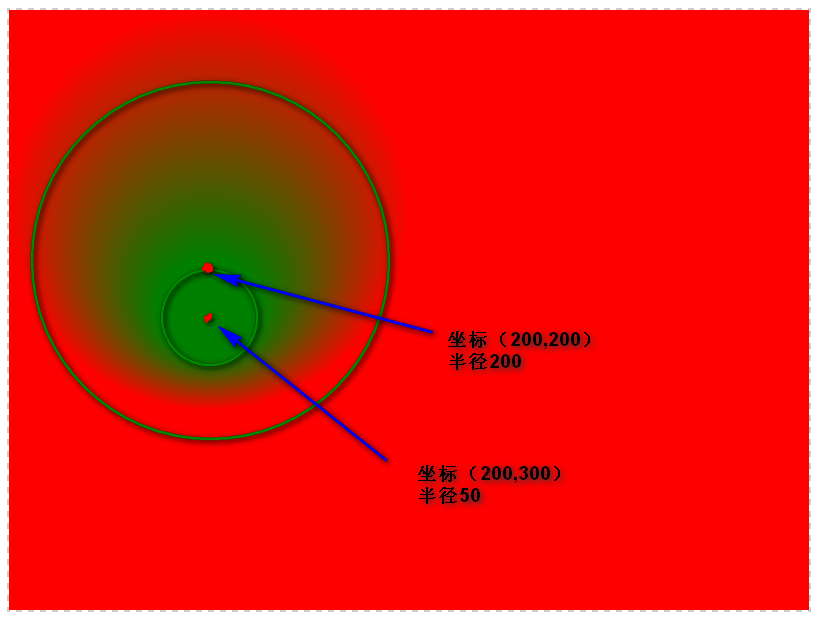
這裡需要說明的是createRadialGradIEnt方法,參數有(Xstart,Ystart,radiusStart,XEnd,YEnd,radiusEnd),也就是說,它在實行漸變時,使用了兩個圓,一個是原始的圓,一個是漸變式圓,其實,這種通過坐標與半徑控制的方式可以實現很多樣式,比如
立體圓
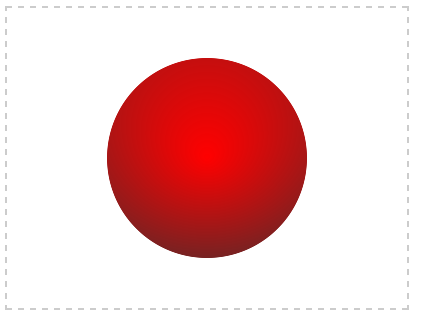
- var gnt = cans.createRadialGradIEnt(200,150,0,200,50,250);
- gnt.addColorStop(0,'red');
- gnt.addColorStop(1,'#333');