今天和大家分享一個以SVG圖像為主的loading加載動畫,現在移動端網頁使用比較多,若還用GIF做loading圖片的話,可能會影響圖像的質量,所以使用SVG是一個不錯的方式。
這次展示的代碼由 Aurer 編寫,前端人員只需要直接復制想要的SVG代碼就能直接使用,而且可以改變顏色。當然,對於好學的同學,也可以研究下這個代碼的編寫原理。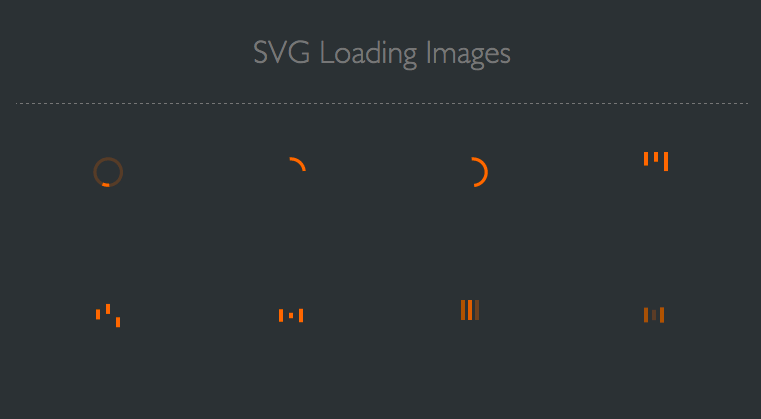
使用教程
接下來設計達人網小編為大家講解這個使用方法,其實是相當簡單的。
STEP 1: 復制你想要的SVG加載動畫代碼到<body>裡面,小編隨意復制一個代碼如下:
XML/HTML Code復制內容到剪貼板- <svg version="1.1" id="Layer_1" xmlns="http://www.w3.org/2000/svg" xmlns:xlink="http://www.w3.org/1999/xlink" x="0px" y="0px" width="24px" height="30px" viewBox="0 0 24 30" style="enable-background:new 0 0 50 50;" xml:space="preserve">
- <rect x="0" y="0" width="4" height="10" fill="#333" transform="translate(0 15.1665)">
- <animateTransform attributeType="xml" attributeName="transform" type="translate" values="0 0; 0 20; 0 0" begin="0" dur="0.6s" repeatCount="indefinite"></animateTransform>
- </rect>
- <rect x="10" y="0" width="4" height="10" fill="#333" transform="translate(0 11.5002)">
- <animateTransform attributeType="xml" attributeName="transform" type="translate" values="0 0; 0 20; 0 0" begin="0.2s" dur="0.6s" repeatCount="indefinite"></animateTransform>
- </rect>
- <rect x="20" y="0" width="4" height="10" fill="#333" transform="translate(0 1.83315)">
- <animateTransform attributeType="xml" attributeName="transform" type="translate" values="0 0; 0 20; 0 0" begin="0.4s" dur="0.6s" repeatCount="indefinite"></animateTransform>
- </rect>
- </svg>
此時代碼已經可以帶動畫了,但沒顏色,請繼續看STEP2添加顏色。
STEP 2 : 為SVG圖像添加顏色
給你的樣式表添加如下樣式,裡面的顏色代碼換上你喜歡的即!
XML/HTML Code復制內容到剪貼板- <style>
- svg path,svg rect{fill: #FF6700;}
- </style>
完成!最終DEMO:
ionic庫中的加載動畫使用
ionic是一個用來開發混合手機應用的,開源的,免費的代碼庫。可以優化html、css和js的性能,構建高效的應用程序,而且還可以用於構建Sass和AngularJS的優化。ionic會是一個可以信賴的框架。
安裝很簡單,如果有npm,Window 和 Linux 上打開命令行工具執行以下命令:
復制代碼代碼如下:$ npm install -g cordova ionic
Mac 系統上使用以下命令:
復制代碼代碼如下:sudo npm install -g cordova ionic
提示: IOS需要在Mac Os X. 和Xcode環境下面安裝使用。
如果你已經安裝了以上環境,可以執行以下命令來更新版本:
復制代碼代碼如下:npm update -g cordova ionic
或
復制代碼代碼如下:sudo npm update -g cordova ionic
下面我們來看一下具體的兩個加載相關的用法:
ionic 加載動作 $ionicLoading
$ionicLoading 是 ionic 默認的一個加載交互效果。裡面的內容也是可以在模板裡面修改。
使用實例:
HTML 代碼:
- <html ng-app="ionicApp">
- <head>
- <meta charset="utf-8">
- <meta name="viewport" content="initial-scale=1, maximum-scale=1, user-scalable=no, width=device-width">
- <title>Ionic Modal</title>
- <link href="http://www.runoob.com/static/ionic/css/ionic.min.css" rel="stylesheet">
- <script src="http://www.runoob.com/static/ionic/js/ionic.bundle.min.js"></script>
- </head>
- <body ng-controller="AppCtrl">
- <ion-view title="Home">
- <ion-header-bar>
- <h1 class="title">The Stooges</h1>
- </ion-header-bar>
- <ion-content has-header="true">
- <ion-list>
- <ion-item ng-repeat="stooge in stooges" href="#">{{stooge.name}}</ion-item>
- </ion-list>
- </ion-content>
- </ion-view>
- </body>
- </html>
JavaScript 代碼
JavaScript Code復制內容到剪貼板- angular.module(‘ionicApp‘, [‘ionic‘])
- .controller(‘AppCtrl‘, function($scope, $timeout, $ionicLoading) {
- // Setup the loader
- $ionicLoading.show({
- content: ‘Loading‘,
- animation: ‘fade-in‘,
- showBackdrop: true,
- maxWidth: 200,
- showDelay: 0
- });
- // Set a timeout to clear loader, however you would actually call the $ionicLoading.hide(); method whenever everything is ready or loaded.
- $timeout(function () {
- $ionicLoading.hide();
- $scope.stooges = [{name: ‘Moe‘}, {name: ‘Larry‘}, {name: ‘Curly‘}];
- }, 2000);
- });
$ionicLoadingConfig
使用實例:
HTML 代碼
XML/HTML Code復制內容到剪貼板- <ion-content scroll="false" class="has-header">
- <p>
- <ion-spinner icon="android"></ion-spinner>
- <ion-spinner icon="ios"></ion-spinner>
- <ion-spinner icon="ios-small"></ion-spinner>
- <ion-spinner icon="bubbles" class="spinner-balanced"></ion-spinner>
- <ion-spinner icon="circles" class="spinner-energized"></ion-spinner>
- </p>
- <p>
- <ion-spinner icon="crescent" class="spinner-royal"></ion-spinner>
- <ion-spinner icon="dots" class="spinner-dark"></ion-spinner>
- <ion-spinner icon="lines" class="spinner-calm"></ion-spinner>
- <ion-spinner icon="ripple" class="spinner-assertive"></ion-spinner>
- <ion-spinner icon="spiral"></ion-spinner>
- </p>
- </ion-content>
CSS 代碼
- body {
- cursor: url(‘http://www.runob.com/try/demo_source/finger.png‘), auto;
- }
- p {
- text-align: center;
- margin-bottom: 40px !important;
- }
- .spinner svg {
- width: 19% !important;
- height: 85px !important;
- }
JavaScript 代碼
JavaScript Code復制內容到剪貼板- angular.module(‘ionicApp‘, [‘ionic‘])
- .controller(‘MyCtrl‘, function($scope) {
- });