<canvas></canvas>是HTML5中新增的標簽,用於繪制圖形,實際上,這個標簽和其他的標簽一樣,其特殊之處在於該標簽可以獲取一個CanvasRenderingContext2D對象,我們可以通過JavaScript腳本來控制該對象進行繪圖。
<canvas></canvas>只是一個繪制圖形的容器,除了id、class、style等屬性外,還有height和width屬性。在<canvas>>元素上繪圖主要有三步:
1.獲取<canvas>元素對應的DOM對象,這是一個Canvas對象;
2.調用Canvas對象的getContext()方法,得到一個CanvasRenderingContext2D對象;
3.調用CanvasRenderingContext2D對象進行繪圖。
填充樣式
前面用到的fillStyle和strokeStyle除了設置顏色外,還能設置其他填充樣式,這裡以fillStyle為例:
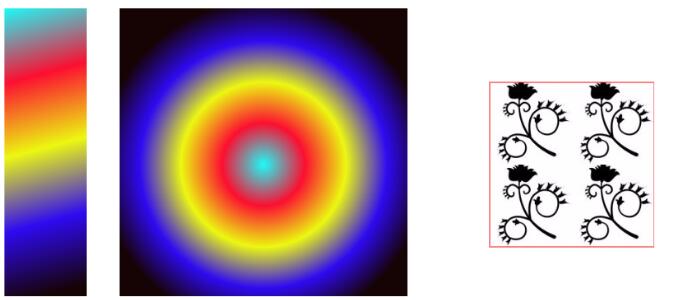
•線性漸變
使用步驟
(1)var grd = context.createLinearGradient( xstart , ystart, xend , yend )創建一個線性漸變,設置起始坐標和終點坐標;
(2)grd.addColorStop( stop , color )為線性漸變添加顏色,stop為0~1的值;
(3)context.fillStyle=grd將賦值給context。
•徑向漸變
該方法與線性漸變使用方法類似,只是第一步接收的參數不一樣
var grd = context.createRadialGradient(x0 , y0, r0 , x1 , y1 , r1 );接收起始圓心的坐標和圓半徑以及終點圓心的坐標和圓的半徑。
•位圖填充
createPattern( img , repeat-style )使用圖片填充,repeat-style可以取repeat、repeat-x、repeat-y、no-repeat。
- var canvas = document.getElementById("canvas");
- var context = canvas.getContext("2d");
- //線性漸變
- var grd = context.createLinearGradient( 10 , 10, 100 , 350 );
- grd.addColorStop(0,"#1EF9F7");
- grd.addColorStop(0.25,"#FC0F31");
- grd.addColorStop(0.5,"#ECF811");
- grd.addColorStop(0.75,"#2F0AF1");
- grd.addColorStop(1,"#160303");
- context.fillStyle = grd;
- context.fillRect(10,10,100,350);
- //徑向漸變
- var grd = context.createRadialGradient(325 , 200, 0 , 325 , 200 , 200 );
- grd.addColorStop(0,"#1EF9F7");
- grd.addColorStop(0.25,"#FC0F31");
- grd.addColorStop(0.5,"#ECF811");
- grd.addColorStop(0.75,"#2F0AF1");
- grd.addColorStop(1,"#160303");
- context.fillStyle = grd;
- context.fillRect(150,10,350,350);
- //位圖填充
- var bgimg = new Image();
- bgimg.src = "background.jpg";
- bgimg.onload=function(){
- var pattern = context.createPattern(bgimg, "repeat");
- context.fillStyle = pattern;
- context.strokeStyle="#F20B0B";
- context.fillRect(600, 100, 200,200);
- context.strokeRect(600, 100, 200,200);
- };
效果如下:

以上就是本文的全部內容,希望對大家的學習有所幫助,也希望大家多多支持。