本文為大家分享了JS組件Form表單驗證神器BootstrapValidator,供大家參考,具體內容如下
1、初級用法
來看bootstrapvalidator的描述:A jQuery form validator for Bootstrap 3。從描述中我們就可以知道它至少需要jQuery、bootstrap的支持。我們首先引入需要的js組件:
 <script src="~/Scripts/jquery-1.10.2.js"></script>

 <script src="~/Content/bootstrap/js/bootstrap.min.js"></script>
 <link href="~/Content/bootstrap/css/bootstrap.min.css" rel="stylesheet" />

 <script src="~/Content/bootstrapValidator/js/bootstrapValidator.min.js"></script>
 <link href="~/Content/bootstrapValidator/css/bootstrapValidator.min.css" rel="stylesheet" />
我們知道,既然是表單驗證,那麼我們在cshtml頁面就必須要有一個Form,並且我們知道Form裡面取元素都是通過name屬性去取值的,所以,表單裡面的元素都要有一個name的屬性值。
 <form>
  <div class="form-group">
  <label>Username</label>
  <input type="text" class="form-control" name="username" />
  </div>
  <div class="form-group">
  <label>Email address</label>
  <input type="text" class="form-control" name="email" />
  </div>
  <div class="form-group">
  <button type="submit" name="submit" class="btn btn-primary">Submit</button>
  </div>
 </form>
有了表單元素之後,就是我們的js初始化了。
 $(function () {
 $('form').bootstrapValidator({
        message: 'This value is not valid',
   feedbackIcons: {
          valid: 'glyphicon glyphicon-ok',
          invalid: 'glyphicon glyphicon-remove',
          validating: 'glyphicon glyphicon-refresh'
           },
  fields: {
  username: {
   message: '用戶名驗證失敗',
   validators: {
   notEmpty: {
    message: '用戶名不能為空'
   }
   }
  },
  email: {
   validators: {
   notEmpty: {
    message: '郵箱地址不能為空'
   }
   }
  }
  }
 });
 });
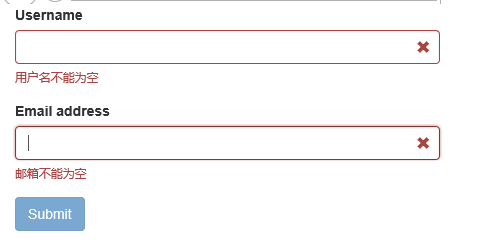
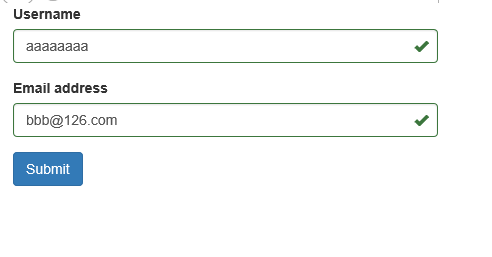
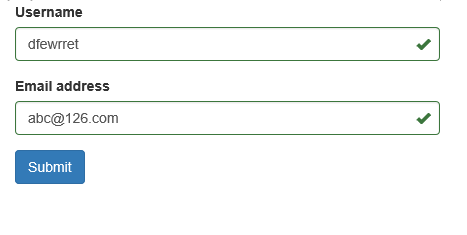
內容應該很容易看懂。來看效果:
驗證通不過,提交按鈕灰掉不能點擊
驗證通過,提交按鈕恢復
看看效果先感受下,最大優點:使用簡單,界面友好。下面我們來看看重疊驗證。
2、中級用法
上面我們知道了非空驗證的寫法,除此之外肯定還有其他驗證方式啊。別急,我們慢慢來看。上面的代碼cshtml部分不動,js部分我們稍作修改:
 $(function () {
 $('form').bootstrapValidator({
  message: 'This value is not valid',
  feedbackIcons: {
  valid: 'glyphicon glyphicon-ok',
  invalid: 'glyphicon glyphicon-remove',
  validating: 'glyphicon glyphicon-refresh'
  },
  fields: {
  username: {
   message: '用戶名驗證失敗',
   validators: {
   notEmpty: {
    message: '用戶名不能為空'
   },
   stringLength: {
    min: 6,
    max: 18,
    message: '用戶名長度必須在6到18位之間'
   },
   regexp: {
    regexp: /^[a-zA-Z0-9_]+$/,
    message: '用戶名只能包含大寫、小寫、數字和下劃線'
   }
   }
  },
  email: {
   validators: {
   notEmpty: {
    message: '郵箱不能為空'
   },
   emailAddress: {
    message: '郵箱地址格式有誤'
   }
   }
  }
  }
 });
 });
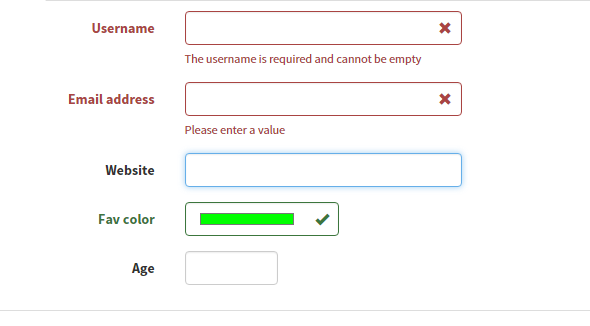
加上了重疊驗證我們來看效果:
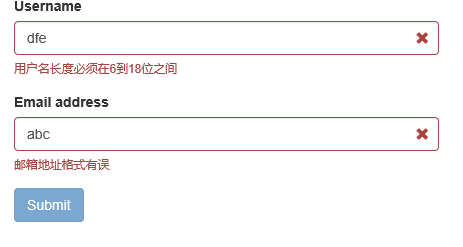
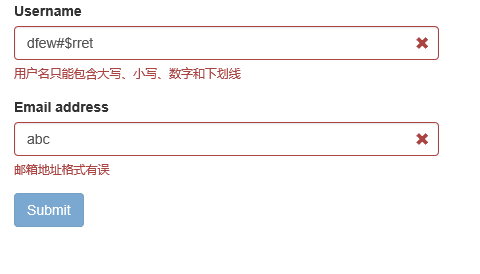
由上面的代碼可以看出在validators屬性對應一個Json對象,裡面可以包含多個驗證的類型:
- notEmpty:非空驗證;
- stringLength:字符串長度驗證;
- regexp:正則表達式驗證;
- emailAddress:郵箱地址驗證(都不用我們去寫郵箱的正則了~~)
除此之外,在文檔裡面我們看到它總共有46個驗證類型,我們抽幾個常見的出來看看:
- base64:64位編碼驗證;
- between:驗證輸入值必須在某一個范圍值以內,比如大於10小於100;
- creditCard:身份證驗證;
- date:日期驗證;
- ip:IP地址驗證;
- numeric:數值驗證;
- phone:電話號碼驗證;
- uri:url驗證;
還有一個比較常用的就是submitHandler屬性,它對應著提交按鈕的事件方法。使用如下:
$(function () {
 $('form').bootstrapValidator({
  message: 'This value is not valid',
  feedbackIcons: {
  valid: 'glyphicon glyphicon-ok',
  invalid: 'glyphicon glyphicon-remove',
  validating: 'glyphicon glyphicon-refresh'
  },
  fields: {
  username: {
   message: '用戶名驗證失敗',
   validators: {
   notEmpty: {
    message: '用戶名不能為空'
   },
   stringLength: {
    min: 6,
    max: 18,
    message: '用戶名長度必須在6到18位之間'
   },
   regexp: {
    regexp: /^[a-zA-Z0-9_]+$/,
    message: '用戶名只能包含大寫、小寫、數字和下劃線'
   }
   }
  },
  email: {
   validators: {
   notEmpty: {
    message: '郵箱不能為空'
   },
   emailAddress: {
    message: '郵箱地址格式有誤'
   }
   }
  }
  },
  submitHandler: function (validator, form, submitButton) {
  alert("submit");
  }
 });
 });
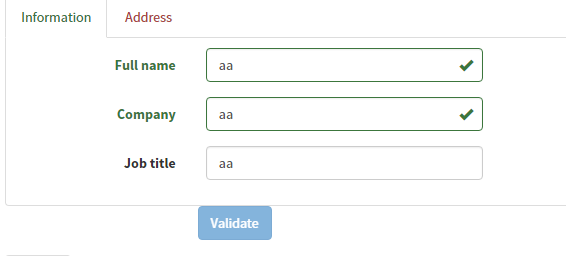
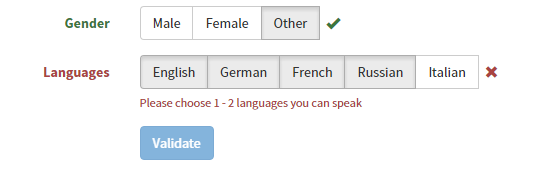
在它的Demo裡面介紹了很多驗證的實例。我們簡單看看它的效果,至於實現代碼,其實很簡單,有興趣的可以直接看api。
顏色驗證
Tab頁表單驗證
按鈕驗證
如果大家還想深入學習,可以點擊這裡進行學習,再為大家附兩個精彩的專題:Bootstrap學習教程 Bootstrap實戰教程
以上就是關於本文的全部內容,希望對大家的學習有所幫助。