Bootstrap中的fileinput 多圖片上傳及編輯功能
編輯:關於JavaScript
大家如果對Bootstrap-fileinput 的配置不清楚的話,大家可以查看官方網站:http://plugins.krajee.com/file-input。
邏輯說明:先從後台獲取數據展示,然後進行編輯。
廢話不多說, 直接上代碼.
1. 頁面部分代碼:
<div class="form-group">
<label for="inputEmail3" class="col-xs-3 control-label">項目LOGO</label>
<div class="col-xs-7">
<input id="testlogo" type="file" name="icoFile" class="file-loading" />
<input type="text" name="htestlogo" id="htestlogo" onchange="addFile(this)" >
</div>
</div>
說明: 其中onchange()為我業務需要, 上傳完成後自動執行一個添加事件。 此方法可以去掉。
2. 獲取初始化數據方法:
// 初始化獲取原有文件
$(function(){
$.ajax({
type : "post",
url : "/eim/project/testFileUpload.do",
dataType : "json",
success : function(data) {
layer.msg('操作成功!');
showPhotos(data);
},
error: function(XMLHttpRequest, textStatus, errorThrown) {
layer.msg('操作失敗!');
}
});
});
說明:此處我返回是一個 對象數組:List<MemberUser>,可以理解為獲取一個班中所有的學生,展示頭像
3.初始化bootstrap-fileinput 組件:
function showPhotos(djson){
//後台返回json字符串轉換為json對象
var reData = eval(djson);
// 預覽圖片json數據組
var preList = new Array();
for ( var i = 0; i < reData.length; i++) {
var array_element = reData[i];
// 此處指針對.txt判斷,其余自行添加
if(array_element.fileIdFile.name.indexOf("txt")>0){
// 非圖片類型的展示
preList[i]= "<div class='file-preview-other-frame'><div class='file-preview-other'><span class='file-icon-4x'><i class='fa fa-file-text-o text-info'></i></span></div></div>"
}else{
// 圖片類型
preList[i]= "<img src=\"/eim/upload/getIMG.do?savePath="+array_element.fileIdFile.filePath+"&name="+array_element.fileIdFile.name+"\" class=\"file-preview-image\">";
}
}
var previewJson = preList;
// 與上面 預覽圖片json數據組 對應的config數據
var preConfigList = new Array();
for ( var i = 0; i < reData.length; i++) {
var array_element = reData[i];
var tjson = {caption: array_element.fileIdFile.fileName, // 展示的文件名
width: '120px',
url: '/eim/project/deleteFile.do', // 刪除url
key: array_element.id, // 刪除是Ajax向後台傳遞的參數
extra: {id: 100}
};
preConfigList[i] = tjson;
}
// 具體參數自行查詢
$('#testlogo').fileinput({
uploadUrl: '/eim/upload/uploadFile.do',
uploadAsync:true,
showCaption: true,
showUpload: true,//是否顯示上傳按鈕
showRemove: false,//是否顯示刪除按鈕
showCaption: true,//是否顯示輸入框
showPreview:true,
showCancel:true,
dropZoneEnabled: false,
maxFileCount: 10,
initialPreviewShowDelete:true,
msgFilesTooMany: "選擇上傳的文件數量 超過允許的最大數值!",
initialPreview: previewJson,
previewFileIcon: '<i class="fa fa-file"></i>',
allowedPreviewTypes: ['image'],
previewFileIconSettings: {
'docx': '<i class="fa fa-file-word-o text-primary"></i>',
'xlsx': '<i class="fa fa-file-excel-o text-success"></i>',
'pptx': '<i class="fa fa-file-powerpoint-o text-danger"></i>',
'pdf': '<i class="fa fa-file-pdf-o text-danger"></i>',
'zip': '<i class="fa fa-file-archive-o text-muted"></i>',
'sql': '<i class="fa fa-file-word-o text-primary"></i>',
},
initialPreviewConfig: preConfigList
}).off('filepreupload').on('filepreupload', function() {
// alert(data.url);
}).on("fileuploaded", function(event, outData) {
//文件上傳成功後返回的數據, 此處我只保存返回文件的id
var result = outData.response.id;
// 對應的input 賦值
$('#htestlogo').val(result).change();
});
}
4. 後台java保存文件部分代碼
@RequestMapping(value="/uploadFile",method=RequestMethod.POST)
@ResponseBody
public Object uploadFile(HttpServletRequest request, HttpServletResponse response) throws ServletException, IOException {
//轉型為MultipartHttpServletRequest
MultipartHttpServletRequest multipartRequest = (MultipartHttpServletRequest)request;
//獲取文件到map容器中
Map<String,MultipartFile> fileMap = multipartRequest.getFileMap();
//獲取頁面傳遞過來的路徑參數
folderPath = request.getParameter("folder");
String rootPath = BaseConfig.uploadPath;
String filePath = rootPath + folderPath+"/";
//文件上傳並返回map容器,map存儲了文件信息
FileModel fileModel = UploadifyUtils.uploadFiles(filePath,fileMap);
boolean flag = service.add(fileModel);
if(flag){
String result = fileModel.getId()+";"+fileModel.getFilePath()+";"+fileModel.getName()+";"+fileModel.getFilePath();
Map map = new HashMap<>();
map.put("id", fileModel.getId());
//返回文件保存ID
//response.getWriter().write(map);
return map;
}
return null;
}
說明:該段代碼為獲取上傳文件的部分信息, 如文件名,上傳的路徑 等,將文件信息保存到表中,對應對象為 FileModel 。
5.上傳完成後重新刷新該組件即可。
最終展示效果 :
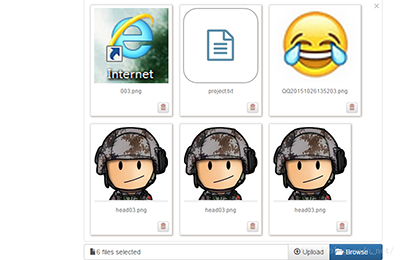
說明:此處指針對txt文件類型判斷, 其余的doc,ppt裡面有對應的展示圖標,只須在判斷是添加對應樣式即可
附:根據路徑過去/下載文件代碼:
/**
* 文件下載
*
* @param savePath
* 保存目錄
* @param name
* 文件原名
* @param file
* 保存時的名稱 包含後綴
* @param request
* @param response
* @return
*/
public static String down(String savePath, String name, String fileName, HttpServletRequest request,
HttpServletResponse response) {
try {
String path = savePath + "/" + name;
File file = new File(path);
if (!file.exists()) {
// 不存在
request.setAttribute("name", fileName);
return "download_error";// 返回下載文件不存在
}
response.setContentType("application/octet-stream");
// 根據不同浏覽器 設置response的Header
String userAgent = request.getHeader("User-Agent").toLowerCase();
if (userAgent.indexOf("msie") != -1) {
// ie浏覽器
// System.out.println("ie浏覽器");
response.addHeader("Content-Disposition", "attachment;filename=" + URLEncoder.encode(name, "utf-8"));
} else {
response.addHeader("Content-Disposition",
"attachment;filename=" + new String(name.getBytes("utf-8"), "ISO8859-1"));
}
response.addHeader("Content-Length", "" + file.length());
// 以流的形式下載文件
InputStream fis = new BufferedInputStream(new FileInputStream(path));
byte[] buffer = new byte[fis.available()];
fis.read(buffer);
fis.close();
//response.setContentType("image/*"); // 設置返回的文件類型
OutputStream toClient = response.getOutputStream();
OutputStream bos = new BufferedOutputStream(toClient);
//BufferedWriter bw = new BufferedWriter(new OutputStreamWriter(bos));
bos.write(buffer);
//bw.close();
bos.close();
toClient.close();
return null;
} catch (Exception e) {
e.printStackTrace();
//response.reset();
return "exception";// 返回異常頁面
} finally {
/* if (toClient != null) {
try {
toClient.close();
} catch (IOException e) {
e.printStackTrace();
}
}*/
}
}
附:
UploadifyUtils.uploadFiles 部分代碼
public static FileModel uploadFiles(String savePath,Map<String,MultipartFile> fiLeMap){
//上傳文件
//附件模型對象
FileModel fm=new FileModel();
try {
File file = new File(savePath);
//判斷文件夾是否存在,如果不存在則創建文件夾
makeDir(file);
if(fiLeMap!=null){
for(Map.Entry<String, MultipartFile> entity:fiLeMap.entrySet()){
MultipartFile f = entity.getValue();
if(f!=null&&!f.isEmpty()){
String uuid=UploadifyUtils.getUUID();//uuid作為保存時的文件名
String ext=UploadifyUtils.getFileExt(f.getOriginalFilename());//獲取文件後綴
//保存文件
File newFile = new File(savePath+"/"+uuid+"."+ext);
f.transferTo(newFile);
fm.setFileName(f.getOriginalFilename());
fm.setName(uuid+"."+ext);
fm.setFilePath(savePath);//保存路徑
fm.setExt(ext);
fm.setSize(f.getSize());
}
}
}
return fm;
}catch (Exception e) {
log.error(e);
return null;
}
}
以上所述是小編給大家介紹的Bootstrap中的fileinput 多圖片上傳編輯,希望對大家有所幫助,如果大家有任何疑問請給我留言,小編會及時回復大家的。在此也非常感謝大家對網站的支持!
小編推薦
熱門推薦