最後的效果如下:
這裡面有幾個功能,第一個是支持拖拽,第二個壓縮,第三個是裁剪編輯,第四個是上傳和上傳進度顯示,下面依次介紹每個功能的實現:
1. 拖拽顯示圖片
拖拽讀取的功能主要是要兼聽html5的drag事件,這個沒什麼好說的,查查api就知道怎麼做了,主要在於怎麼讀取用戶拖過來的圖片並把它轉成base64以在本地顯示。
var handler = {
init: function($container){
//需要把dragover的默認行為禁掉,不然會跳頁
$container.on("dragover", function(event){
event.preventDefault();
});
$container.on("drop", function(event){
event.preventDefault();
//這裡獲取拖過來的圖片文件,為一個File對象
var file = event.originalEvent.dataTransfer.files[0];
handler.handleDrop($(this), file);
});
}
}
varhandler={
init:function($container){
//需要把dragover的默認行為禁掉,不然會跳頁
$container.on("dragover",function(event){
event.preventDefault();
});
$container.on("drop",function(event){
event.preventDefault();
//這裡獲取拖過來的圖片文件,為一個File對象
varfile=event.originalEvent.dataTransfer.files[0];
handler.handleDrop($(this),file);
});
}
}
代碼第10行獲取圖片文件,然後傳給11行處理。
如果使用input,則監聽input的change事件:
$container.on("change", "input[type=file]", function(event){
if(!this.value) return;
var file = this.files[0];
handler.handleDrop($(this).closest(".container"), file);
this.value = "";
});
$container.on("change","input[type=file]",function(event){
if(!this.value)return;
varfile=this.files[0];
handler.handleDrop($(this).closest(".container"),file);
this.value="";
});
代碼第3行,獲取File對象,同樣傳給handleDrop進行處理
接下來在handleDrop函數裡,讀取file的內容,並把它轉成base64的格式:
handleDrop: function($container, file){
var $img = $container.find("img");
handler.readImgFile(file, $img, $container);
},
handleDrop:function($container,file){
var$img= $container.find("img");
handler.readImgFile(file,$img,$container);
},
我的代碼裡面又調了個readImgFile的函數,helper的函數比較多,主要是為了拆解大模塊和復用小模塊。
在readImgFile裡面讀取圖片文件內容:
使用FileReader讀取文件 JavaScript
readImgFile: function(file, $img, $container){
var reader = new FileReader(file);
//檢驗用戶是否選則是圖片文件
if(file.type.split("/")[0] !== "image"){
util.toast("You should choose an image file");
return;
}
reader.onload = function(event) {
var base64 = event.target.result;
handler.compressAndUpload($img, base64, file, $container);
}
reader.readAsDataURL(file);
}
readImgFile:function(file,$img,$container){
varreader=newFileReader(file);
//檢驗用戶是否選則是圖片文件
if(file.type.split("/")[0]!=="image"){
util.toast("You should choose an image file");
return;
}
reader.onload=function(event){
varbase64=event.target.result;
handler.compressAndUpload($img,base64,file, $container);
}
reader.readAsDataURL(file);
}
這裡是通過FileReader讀取文件內容,調的是readAsDataURL,這個api能夠把二進制圖片內容轉成base64的格式,讀取完之後會觸發onload事件,在onload裡面進行顯示和上傳:
//獲取圖片base64內容
var base64 = event.target.result;
//如果圖片大於1MB,將body置半透明
if(file.size > ONE_MB){
$("body").css("opacity", 0.5);
}
//因為這裡圖片太大會被卡一下,整個頁面會不可操作
$img.attr("src", baseUrl);
//還原
if(file.size > ONE_MB){
$("body").css("opacity", 1);
}
//然後再調一個壓縮和上傳的函數
handler.compressAndUpload($img, file, $container);
//獲取圖片base64內容
varbase64=event.target.result;
//如果圖片大於1MB,將body置半透明
if(file.size>ONE_MB){
$("body").css("opacity",0.5);
}
//因為這裡圖片太大會被卡一下,整個頁面會不可操作
$img.attr("src",baseUrl);
//還原
if(file.size>ONE_MB){
$("body").css("opacity",1);
}
//然後再調一個壓縮和上傳的函數
handler.compressAndUpload($img,file,$container);
如果圖片有幾個Mb的,在上面第8行展示的時候被卡一下,筆者曾嘗試使用web worker多線程解決,但是由於多線程沒有window對象,更不能操作dom,所以不能很好地解決這個問題。采取了一個補償措施:通過把頁面變虛告訴用戶現在在處理之中,頁面不可操作,稍等一會
這裡還會有一個問題,就是ios系統拍攝的照片,如果不是橫著拍的,展示出來的照片旋轉角度會有問題,如下一張豎著拍的照片,讀出來是這樣的:
即不管你怎麼拍,ios實際存的圖片都是橫著放的,因此需要用戶自己手動去旋轉。旋轉的角度放在了exif的數據結構裡面,把這個讀出來就知道它的旋轉角度了,用一個EXIF的庫讀取:
讀取exif的信息
readImgFile: function(file, $img, $container){
EXIF.getData(file, function(){
var orientation = this.exifdata.Orientation,
rotateDeg = 0;
//如果不是ios拍的照片或者是橫拍的,則不用處理,直接讀取
if(typeof orientation === "undefined" || orientation === 1){
//原本的readImgFile,添加一個rotateDeg的參數
handler.doReadImgFile(file, $img, $container, rotateDeg);
}
//否則用canvas旋轉一下
else{
rotateDeg = orientation === 6 ? 90*Math.PI/180 :
orientation === 8 ? -90*Math.PI/180 :
orientation === 3 ? 180*Math.PI/180 : 0;
handler.doReadImgFile(file, $img, $container, rotateDeg);
}
});
}

readImgFile:function(file,$img,$container){
EXIF.getData(file,function(){
varorientation=this.exifdata.Orientation,
rotateDeg=0;
//如果不是ios拍的照片或者是橫拍的,則不用處理,直接讀取
if(typeoforientation==="undefined"||orientation===1){
//原本的readImgFile,添加一個rotateDeg的參數
handler.doReadImgFile(file,$img,$container,rotateDeg);
}
//否則用canvas旋轉一下
else{
rotateDeg=orientation===6?90*Math.PI/180:
orientation===8?-90*Math.PI/180:
orientation===3?180*Math.PI/180:0;
handler.doReadImgFile(file,$img,$container,rotateDeg);
}
});
}
知道角度之後,就可以用canvas處理了,在下面的壓縮圖片進行說明,因為壓縮也要用到canvas
2. 壓縮圖片
壓縮圖片可以借助canvas,canvas可以很方便地實現壓縮,其原理是把一張圖片畫到一個小的畫布,然後再把這個畫布的內容導出base64,就能夠拿到一張被壓小的圖片了:
//設定圖片最大壓縮寬度為1500px
var maxWidth = 1500;
var resultImg = handler.compress($img[0], maxWidth, file.type);
//設定圖片最大壓縮寬度為1500px
varmaxWidth=1500;
varresultImg=handler.compress($img[0],maxWidth,file.type);
compress函數進行壓縮,在這個函數裡首先創建一個canvas對象,然後計算這個畫布的大小:
compress: function(img, maxWidth, mimeType){
//創建一個canvas對象
var cvs = document.createElement('canvas');
var width = img.naturalWidth,
height = img.naturalHeight,
imgRatio = width / height;
//如果圖片維度超過了給定的maxWidth 1500,
//為了保持圖片寬高比,計算畫布的大小
if(width > maxWidth){
width = maxWidth;
height = width / imgRatio;
}
cvs.width = width;
cvs.height = height;
}
compress:function(img,maxWidth,mimeType){
//創建一個canvas對象
varcvs=document.createElement('canvas');
varwidth=img.naturalWidth,
height=img.naturalHeight,
imgRatio=width/height;
//如果圖片維度超過了給定的maxWidth 1500,
//為了保持圖片寬高比,計算畫布的大小
if(width>maxWidth){
width=maxWidth;
height=width/imgRatio;
}
cvs.width=width;
cvs.height=height;
}
接下來把大的圖片畫到一個小的畫布上,再導出:
//把大圖片畫到一個小畫布
var ctx = cvs.getContext("2d").drawImage(img, 0, 0, img.naturalWidth, img.naturalHeight, 0, 0, width, height);
//圖片質量進行適當壓縮
var quality = width >= 1500 ? 0.5 :
width > 600 ? 0.6 : 1;
//導出圖片為base64
var newImageData = cvs.toDataURL(mimeType, quality);
var resultImg = new Image();
resultImg.src = newImageData;
return resultImg;
//把大圖片畫到一個小畫布
varctx=cvs.getContext("2d").drawImage(img,0,0,img.naturalWidth,img.naturalHeight,0,0,width,height);
//圖片質量進行適當壓縮
varquality=width>=1500?0.5:
width>600?0.6:1;
//導出圖片為base64
varnewImageData=cvs.toDataURL(mimeType,quality);
varresultImg=newImage();
resultImg.src=newImageData;
returnresultImg;
最後一行返回了一個被壓縮過的小圖片,就可對這個圖片進行裁剪了。
在說明裁剪之前,由於第二點提到ios拍的照片需要旋轉一下,在壓縮的時候可以一起處理。也就是說,如果需要旋轉的話,那麼畫在canvas上面就把它旋轉好了:
var ctx = cvs.getContext("2d");
var destX = 0,
destY = 0;
if(rotateDeg){
ctx.translate(cvs.width / 2, cvs.height / 2);
ctx.rotate(rotateDeg);
destX = -width / 2,
destY = -height / 2;
}
ctx.drawImage(img, 0, 0, img.naturalWidth, img.naturalHeight, destX, destY, width, height);
varctx=cvs.getContext("2d");
vardestX=0,
destY=0;
if(rotateDeg){
ctx.translate(cvs.width/2,cvs.height/2);
ctx.rotate(rotateDeg);
destX=-width/2,
destY=-height/2;
}
ctx.drawImage(img,0,0,img.naturalWidth,img.naturalHeight,destX,destY,width,height);
這樣就解決了ios圖片旋轉的問題,得到一張旋轉和壓縮調節過的圖片之後,再用它進行裁剪和編輯
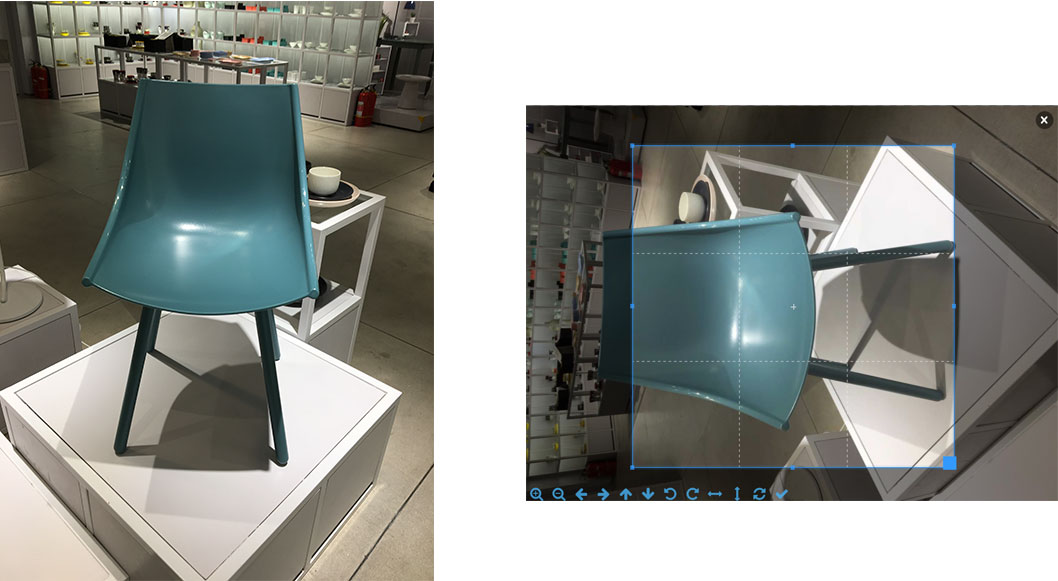
3. 裁剪圖片
裁剪圖片,上網找到了一個插件cropper,這個插件還是挺強大,支持裁剪、旋轉、翻轉,但是它並沒有對圖片真正的處理,只是記錄了用戶做了哪些變換,然後你自己再去處理。可以把變換的數據傳給後端,讓後端去處理。這裡我們在前端處理,因為我們不用去兼容IE8。
如下,我把一張圖片,旋轉了一下,同時翻轉了一下:
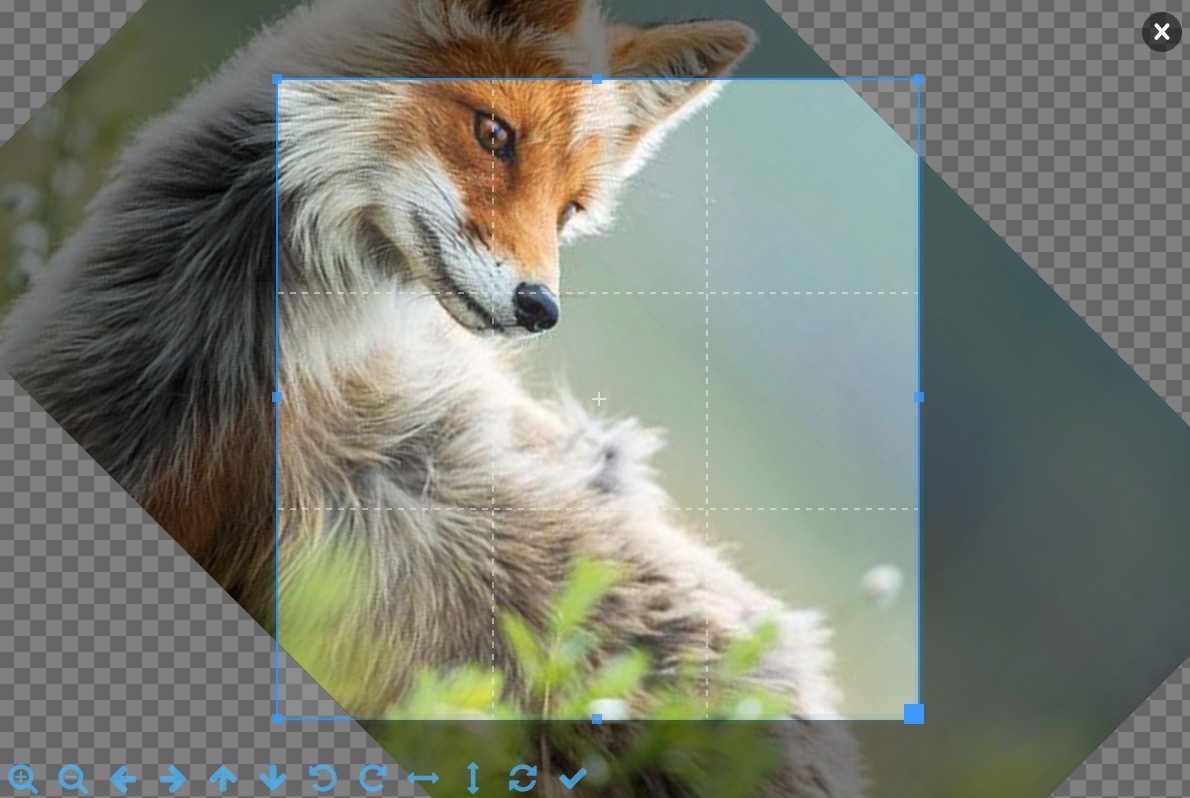
它的輸出是:
{
height: 319.2000000000001,
rotate: 45,
scaleX: -1,
scaleY: 1,
width: 319.2000000000001
x: 193.2462838120872
y: 193.2462838120872
}
{
height:319.2000000000001,
rotate:45,
scaleX:-1,
scaleY:1,
width:319.2000000000001
x:193.2462838120872
y:193.2462838120872
}
通過這些信息就知道了:圖片被左右翻轉了一下,同時順時針轉了45度,還知道裁剪選框的位置和大小。通過這些完整的信息就可以做一對一的處理。
在展示的時候,插件使用的是img標簽,設置它的css的transform屬性進行變換。真正的處理還是要借助canvas,這裡分三步說明:
1. 假設用戶沒有進行旋轉和翻轉,只是選了簡單地選了下區域裁剪了一下,那就簡單很多。最簡單的辦法就是創建一個canvas,它的大小就是選框的大小,然後根據起點x、y和寬高把圖片相應的位置畫到這個畫布,再導出圖片就可以了。由於考慮到需要翻轉,所以用第二種方法,創建一個和圖片一樣大小的canvas,把圖片原封不動地畫上去,然後把選中區域的數據imageData存起來,重新設置畫布的大小為選中框的大小,再把imageData畫上去,最後再導出就可以了:
var cvs = document.createElement('canvas');
var img = $img[0];
var width = img.naturalWidth,
height = img.naturalHeight;
cvs.width = width;
cvs.height = height;
var ctx = cvs.getContext("2d");
var destX = 0,
destY = 0;
ctx.drawImage(img, destX, destY);
//把選中框裡的圖片內容存起來
var imageData = ctx.getImageData(cropOptions.x, cropOptions.y, cropOptions.width, cropOptions.height);
cvs.width = cropOptions.width;
cvs.height = cropOptions.height;
//然後再畫上去
ctx.putImageData(imageData, 0, 0);
varcvs=document.createElement('canvas');
varimg=$img[0];
varwidth=img.naturalWidth,
height=img.naturalHeight;
cvs.width=width;
cvs.height=height;
varctx=cvs.getContext("2d");
vardestX=0,
destY=0;
ctx.drawImage(img,destX,destY);
//把選中框裡的圖片內容存起來
varimageData=ctx.getImageData(cropOptions.x,cropOptions.y,cropOptions.width,cropOptions.height);
cvs.width=cropOptions.width;
cvs.height=cropOptions.height;
//然後再畫上去
ctx.putImageData(imageData,0,0);
代碼14行,通過插件給的數據,保存選中區域的圖片數據,18行再把它畫上去
2. 如果用戶做了翻轉,用上面的結構很容易可以實現,只需要在第11行drawImage之前對畫布做一下翻轉變化:
canvas flip實現 JavaScript
//fip
if(cropOptions.scaleX === -1 || cropOptions.scaleY === -1){
destX = cropOptions.scaleX === -1 ? width * -1 : 0; // Set x position to -100% if flip horizontal
destY = cropOptions.scaleY === -1 ? height * -1 : 0; // Set y position to -100% if flip vertical
ctx.scale(cropOptions.scaleX, cropOptions.scaleY);
}
ctx.drawImage(img, destX, destY);
//fip
if(cropOptions.scaleX===-1||cropOptions.scaleY===-1){
destX=cropOptions.scaleX===-1?width*-1:0; // Set x position to -100% if flip horizontal
destY=cropOptions.scaleY===-1?height*-1:0; // Set y position to -100% if flip vertical
ctx.scale(cropOptions.scaleX,cropOptions.scaleY);
}
ctx.drawImage(img,destX,destY);
其它的都不用變,就可以實現上下左右翻轉了,難點在於既要翻轉又要旋轉
3. 兩種變換疊加沒辦法直接通過變化canvas的坐標,一次性drawImage上去。還是有兩種辦法,第一種是用imageData進行數學變換,計算一遍得到imageData裡面,從第一行到最後一行每個像素新的rgba值是多少,然後再畫上去;第二種辦法,就是創建第二個canvas,第一個canvas作翻轉,把它的結果畫到第二個canvas,然後再旋轉,最後導到。由於第二種辦法相對比較簡單,我們采取第二種辦法:
同上,在第一個canvas畫完之後:
實現旋轉、翻轉結合 JavaScript
ctx.drawImage(img, destX, destY);
//rotate
if(cropOptions.rotate !== 0){
var newCanvas = document.createElement("canvas"),
deg = cropOptions.rotate / 180 * Math.PI;
//旋轉之後,導致畫布變大,需要計算一下
newCanvas.width = Math.abs(width * Math.cos(deg)) + Math.abs(height * Math.sin(deg));
newCanvas.height = Math.abs(width * Math.sin(deg)) + Math.abs(height * Math.cos(deg));
var newContext = newCanvas.getContext("2d");
newContext.save();
newContext.translate(newCanvas.width / 2, newCanvas.height / 2);
newContext.rotate(deg);
destX = -width / 2,
destY = -height / 2;
//將第一個canvas的內容在經旋轉後的坐標系畫上來
newContext.drawImage(cvs, destX, destY);
newContext.restore();
ctx = newContext;
cvs = newCanvas;
}
ctx.drawImage(img,destX,destY);
//rotate
if(cropOptions.rotate!==0){
varnewCanvas=document.createElement("canvas"),
deg=cropOptions.rotate/180*Math.PI;
//旋轉之後,導致畫布變大,需要計算一下
newCanvas.width=Math.abs(width*Math.cos(deg))+Math.abs(height*Math.sin(deg));
newCanvas.height=Math.abs(width*Math.sin(deg))+Math.abs(height*Math.cos(deg));
varnewContext=newCanvas.getContext("2d");
newContext.save();
newContext.translate(newCanvas.width/2,newCanvas.height/2);
newContext.rotate(deg);
destX=-width/2,
destY=-height/2;
//將第一個canvas的內容在經旋轉後的坐標系畫上來
newContext.drawImage(cvs,destX,destY);
newContext.restore();
ctx=newContext;
cvs=newCanvas;
}
將第二步的代碼插入第一步,再將第三步的代碼插入第二步,就是一個完整的處理過程了。
最後再介紹下上傳
4. 文件上傳和上傳進度
文件上傳只能通過表單提交的形式,編碼方式為multipart/form-data,這個我在《三種上傳文件不刷新頁面的方法討論:iframe/FormData/FileReader》已做詳細討論,可以通過寫一個form標簽進行提交,但也可以模擬表單提交的格式,表單提交的格式在那篇文章已提及。
首先創建一個ajax請求:
JavaScript
var xhr = new XMLHttpRequest();
xhr.open('POST', upload_url, true);
var boundary = 'someboundary';
xhr.setRequestHeader('Content-Type', 'multipart/form-data; boundary=' + boundary);
varxhr=newXMLHttpRequest();
xhr.open('POST',upload_url,true);
varboundary='someboundary';
xhr.setRequestHeader('Content-Type','multipart/form-data; boundary='+boundary);
並設置編碼方式,然後拼表單格式的數據進行上傳:
ajax上傳 JavaScript
var data = img.src;
data = data.replace('data:' + file.type + ';base64,', '');
xhr.sendAsBinary([
//name=data
'--' + boundary,
'Content-Disposition: form-data; name="data"; filename="' + file.name + '"',
'Content-Type: ' + file.type, '',
atob(data), '--' + boundary,
//name=docName
'--' + boundary,
'Content-Disposition: form-data; name="docName"', '',
file.name,
'--' + boundary + '--'
].join('\r\n'));

vardata=img.src;
data=data.replace('data:'+file.type+';base64,','');
xhr.sendAsBinary([
//name=data
'--'+boundary,
'Content-Disposition: form-data; name="data"; filename="'+file.name+'"',
'Content-Type: '+file.type,'',
atob(data),'--'+boundary,
//name=docName
'--'+boundary,
'Content-Disposition: form-data; name="docName"','',
file.name,
'--'+boundary+'--'
].join('\r\n'));
表單數據不同的字段是用boundary的隨機字符串分隔的。拼好之後用sendAsBinary發出去,在調這個函數之前先監聽下它的事件,包括
1) 上傳的進度:
上傳進度 JavaScript
xhr.upload.onprogress = function(event){
if(event.lengthComputable) {
duringCallback((event.loaded / event.total) * 100);
}
};
xhr.upload.onprogress=function(event){
if(event.lengthComputable){
duringCallback((event.loaded/event.total)*100);
}
};
這裡凋duringCallback的回調函數,給這個回調函數傳了當前進度的參數,用這個參數就可以設置進度條的過程了。進度條可以自己實現,或者直接上網找一個,隨便一搜就有了。
2) 成功和失敗:
成功和失敗回調 JavaScript
xhr.onreadystatechange = function() {
if (this.readyState == 4){
if (this.status == 200) {
successCallback(this.responseText);
}else if (this.status >= 400) {
if (errorCallback && errorCallback instanceof Function) {
errorCallback(this.responseText);
}
}
}
};
xhr.onreadystatechange=function(){
if(this.readyState==4){
if(this.status==200){
successCallback(this.responseText);
}elseif(this.status>=400){
if(errorCallback&& errorCallback instanceofFunction){
errorCallback(this.responseText);
}
}
}
};
這個上傳功能參考了一個JIC插件
至此整個功能就拆解說明完了,上面的代碼可以兼容到IE10,FileReader的api到IE10才兼容,問題應該不大,因為微軟都已經放棄了IE11以下的浏覽器,為啥我們還要去兼容呢。
這個東西一來減少了後端的壓力,二來不用和後端來回交互,對用戶來說還是比較好的,除了上面說的一個地方會被卡一下之外。核心代碼已在上面說明,完整代碼和demo就不再放出來了。
以上所述是小編給大家介紹的WEB前端實現裁剪上傳圖片功能,希望對大家有所幫助,如果大家有任何疑問請給我留言,小編會及時回復大家的。在此也非常感謝大家對網站的支持!