H5移動端圖片壓縮上傳開發流程
編輯:關於JavaScript
H5活動已十分普遍,其中一種形式是讓用戶上傳圖片進行參與。移動端上傳圖片,用戶一般都是上傳手機相冊中的圖片,而現在手機的拍攝質量越來越高,一般單張照片的尺寸都在3M左右。若直接上傳,十分耗流量,並且體驗效果也不佳。因此需要在上傳之前,先進行本地壓縮。
接下來總結在h5活動的開發中圖片壓縮上傳的功能,並標記其中踩過的幾個坑,分享給大家:
小白區必看
對於移動端圖片上傳毫無概念的話,需要補充FileReader、Blob、FormData三個概念。
1.FileReader
定義
使用FileReader對象,web應用程序可以異步的讀取存儲在用戶計算機上的文件(或者原始數據緩沖)內容,可以使用File對象或者Blob對象來指定所要處理的文件或數據.
方法
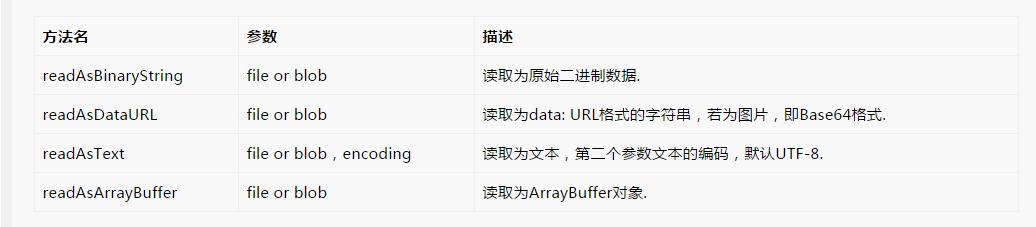
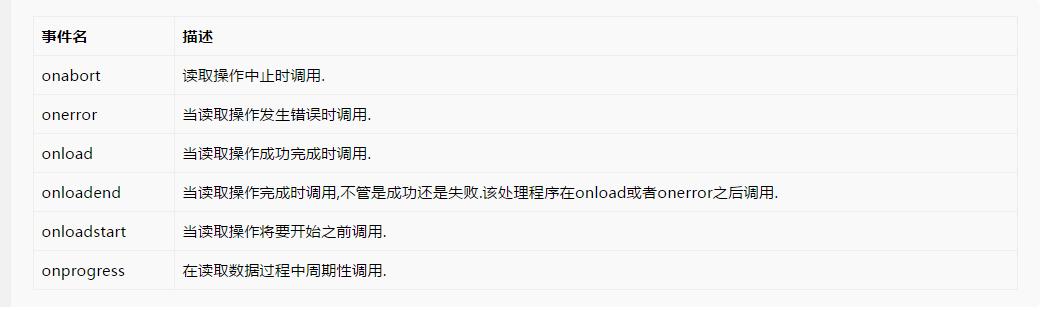
事件處理程序
使用
var fileReader = new FileReader();
fileReader.onload = function() {
 var url = this.result;
}
//or
fileReader.onload = function(e) {
 var url = e.target.result;
}
2.Blob
BLOB(binary large object),二進制大對象,是一個可以存儲二進制文件的容器。
3.FormData
利用FormData對象,你可以使用一系列的鍵值對來模擬一個完整的表單,然後使用XMLHttpRequest發送這個”表單”.
正題
移動端圖片壓縮上傳過程:
1)input file上傳圖片,使用FileReader讀取用戶上傳的圖片;
2)圖片數據傳入img對象,將img繪制到canvas上,再使用canvas.toDataURL進行壓縮;
3)獲取壓縮後的base64格式圖片數據,轉成二進制,塞入formdata,最後通過xmlHttpRequest提交formdata;
1.獲取圖片數據
fileEle.onchange = function() {
  if (!this.files.length) return;

  //以下考慮的是單圖情況
  var _ua = window.navigator.userAgent;
  var _simpleFile = this.files[0];

  //判斷是否為圖片
  if (!/\/(?:jpeg|png|gif)/i.test(_simpleFile.type)) return;

  //插件exif.js獲取ios圖片的方向信息
  var _orientation;
  if(_ua.indexOf('iphone') > 0) {
    EXIF.getData(_simpleFile,function(){
      _orientation=EXIF.getTag(this,'Orientation');
    });
  }

  //1.讀取文件,通過FileReader,將圖片文件轉化為DataURL,即data:img/png;base64,開頭的url,可以直接放在image.src中;
  var _reader = new FileReader(),
    _img = new Image(),
    _url;

  _reader.onload = function() {
    _url = this.result;
    _img.url = _url;
    _img.onload = function () {
      var _data = compress(_img);
      uploadPhoto(_data, _orientation);
    };
  };

  _reader.readAsDataURL(_simpleFile);
};
2.壓縮圖片
/**
 * 計算圖片的尺寸,根據尺寸壓縮
 * 1. iphone手機html5上傳圖片方向問題,借助exif.js
 * 2. 安卓UC浏覽器不支持 new Blob(),使用BlobBuilder
 * @param {Object} _img     圖片
 * @param {Number} _orientation 照片信息
 * @return {String}       壓縮後base64格式的圖片
 */
function compress(_img, _orientation) {
  //2.計算符合目標尺寸寬高值,若上傳圖片的寬高都大於目標圖,對目標圖等比壓縮;如果有一邊小於,對上傳圖片等比放大。
  var _goalWidth = 750,         //目標寬度
    _goalHeight = 750,         //目標高度
    _imgWidth = _img.naturalWidth,   //圖片寬度
    _imgHeight = _img.naturalHeight,  //圖片高度
    _tempWidth = _imgWidth,      //放大或縮小後的臨時寬度
    _tempHeight = _imgHeight,     //放大或縮小後的臨時寬度
    _r = 0;              //壓縮比

  if(_imgWidth === _goalWidth && _imgHeight === _goalHeight) {

  } else if(_imgWidth > _goalWidth && _imgHeight > _goalHeight) {//寬高都大於目標圖,需等比壓縮
    _r = _imgWidth / _goalWidth;
    if(_imgHeight / _goalHeight < _r) {
      _r = _imgHeight / _goalHeight;
    }
    _tempWidth = Math.ceil(_imgWidth / _r);
    _tempHeight = Math.ceil(_imgHeight / _r);
  } else {
    if(_imgWidth < _goalWidth && _imgHeight < _goalHeight) {//寬高都小於
      _r = _goalWidth / _imgWidth;
      if(_goalHeight / _imgHeight < _r) {
        _r = _goalHeight / _imgHeight;
      }
    } else {
      if(_imgWidth < _goalWidth) {     //寬小於
        _r = _goalWidth / _imgWidth;
      } else{               //高小於
        _r = _goalHeight / _imgHeight;
      }
    }

    _tempWidth = Math.ceil(_imgWidth * _r);
    _tempHeight = Math.ceil(_imgHeight * _r);
  }

  //3.利用canvas對圖片進行裁剪,等比放大或縮小後進行居中裁剪
  var _canvas = e._$get('canvas-clip');
  if(!_canvas.getContext) return;

  var _context = _canvas.getContext('2d');
  _canvas.width = _tempWidth;
  _canvas.height = _tempHeight;
  var _degree;

  //ios bug,iphone手機上可能會遇到圖片方向錯誤問題
  switch(_orientation){
    //iphone橫屏拍攝,此時home鍵在左側
    case 3:
      _degree=180;
      _tempWidth=-_imgWidth;
      _tempHeight=-_imgHeight;
      break;
    //iphone豎屏拍攝,此時home鍵在下方(正常拿手機的方向)
    case 6:
      _canvas.width=_imgHeight;
      _canvas.height=_imgWidth;
      _degree=90;
      _tempWidth=_imgWidth;
      _tempHeight=-_imgHeight;
      break;
    //iphone豎屏拍攝,此時home鍵在上方
    case 8:
      _canvas.width=_imgHeight;
      _canvas.height=_imgWidth;
      _degree=270;
      _tempWidth=-_imgWidth;
      _tempHeight=_imgHeight;
      break;
  }
  if(window.navigator.userAgent.indexOf('iphone') > 0 && !!_degree) {
    _context.rotate(_degree*Math.PI/180);
    _context.drawImage(_img, 0, 0, _tempWidth, _tempHeight);
  } else {
    _context.drawImage(_img, 0, 0, _tempWidth, _tempHeight);
  }
  //toDataURL方法,可以獲取格式為"data:image/png;base64,***"的base64圖片信息;
  var _data = _canvas.toDataURL('image/jpeg');
  return _data;
}
3.上傳圖片
/**
 * 上傳圖片到NOS
 * @param {Object} _blog Blob格式的圖片
 * @return {Void}
 */
function uploadPhoto(_data) {
  //4.獲取canvas中的圖片信息
  //window.atob方法將其中的base64格式的圖片轉換成二進制字符串;若將轉換後的值直接賦值給Blob會報錯,需Uint8Array轉換:最後創建Blob對象;
  _data = _data.split(',')[1];
  _data = window.atob(_data);

  //如果不用ArrayBuffer,發送給服務器的圖片格式是[object Uint8Array],上傳失敗...
  var _buffer = new ArrayBuffer(_data.length);
  var _ubuffer = new Uint8Array(_buffer);
  for (var i = 0; i < _data.length; i++) {
    _ubuffer[i] = _data.charCodeAt(i);
  }

  // 安卓 UC浏覽器不支持 new Blob(),使用BlobBuilder
  var _blob;
  try {
    _blob = new Blob([_buffer], {type:'image/jpeg'});
  } catch(ee) {
    window.BlobBuilder = window.BlobBuilder || window.WebKitBlobBuilder || window.MozBlobBuilder || window.MSBlobBuilder;
    if (ee.name == 'TypeError' && window.BlobBuilder) {
      var _bb = new BlobBuilder();
      _bb.append(_buffer);
      _blob = _bb.getBlob('image/jpeg');
    }
  }

  var _suffix = 'jpg';
  if(_blob.type === 'image/jpeg') {
    _suffix = 'jpg';
  }

  //獲取NOStoken
  this.__cache._$requestDWRByGet({url: 'ImageBean.genTokens',param: [_suffix,'','','','1'],onload: function(_tokens) {
    _tokens = _tokens || [];
    var _token = _tokens[0];
    if(!_token || !_token.objectName || !_token.uploadToken){
      alert('token獲取失敗!');
      return false;
    }

    //上傳圖片到NOS
    var _objectName = _token.objectName,
      _uploadToken = _token.uploadToken,
      _bucketName = _token.bucketName;

    var _formData = new FormData();
    _formData.append('Object', _objectName);
    _formData.append('x-nos-token', _uploadToken);
    _formData.append('file',_blob);

    var _xhr;
    if (window.XMLHttpRequest) {
      _xhr = new window.XMLHttpRequest();
    } else if (window.ActiveXObject) {
      _xhr = new ActiveXObject("Microsoft.XMLHTTP");
    }

    _xhr.onreadystatechange = function() {
      if(_xhr.readyState === 4) {
        if((_xhr.status >= 200 && _xhr.status < 300) || _xhr.status === 304) {
          var _imgurl = "http://nos.netease.com/" + _bucketName + "/" + _objectName + "?imageView";
          var _newUrl = mb.x._$imgResize(_imgurl, 750, 750, 1, true);

          window.location.href = 'http://www.lofter.com/act/taxiu?op=effect&originImgUrl=' + _newUrl;
        }
      }
    };
    _xhr.open('POST', 'http://nos.netease.com/' + _bucketName, true);
    _xhr.send(_formData);
  }});
}
判斷iphone拍攝圖片方向的插件:exif
至此H5圖片壓縮上傳的流程結束。
以上就是本文的全部內容,希望對大家的學習有所幫助,也希望大家多多支持。
小編推薦
熱門推薦