Servlet實現文件上傳,可多文件上傳示例
編輯:關於JavaScript
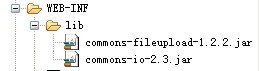
一、Servlet實現文件上傳,需要添加第三方提供的jar包
下載地址:
1) commons-fileupload-1.2.2-bin.zip: 點擊打開鏈接
2) commons-io-2.3-bin.zip: 點擊打開鏈接
接著把這兩個jar包放到 lib文件夾下:
二:文件上傳的表單提交方式必須是POST方式,
編碼類型:enctype="multipart/form-data",默認是 application/x-www-form-urlencoded
比如:
<form action="FileUpLoad"enctype="multipart/form-data"method="post">
三、舉例:
1.fileupload.jsp
<%@ page language="java" import="javautil*" pageEncoding="UTF-8"%>
<%
String path = requestgetContextPath();
String basePath = requestgetScheme()+"://"+requestgetServerName()+":"+requestgetServerPort()+path+"/";
%>

<!DOCTYPE HTML PUBLIC "-//W3C//DTD HTML 01 Transitional//EN">
<html>
 <head>
  <base href="<%=basePath%>">

  <title>My JSP 'fileuploadjsp' starting page</title>

  <meta http-equiv="pragma" content="no-cache">
  <meta http-equiv="cache-control" content="no-cache">
  <meta http-equiv="expires" content="0">
  <meta http-equiv="keywords" content="keyword1,keyword2,keyword3">
  <meta http-equiv="description" content="This is my page">
  <!--
  <link rel="stylesheet" type="text/css" href="stylescss">
  -->

 </head>

 <body>
   <!-- enctype 默認是 application/x-www-form-urlencoded -->
   <form action="FileUpLoad" enctype="multipart/form-data" method="post" >

        用戶名:<input type="text" name="usename"> <br/>
        上傳文件:<input type="file" name="file1"><br/>
       上傳文件: <input type="file" name="file2"><br/>
       <input type="submit" value="提交"/>
   </form>
 </body>
</html>
2.實際處理文件上傳的 FileUpLoad.java
package comservletfileupload;
import javaioFile;
import javaio*;
import javaioIOException;
import javaioPrintWriter;
import javautilList;
import javaxservletServletException;
import javaxservlethttpHttpServlet;
import javaxservlethttpHttpServletRequest;
import javaxservlethttpHttpServletResponse;
import orgapachecommonsfileuploadFileItem;
import orgapachecommonsfileuploadFileUploadException;
import orgapachecommonsfileuploaddiskDiskFileItemFactory;
import orgapachecommonsfileuploadservletServletFileUpload;

/**
 *
 * @author Administrator
 * 文件上傳
 * 具體步驟:
 * 1)獲得磁盤文件條目工廠 DiskFileItemFactory 要導包
 * 2) 利用 request 獲取 真實路徑 ,供臨時文件存儲,和 最終文件存儲 ,這兩個存儲位置可不同,也可相同
 * 3)對 DiskFileItemFactory 對象設置一些 屬性
 * 4)高水平的API文件上傳處理 ServletFileUpload upload = new ServletFileUpload(factory);
 * 目的是調用 parseRequest(request)方法 獲得 FileItem 集合list ,
 *
 * 5)在 FileItem 對象中 獲取信息,  遍歷, 判斷 表單提交過來的信息 是否是 普通文本信息 另做處理
 * 6)
 *  第一種 用第三方 提供的 itemwrite( new File(path,filename) ); 直接寫到磁盤上
 *  第二種 手動處理
 *
 */
public class FileUpLoad extends HttpServlet {

  public void doPost(HttpServletRequest request, HttpServletResponse response)
      throws ServletException, IOException {

    requestsetCharacterEncoding("utf-8"); //設置編碼

    //獲得磁盤文件條目工廠
    DiskFileItemFactory factory = new DiskFileItemFactory();
    //獲取文件需要上傳到的路徑
    String path = requestgetRealPath("/upload");

    //如果沒以下兩行設置的話,上傳大的 文件 會占用 很多內存,
    //設置暫時存放的 存儲室 , 這個存儲室,可以和 最終存儲文件 的目錄不同
    /**
     * 原理 它是先存到 暫時存儲室,然後在真正寫到 對應目錄的硬盤上,
     * 按理來說 當上傳一個文件時,其實是上傳了兩份,第一個是以 tem 格式的
     * 然後再將其真正寫到 對應目錄的硬盤上
     */
    factorysetRepository(new File(path));
    //設置 緩存的大小,當上傳文件的容量超過該緩存時,直接放到 暫時存儲室
    factorysetSizeThreshold(1024*1024) ;

    //高水平的API文件上傳處理
    ServletFileUpload upload = new ServletFileUpload(factory);


    try {
      //可以上傳多個文件
      List<FileItem> list = (List<FileItem>)uploadparseRequest(request);

      for(FileItem item : list)
      {
        //獲取表單的屬性名字
        String name = itemgetFieldName();

        //如果獲取的 表單信息是普通的 文本 信息
        if(itemisFormField())
        {
          //獲取用戶具體輸入的字符串 ,名字起得挺好,因為表單提交過來的是 字符串類型的
          String value = itemgetString() ;

          requestsetAttribute(name, value);
        }
        //對傳入的非 簡單的字符串進行處理 ,比如說二進制的 圖片,電影這些
        else
        {
          /**
           * 以下三步,主要獲取 上傳文件的名字
           */
          //獲取路徑名
          String value = itemgetName() ;
          //索引到最後一個反斜槓
          int start = valuelastIndexOf("\\");
          //截取 上傳文件的 字符串名字,加1是 去掉反斜槓,
          String filename = valuesubstring(start+1);

          requestsetAttribute(name, filename);

          //真正寫到磁盤上
          //它拋出的異常 用exception 捕捉

          //itemwrite( new File(path,filename) );//第三方提供的

          //手動寫的
          OutputStream out = new FileOutputStream(new File(path,filename));

          InputStream in = itemgetInputStream() ;

          int length = 0 ;
          byte [] buf = new byte[1024] ;

          Systemoutprintln("獲取上傳文件的總共的容量:"+itemgetSize());

          // inread(buf) 每次讀到的數據存放在  buf 數組中
          while( (length = inread(buf) ) != -1)
          {
            //在  buf 數組中 取出數據 寫到 (輸出流)磁盤上
            outwrite(buf, 0, length);

          }

          inclose();
          outclose();
        }
      }


    } catch (FileUploadException e) {
      // TODO Auto-generated catch block
      eprintStackTrace();
    }
    catch (Exception e) {
      // TODO Auto-generated catch block

      //eprintStackTrace();
    }


    requestgetRequestDispatcher("filedemojsp")forward(request, response);


  }

}

System.out.println("獲取上傳文件的總共的容量:"+item.getSize());
3.filedemo.jsp
<%@ page language="java" import="javautil*" pageEncoding="UTF-8"%>
<%
String path = requestgetContextPath();
String basePath = requestgetScheme()+"://"+requestgetServerName()+":"+requestgetServerPort()+path+"/";
%>

<!DOCTYPE HTML PUBLIC "-//W3C//DTD HTML 01 Transitional//EN">
<html>
 <head>
  <base href="<%=basePath%>">

  <title>My JSP 'filedemojsp' starting page</title>

  <meta http-equiv="pragma" content="no-cache">
  <meta http-equiv="cache-control" content="no-cache">
  <meta http-equiv="expires" content="0">
  <meta http-equiv="keywords" content="keyword1,keyword2,keyword3">
  <meta http-equiv="description" content="This is my page">
  <!--
  <link rel="stylesheet" type="text/css" href="stylescss">
  -->

 </head>

 <body>

  用戶名:${requestScopeusename } <br/>
  文件:${requestScopefile1 }<br/>
  ${requestScopefile2 }<br/>
  <!-- 把上傳的圖片顯示出來 -->
  <img alt="go" src="upload/<%=(String)requestgetAttribute("file1")%> " />


 </body>
</html>
4結果頁面:

以上就是本文的全部內容,希望對大家的學習有所幫助,也希望大家多多支持。
小編推薦
熱門推薦