組件簡介
組件系統是Vue.js其中一個重要的概念,它提供了一種抽象,讓我們可以使用獨立可復用的小組件來構建大型應用,任意類型的應用界面都可以抽象為一個組件樹:
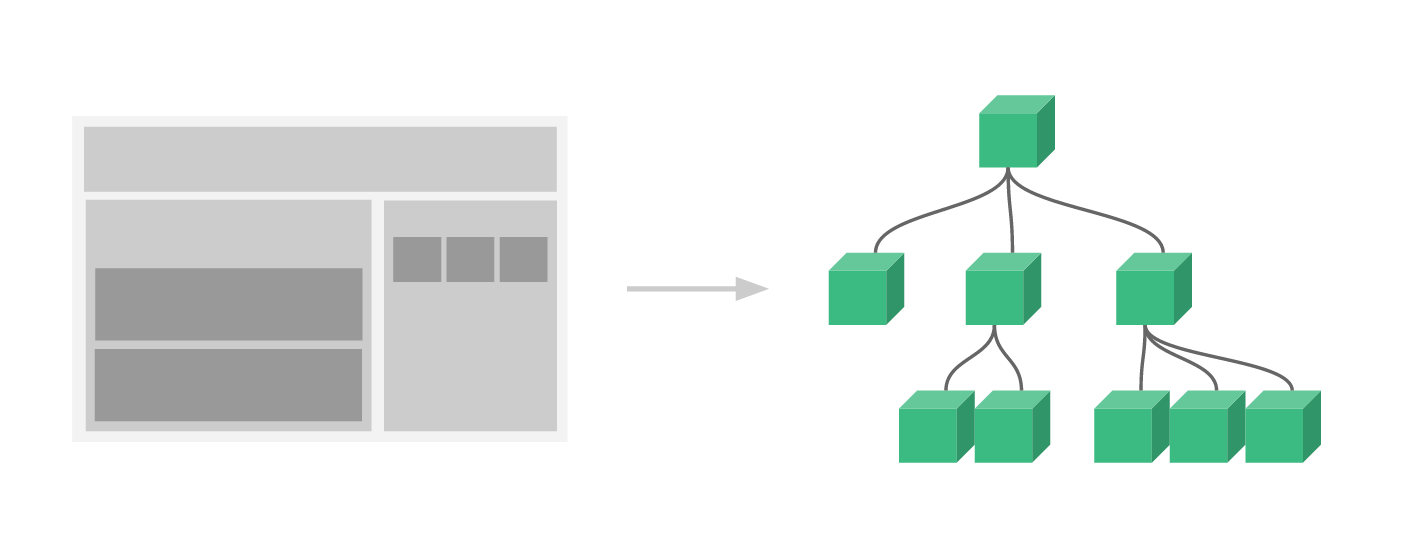
那麼什麼是組件呢?
組件可以擴展HTML元素,封裝可重用的HTML代碼,我們可以將組件看作自定義的HTML元素。
由於組件的篇幅較大,我將會把組件的入門知識分為兩篇來講解,這樣也便於各位看官們快速消化。
組件的創建和注冊
基本步驟
Vue.js的組件的使用有3個步驟:創建組件構造器、注冊組件和使用組件。
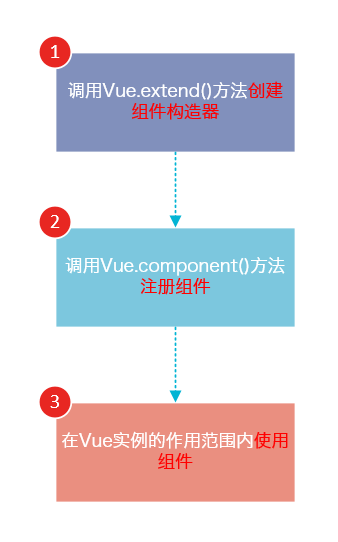
下面的代碼演示了這3個步驟:
<!DOCTYPE html>
<html>
  <body>
    <div id="app">
      <!-- 3. #app是Vue實例掛載的元素,應該在掛載元素范圍內使用組件-->
      <my-component></my-component>
    </div>
  </body>
  <script src="js/vue.js"></script>
  <script>

    // 1.創建一個組件構造器
    var myComponent = Vue.extend({
      template: '<div>This is my first component!</div>'
    })

    // 2.注冊組件,並指定組件的標簽,組件的HTML標簽為<my-component>
    Vue.component('my-component', myComponent)

    new Vue({
      el: '#app'
    });

  </script>
</html>
運行結果如下:
可以看到,使用組件和使用普通的HTML元素沒什麼區別。
理解組件的創建和注冊
我們用以下幾個步驟來理解組件的創建和注冊:
1. Vue.extend()是Vue構造器的擴展,調用Vue.extend()創建的是一個組件構造器,而不是一個具體的組件實例。
2. Vue.extend()構造器有一個選項對象,選項對象的template屬性用於定義組件要渲染的HTML。
3. 使用Vue.component()注冊組件時,需要提供2個參數,第1個參數時組件的標簽,第2個參數是組件構造器。
4. Vue.component()方法內部會調用組件構造器,創建一個組件實例。
5. 組件應該掛載到某個Vue實例下,否則它不會生效。
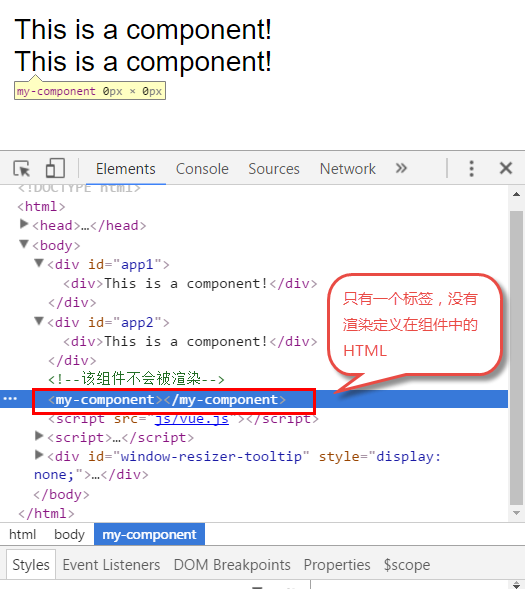
請注意第5點,以下代碼在3個地方使用了<my-component>標簽,但只有#app1和#app2下的<my-component>標簽才起到作用。
<!DOCTYPE html>
<html>
  <body>
    <div id="app1">
      <my-component></my-component>
    </div>

    <div id="app2">
      <my-component></my-component>
    </div>

    <!--該組件不會被渲染-->
    <my-component></my-component>
  </body>
  <script src="js/vue.js"></script>
  <script>
    var myComponent = Vue.extend({
      template: '<div>This is a component!</div>'
    })

    Vue.component('my-component', myComponent)

    var app1 = new Vue({
      el: '#app1'
    });

    var app2 = new Vue({
      el: '#app2'
    })
  </script>
</html>
全局注冊和局部注冊
調用Vue.component()注冊組件時,組件的注冊是全局的,這意味著該組件可以在任意Vue示例下使用。
如果不需要全局注冊,或者是讓組件使用在其它組件內,可以用選項對象的components屬性實現局部注冊。
上面的示例可以改為局部注冊的方式:
<!DOCTYPE html>
<html>
  <body>
    <div id="app">
      <!-- 3. my-component只能在#app下使用-->
      <my-component></my-component>
    </div>
  </body>
  <script src="js/vue.js"></script>
  <script>
    // 1.創建一個組件構造器
    var myComponent = Vue.extend({
      template: '<div>This is my first component!</div>'
    })

    new Vue({
      el: '#app',
      components: {
        // 2. 將myComponent組件注冊到Vue實例下
        'my-component' : myComponent
      }
    });
  </script>
</html>
由於my-component組件是注冊在#app元素對應的Vue實例下的,所以它不能在其它Vue實例下使用。
<div id="app2">
  <!-- 不能使用my-component組件,因為my-component是一個局部組件,它屬於#app-->
  <my-component></my-component>
</div>

<script>
  new Vue({
    el: '#app2'
  });
</script>
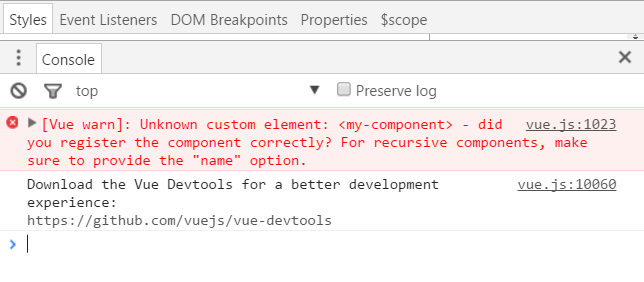
如果你這樣做了,浏覽器會提示一個錯誤:
父組件和子組件
我們可以在組件中定義並使用其他組件,這就構成了父子組件的關系。
<!DOCTYPE html>
<html>
  <body>
    <div id="app">
      <parent-component>
      </parent-component>
    </div>
  </body>
  <script src="js/vue.js"></script>
  <script>

    var Child = Vue.extend({
      template: '<p>This is a child component!</p>'
    })

    var Parent = Vue.extend({
      // 在Parent組件內使用<child-component>標簽
      template :'<p>This is a Parent component</p><child-component></child-component>',
      components: {
        // 局部注冊Child組件,該組件只能在Parent組件內使用
        'child-component': Child
      }
    })

    // 全局注冊Parent組件
    Vue.component('parent-component', Parent)

    new Vue({
      el: '#app'
    })

  </script>
</html>
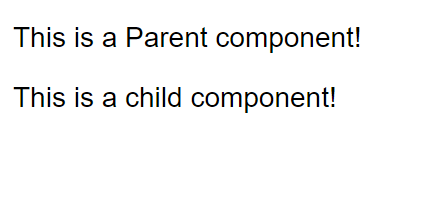
這段代碼的運行結果如下:
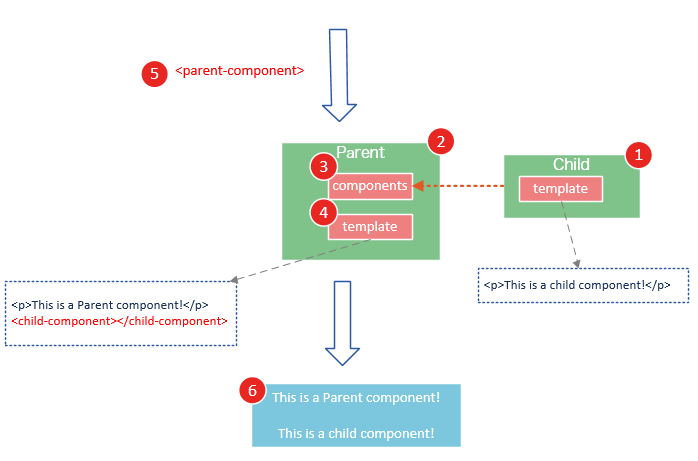
我們分幾個步驟來理解這段代碼:
1.var Child = Vue.extend(...)定義一了個Child組件構造器
2.var Parent = Vue.extend(...)定義一個Parent組件構造器
3.components: { 'child-component': Child },將Child組件注冊到Parent組件,並將Child組件的標簽設置為child-component。
4.template :'<p>This is a Parent component</p><child-component></child-component>',在Parent組件內以標簽的形式使用Child組件。
5.Vue.component('parent-component', Parent) 全局注冊Parent組件
6.在頁面中使用<parent-component>標簽渲染Parent組件的內容,同時Child組件的內容也被渲染出來
Child組件是在Parent組件中注冊的,它只能在Parent組件中使用,確切地說:子組件只能在父組件的template中使用。
請注意下面兩種子組件的使用方式是錯誤的:
1. 以子標簽的形式在父組件中使用
<div id="app">
  <parent-component>
    <child-component></child-component>
  </parent-component>
</div>
為什麼這種方式無效呢?因為當子組件注冊到父組件時,Vue.js會編譯好父組件的模板,模板的內容已經決定了父組件將要渲染的HTML。
<parent-component>…</parent-component>相當於運行時,它的一些子標簽只會被當作普通的HTML來執行,<child-component></child-component>不是標准的HTML標簽,會被浏覽器直接忽視掉。
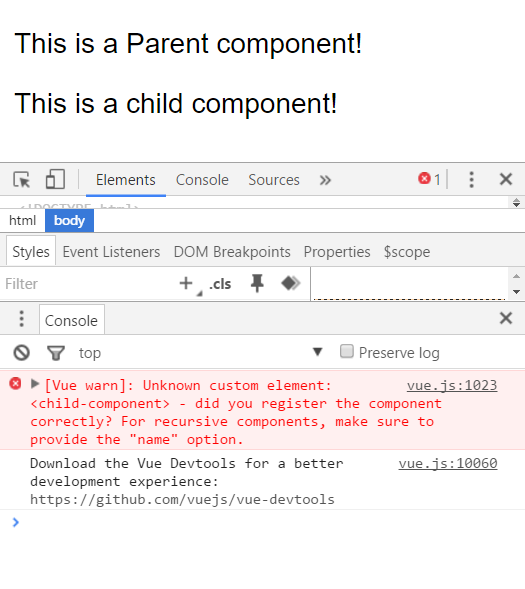
2. 在父組件標簽外使用子組件
<div id="app">
  <parent-component>
  </parent-component>
  <child-component>
  </child-component>
</div>
運行這段代碼,浏覽器會提示以下錯誤
組件注冊語法糖
以上組件注冊的方式有些繁瑣,Vue.js為了簡化這個過程,提供了注冊語法糖。
使用Vue.component()直接創建和注冊組件:
// 全局注冊,my-component1是標簽名稱
Vue.component('my-component1',{
  template: '<div>This is the first component!</div>'
})

var vm1 = new Vue({
  el: '#app1'
})
Vue.component()的第1個參數是標簽名稱,第2個參數是一個選項對象,使用選項對象的template屬性定義組件模板。
使用這種方式,Vue在背後會自動地調用Vue.extend()。
在選項對象的components屬性中實現局部注冊:
var vm2 = new Vue({
  el: '#app2',
  components: {
    // 局部注冊,my-component2是標簽名稱
    'my-component2': {
      template: '<div>This is the second component!</div>'
    },
    // 局部注冊,my-component3是標簽名稱
    'my-component3': {
      template: '<div>This is the third component!</div>'
    }
  }
})
使用script或template標簽
盡管語法糖簡化了組件注冊,但在template選項中拼接HTML元素比較麻煩,這也導致了HTML和JavaScript的高耦合性。
慶幸的是,Vue.js提供了兩種方式將定義在JavaScript中的HTML模板分離出來。
使用<script>標簽
<!DOCTYPE html>
<html>
  <body>
    <div id="app">
      <my-component></my-component>
    </div>

    <script type="text/x-template" id="myComponent">
      <div>This is a component!</div>
    </script>
  </body>
  <script src="js/vue.js"></script>
  <script>

    Vue.component('my-component',{
      template: '#myComponent'
    })

    new Vue({
      el: '#app'
    })

  </script>
</html>
template選項現在不再是HTML元素,而是一個id,Vue.js根據這個id查找對應的元素,然後將這個元素內的HTML作為模板進行編譯。
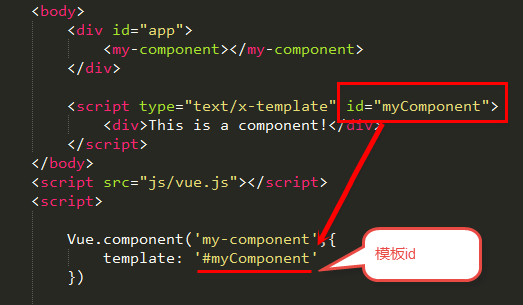
注意:使用<script>標簽時,type指定為text/x-template,意在告訴浏覽器這不是一段js腳本,浏覽器在解析HTML文檔時會忽略<script>標簽內定義的內容。
使用<template>標簽
如果使用<template>標簽,則不需要指定type屬性。
<!DOCTYPE html>
<html>
  <head>
    <meta charset="UTF-8">
    <title></title>
  </head>
  <body>
    <div id="app">
      <my-component></my-component>
    </div>

    <template id="myComponent">
      <div>This is a component!</div>
    </template>
  </body>
  <script src="js/vue.js"></script>
  <script>

    Vue.component('my-component',{
      template: '#myComponent'
    })

    new Vue({
      el: '#app'
    })

  </script>
</html>
在理解了組件的創建和注冊過程後,我建議使用<script>或<template>標簽來定義組件的HTML模板。
這使得HTML代碼和JavaScript代碼是分離的,便於閱讀和維護。
另外,在Vue.js中,可創建.vue後綴的文件,在.vue文件中定義組件,這個內容我會在後面的文章介紹。
組件的el和data選項
傳入Vue構造器的多數選項也可以用在 Vue.extend() 或Vue.component()中,不過有兩個特例: data 和el。
Vue.js規定:在定義組件的選項時,data和el選項必須使用函數。
下面的代碼在執行時,浏覽器會提出一個錯誤
Vue.component('my-component', {
  data: {
    a: 1
  }
})

另外,如果data選項指向某個對象,這意味著所有的組件實例共用一個data。
我們應當使用一個函數作為 data 選項,讓這個函數返回一個新對象:
Vue.component('my-component', {
  data: function(){
    return {a : 1}
  }
})
使用props
組件實例的作用域是孤立的。這意味著不能並且不應該在子組件的模板內直接引用父組件的數據。可以使用 props 把數據傳給子組件。
props基礎示例
下面的代碼定義了一個子組件my-component,在Vue實例中定義了data選項。
var vm = new Vue({
  el: '#app',
  data: {
    name: 'keepfool',
    age: 28
  },
  components: {
    'my-component': {
      template: '#myComponent',
      props: ['myName', 'myAge']
    }
  }
})
為了便於理解,你可以將這個Vue實例看作my-component的父組件。
如果我們想使父組件的數據,則必須先在子組件中定義props屬性,也就是props: ['myName', 'myAge']這行代碼。
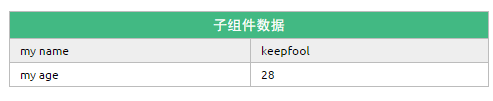
定義子組件的HTML模板:
<template id="myComponent">
  <table>
    <tr>
      <th colspan="2">
        子組件數據
      </th>
    </tr>
    <tr>
      <td>my name</td>
      <td>{{ myName }}</td>
    </tr>
    <tr>
      <td>my age</td>
      <td>{{ myAge }}</td>
    </tr>
  </table>
</template>
將父組件數據通過已定義好的props屬性傳遞給子組件:
<div id="app">
  <my-component v-bind:my-name="name" v-bind:my-age="age"></my-component>
</div>
注意:在子組件中定義prop時,使用了camelCase命名法。由於HTML特性不區分大小寫,camelCase的prop用於特性時,需要轉為 kebab-case(短橫線隔開)。例如,在prop中定義的myName,在用作特性時需要轉換為my-name。
這段程序的運行結果如下:
父組件是如何將數據傳給子組件的呢?相信看了下面這圖,也許你就能很好地理解了。
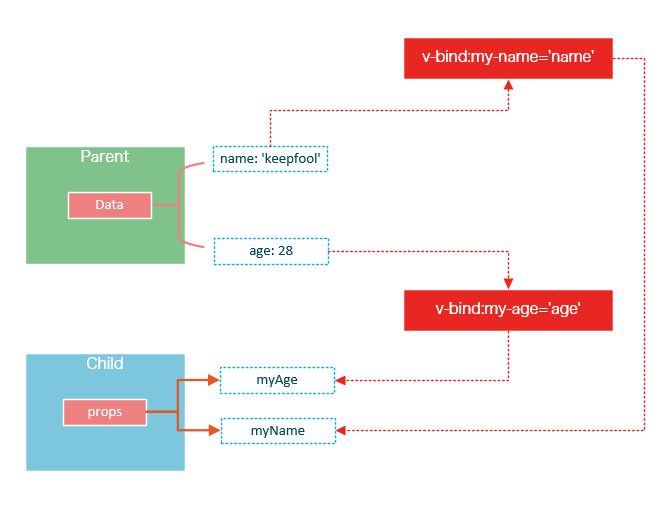
在父組件中使用子組件時,通過以下語法將數據傳遞給子組件:
<child-component v-bind:子組件prop="父組件數據屬性"></child-component>
prop的綁定類型
單向綁定
既然父組件將數據傳遞給了子組件,那麼如果子組件修改了數據,對父組件是否會有所影響呢?
我們將子組件模板和頁面HTML稍作更改:
<div id="app">

  <table>
    <tr>
      <th colspan="3">父組件數據</td>
    </tr>
    <tr>
      <td>name</td>
      <td>{{ name }}</td>
      <td><input type="text" v-model="name" /></td>
    </tr>
    <tr>
      <td>age</td>
      <td>{{ age }}</td>
      <td><input type="text" v-model="age" /></td>
    </tr>
  </table>

  <my-component v-bind:my-name="name" v-bind:my-age="age"></my-component>
</div>

<template id="myComponent">
  <table>
    <tr>
      <th colspan="3">子組件數據</td>
    </tr>
    <tr>
      <td>my name</td>
      <td>{{ myName }}</td>
      <td><input type="text" v-model="myName" /></td>
    </tr>
    <tr>
      <td>my age</td>
      <td>{{ myAge }}</td>
      <td><input type="text" v-model="myAge" /></td>
    </tr>
  </table>
</template>
運行這個頁面,我們做兩個小試驗:
1. 在頁面上修改子組件的數據
修改了子組件的數據,沒有影響父組件的數據。
2. 在頁面上修改父組件的數據
修改了父組件的數據,同時影響了子組件。
prop默認是單向綁定:當父組件的屬性變化時,將傳導給子組件,但是反過來不會。這是為了防止子組件無意修改了父組件的狀態
雙向綁定
可以使用.sync顯式地指定雙向綁定,這使得子組件的數據修改會回傳給父組件。
<my-component v-bind:my-name.sync="name" v-bind:my-age.sync="age"></my-component>
單次綁定
可以使用.once顯式地指定單次綁定,單次綁定在建立之後不會同步之後的變化,這意味著即使父組件修改了數據,也不會傳導給子組件。
<my-component v-bind:my-name.once="name" v-bind:my-age.once="age"></my-component>
示例
為了盡快消化這些知識,我們來做一個小示例吧。
<!DOCTYPE html>
<html>

  <head>
    <meta charset="UTF-8">
    <title></title>
    <link rel="stylesheet" href="styles/demo.css" />
  </head>

  <body>
    <div id="app">
      <div id="searchBar">
        Search <input type="text" v-model="searchQuery" />
      </div>
      <simple-grid :data="gridData" :columns="gridColumns" :filter-key="searchQuery">
      </simple-grid>
    </div>

    <template id="grid-template">
      <table>
        <thead>
          <tr>
            <th v-for="col in columns">
              {{ col | capitalize}}
            </th>
          </tr>
        </thead>
        <tbody>
          <tr v-for="entry in data | filterBy filterKey">
            <td v-for="col in columns">
              {{entry[col]}}
            </td>
          </tr>
        </tbody>
      </table>
    </template>

  </body>
  <script src="js/vue.js"></script>
  <script>
    Vue.component('simple-grid', {
      template: '#grid-template',
      props: {
        data: Array,
        columns: Array,
        filterKey: String
      }
    })

    var demo = new Vue({
      el: '#app',
      data: {
        searchQuery: '',
        gridColumns: ['name', 'age', 'sex'],
        gridData: [{
          name: 'Jack',
          age: 30,
          sex: 'Male'
        }, {
          name: 'Bill',
          age: 26,
          sex: 'Male'
        }, {
          name: 'Tracy',
          age: 22,
          sex: 'Female'
        }, {
          name: 'Chris',
          age: 36,
          sex: 'Male'
        }]
      }
    })
  </script>

</html>
除了以上介紹的知識點,這個示例還用到了兩個知識點:
1. prop驗證
props: {
  data: Array,
  columns: Array,
  filterKey: String
}
這段代碼表示:父組件傳遞過來的data和columns必須是Array類型,filterKey必須是字符串類型。
更多prop驗證的介紹,請參考:官方文檔prop驗證
2. filterBy過濾器
可以根據指定的字符串過濾數據。
總結
使用組件的前提是創建並注冊組件,本篇文章詳細介紹了組件從創建到使用的步驟,並介紹了幾種不同的方式去創建和注冊組件;然後介紹了組件的props選項,它用於將父組件的數據傳遞給子組件,最後我們用一個小的示例演示了這些知識點。
- 上一頁:原生js實現彈出層登錄拖拽功能
- 下一頁:原生js編寫基於面向對象的分頁組件