Tutorial Requirements
Before you proceed, make sure you revIEw the requirements in this section.
Prerequisites
Creating a Project and Opening a Sample XML Schema
(Optional) Exploring XML Schemas
(Optional) Working With XML Schemas Using the Schema VIEw
Adding a New XML Schema File
In this procedure, you will add a new XML schema file, designSchema, in the mySchemaPrj project.
To add a new XML schema file:
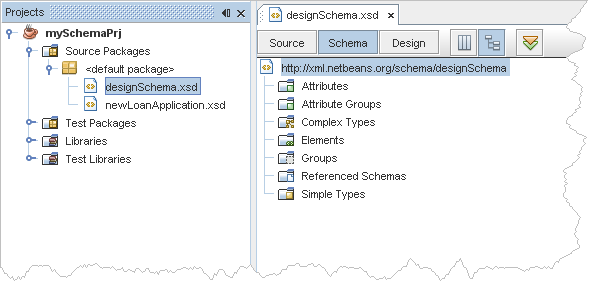
Open the mySchemaPrj project in the IDE.
In the Projects window, expand the mySchemaPrj project node and expand the SourcePackages node.
Select the <defaultpackage> node, right-click and choose New > Other.
The New File wizard opens.
In the Choose File Type page, in the CategorIEs list, select the XML node, then in the File Types list, select XML Schema and click Next.
In the Name and Location page of the wizard, in the File Name fIEld, type designSchema.
Accept the other default values (Folder: src, Target Namespace: http://XML.Netbeans.org/schema/designSchema), and click Finish.
In the Projects window, the <defaultpackage> node under the SourcePackages node now contains a subnode labeled designSchema.xsd. The Source Editor contains a tab for the XML schema file, designSchema.xsd.
Adding Components to the XML Schema
In this procedure, you will add elements and attributes to the XML schema file, designSchema.
To add a component to the XML schema:
If mySchemaPrj is not open in the IDE, open it now and then open the designSchema schema file.
Maximize the Schema vIEw by right-clicking the tab for the file and choosing Maximize Window from the pop-up menu.
Maximizing the vIEw lets you see more information about the schema.
In the Schema view, click the Design button to open the Design vIEw.
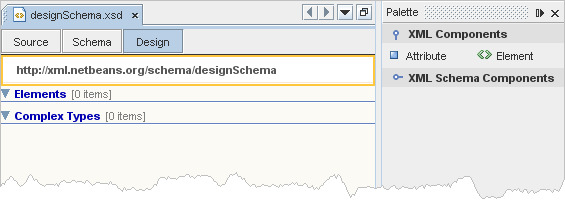
Note: If you do not see the Palette window, from the IDE main menu, choose Window > Palette.
In the XML Components section of the Palette, click the Element icon  and drag it just below the Elements node in the schema design area.
The editor only allows drag-and-drop to relevant areas of the schema design area and provides you with visual clues to let you know where you are adding the component.
 If you drag the selection over a component node or between nodes where you can add the new component, the cursor changes to an arrow with a small rectangle.
 If you drag the selection over a component node or between nodes where you cannot add the new component, the cursor changes to resemble a no entry sign.
The editor also provides textual hints in the form of tooltips.
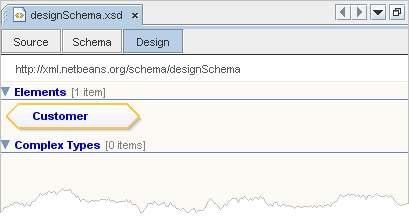
The IDE adds a newElement component below the Elements nodes in the schema design area.
Press Enter to accept the default name.
Choose Window > Properties to open the PropertIEs window.
You will use the PropertIEs window to change the name of the element.
In the schema design area of the Design vIEw, select newElement .
In the PropertIEs window, click the Name property, type Customer and press Enter.
The IDE updates the Design vIEw with the name you entered.
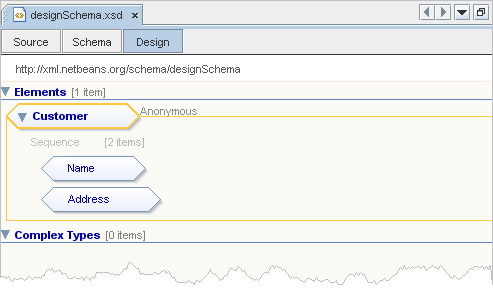
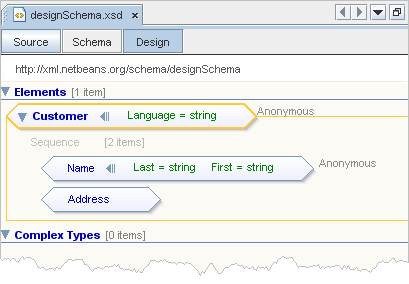
To add Name and Address elements to the Customer global element:
In the XML Components section of the Palette, click the Element icon and drag it onto the Customer element.
Notice that the IDE automatically adds a sequence component.
Type Name and press Enter.
In the XML Components section of the Palette, click the Element icon and drag it onto the Customer element.
Type Address and press Enter.
To add Last and First attributes to the Name element in the Customer global element:
In the XML Components section of the Palette, click the Attribute icon  and drag it onto the Name element.
The IDE adds an editable box to the right of the Name label in the Name node.
Type Last and press Enter.
In the XML Components section of the Palette, click the Attribute icon and drag it onto the Name element.
The IDE adds an editable box to the right of the Last attribute label in the Name node.
Type First and press Enter.
Click the Hide attributes icon,  , between the Name label and the attributes to hide the element's attributes.
The icon changes to a Show attributes icon,  , which you can then click to show the attributes again.

To add Language as an attribute to the Customer global element:
In the schema design area, select the Customer global element, right-click and choose Add > Attribute from the pop-up menu.
The IDE adds an editable box to the right of the Customer label in the Customer node.
Type Language and press Enter.
Editing XML Schema Components
In this procedure, you will use the PropertIEs dialog box and in-place editing to make changes to schema components.
To change the type of an attribute using the PropertIEs dialog box:
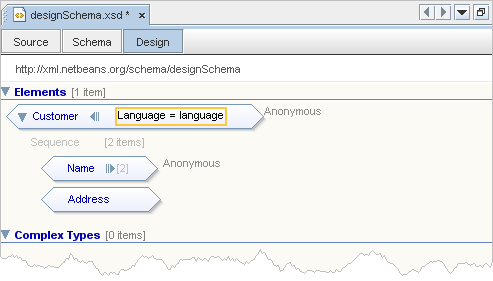
In the Design vIEw, select the Language attribute of the Customer global element.
Right-click and choose PropertIEs from the pop-up menu.
The PropertIEs dialog box opens.
In the Definition property, click the ellipsis button.
The Attribute's definition - Definition dialog box opens. The Built-in Types node is expanded and the string node is selected.
In the Built-in Types, select language.
Click OK.
The IDE updates the Definition property for the Language attribute. The schema design area is updated to reflect the updated Definition property of the Language attribute.
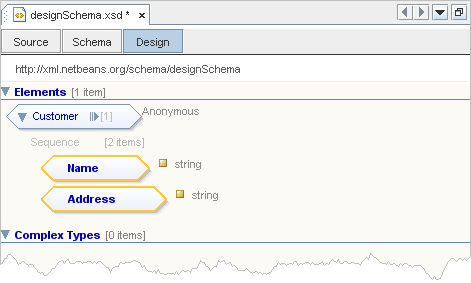
To restrict schema components to accept only a string in the instance document:
If the Properties window is not visible in the IDE, from the IDE main menu, choose Window > PropertIEs.
In the Design vIEw, expand the Customer node and select the Name node.
Hold down the Ctrl key and click the Address node to add the component to your selection.
In the PropertIEs window, click the ellipsis button in the Definition property.
The Element's definition - Definition dialog box opens.
Expand the Built-in Types node and select string.
Click OK.
The IDE updates the Definition property for the Name and Address components and also updates the Design vIEw.
To save your changes:
In the Projects window, select the mySchemaPrj node and choose File > Save All.
- 上一頁:Retrieving and Referencing External XML Resources
- 下一頁:Creating a Project and Opening a Sample XML Schema
相關文章
- background-color設置與代碼簡寫
- text-decoration:line-through CSS文字中劃線 刪除線 貫穿線樣式
- HTMl5的存儲方式sessionStorage和localStorage詳解
- CSS3 transform 屬性
- 使用jquery.easysector.js繪制百分比餅圖
- js 自帶的sort() 方法全面了解
- 深入理解js generator數據類型
- 完美解決ajax跨域請求下parsererror的錯誤
- Ajax 設置Access-Control-Allow-Origin實現跨域訪問
- Servlet 與 Ajax 交互一直報status=parsererror的解決辦法