隊列 是用於存儲等待處理的消息的臨時數據結構。Amazon Simple Queue Services (Amazon SQS) 是一個支持 Web 服務的高可用性可伸縮消息隊列。Amazon SQS 的主要益處包括:
基於雲的解決方案。由 Amazon 管理,不需使用私有基礎設施,也不需要專業支持知識。
基於 Internet。任何連接到 Internet 的客戶端都可以通過 Web 服務訪問該服務,因此支持業務到業務(B2B)集成。
冗余。該服務在多個服務器上存儲所有消息,以提供高可用性和容錯。
多個並發讀/寫。Amazon SQS 支持多個進程同時讀寫一個隊列,以及在處理窗口時鎖定消息,以避免兩個客戶端同時處理一條消息。
可配置。通過使用 Amazon SQS 服務,您可以根據存儲在隊列中的消息的處理需求設計和鎖定窗口。鎖定窗口能夠阻止兩個隊列讀取器同時處理同一個隊列項。對於處理時間更長的隊列項,則需要更長時間地鎖定窗口。鎖定窗口由可見性超時參數控制,您可以給每個隊列配置該參數。
易於使用的 API。它為常見的語言(包括 Java 和 Microsoft .Net 平台)提供 API 包裝器,以支持快速開發並無縫地集成到現有應用程序中。
低成本的解決方案。公司僅需為它們的 HTTP 請求使用的帶寬付費;Amazon SQS 不收取其他額外的費用。
在開始 Amazon SQS 開發之前,了解它的一些特征是非常有幫助的。如果不了解這些特征,您剛開始使用 Amazon SQS 時可能會碰到挫折,或感到困惑。
首先,Amazon 不能保證隊列項的處理順序。這意味著先進先出(first-in-first-out,FIFO)處理不得到保證,這在很多消息隊列實現中都很常見。Amazon 僅保證所有消息都分發出去。
Amazon SQS 的第二大特征是最終一致性。大型數據庫系統的主要特征是一致性、高可用性和可伸縮性。Amazon 不是關注所有 3 個特征,而是主要關注高可用性和可伸縮性,然後再以此為基礎提供最終的一致性。這意味著 Amazon 通過將所有消息發送到多個服務器來實現高可用性和可伸縮性。Amazon 保證最終會將所有消息分發出去,但不保證什麼時候分發它們。從實用的角度看,這意味著假如您向一個隊列發送 3 條消息,當下次嘗試接收這些消息時,不一定能收到所有 3 條消息。您可能在一個 Read 中收到所有 3 條消息,或在第一個 Read 中收到前兩條消息,在第二個 Read 中收到第三條消息。如果您持續地輪詢該隊列,最終肯定能收到所有 3 條消息。
為了開始使用 Amazon SQS,您必須根據自己使用的語言獲取 Amazon SQS 的 API 庫。Amazon 為所有常見的語言都提供了一個庫,比如 Perl、Microsoft Visual Basic®.Net、C#、Java 和 PHP。這些庫是開源的,並且易於使用。
通過 Java 語言使用 Amazon SQS
現在您首先學習如何使用 Java 語言創建隊列、發送消息和接收消息。第一步是創建一個 Amazon SQS 隊列。清單 1 中的代碼顯示了如何為 Amazon SQS 創建 HTTP 客戶端、實例化 CreateQueueRequest 對象和調用隊列創建請求。Access Key ID(由 20 個字母和數字組成)是請求身份驗證或讀取隊列項所需的密匙。為了創建或操作隊列項,您需要使用 Secret Access Key(由 40 個字母和數字組成)。注冊 Amazon 時就會收到這些密匙。
清單 1. 創建 Amazon SQS 隊列
String queueName = "TestQueue";

// create http clIEnt
AmazonSQS service = new AmazonSQSClIEnt(accessKeyId, secretAccessKey);

// instantiate create queue request
CreateQueueRequest request = new CreateQueueRequest();
request.setQueueName(queueName);
request.setDefaultVisibilityTimeout(30);

// execute create queue Operation and get the server response
System.out.print("Creating Queue: " + queueName);
CreateQueueResponse response = service.createQueue(request);
if (response.isSetCreateQueueResult()) {
 System.out.print("Create Queue Result:");
 CreateQueueResult createQueueResult = response.getCreateQueueResult();
 if (createQueueResult.isSetQueueUrl()) {
 System.out.print("Queue Url: " + createQueueResult.getQueueUrl());
 }
}
下一步是向最新創建的隊列發送一條消息。清單 2 中的代碼顯示了如何為 Amazon SQS 創建 HTTP 客戶端,以及如何向隊列發送一個簡單的消息。
清單 2. 向隊列發送消息
String queueName = "TestQueue";

// create http clIEnt
AmazonSQS service = new AmazonSQSClIEnt(accessKeyId, secretAccessKey);

// instantiate send message request
SendMessageRequest request = new SendMessageRequest();
request.setQueueName(queueName);
request.setMessageBody("Test SQS Message");

// execute the send message Operation and get the server response
SendMessageResponse response = service.sendMessage(request);
if (response.isSetSendMessageResult()) {
 System.out.print("Send Message Result: ");

 SendMessageResult sendMessageResult = response.getSendMessageResult();
 if (sendMessageResult.isSetMessageId()) {
 System.out.print("\tMessageId: " + sendMessageResult.getMessageId());
 }
}
現在,我們嘗試從隊列接收消息。清單 3 顯示了如何為 Amazon SQS 創建 HTTP 客戶端,以及如何從隊列接收消息。Message 包含來自隊列的消息並公開幾個關鍵方法:
getMessageId。返回消息的唯一標識符。您可以使用 isSetMessageId 確定消息 ID 是否已設置。
getReceiptHandle。將句柄返回給消息。句柄用於刪除消息。您可以使用 isSetReceiptHandle 確定消息句柄是否已設置。
getBody。以字符串的形式返回消息體。消息可以是純文本或 XML,您可以使用 isSetBody 確定消息體是否已設置。
清單 3. 從隊列接收消息
String queueName = "TestQueue";

// create http clIEnt
AmazonSQS service = new AmazonSQSClIEnt(accessKeyId, secretAccessKey);

// instantiate the receive message request
ReceiveMessageRequest request = new ReceiveMessageRequest();
request.setQueueName(queueName);
// the following two parameters are optional
request.setMaxNumberOfMessages(10); // set maximum number of messages to receive
request.setVisibilityTimeout(30); // set visibility window

// execute the receive messages Operation and get server response
ReceiveMessageResponse response = service.receiveMessage(request);

System.out.print("Receive Message Response:");

if (response.isSetReceiveMessageResult()) {
 ReceiveMessageResult receiveMessageResult = response.getReceiveMessageResult();
 Java.util.List<Message> messageList = receiveMessageResult.getMessage();
 for (Message message : messageList) {
 if (message.isSetMessageId()) {
  System.out.print("MessageId: " + message.getMessageId());
 }

 if (message.isSetReceiptHandle()) {
  System.out.print("ReceiptHandle: " + message.getReceiptHandle());
 }
 if (message.isSetBody()) {
  System.out.print("Body: " + message.getBody());
 }
}
通過 C# 使用 Amazon SQS
現在,您將使用 C# 將一個對象系列化到 XML,並將其作為 Amazon SQS 消息發送。
第一步是創建一個將被系列化的業務對象;清單 4 顯示了一個 Product 對象。公共屬性被控制 XML 系列化的屬性修飾。C# 屬性類似於 Java 注釋,定義屬性如何映射到 XML 元素或 XML 屬性。此外,這個類包含將對象實例系列化到 XML 的 ToXML() 方法。
清單 4. 創建用於系列化的業務對象
namespace Stewart.Test
{
/// <summary>
/// Product
/// </summary>
[XMLRoot(ElementName="Product")]
public class Product
{
 /// <summary>
 /// Product Name
 /// </summary>
 [XMLElement("ProductName")]
 public string ProductName;

 /// <summary>
 /// Product Price
 /// </summary>
 [XMLElement("ProductPrice")]
 public decimal ProductPrice;

 /// <summary>
 /// Quantity in stock
 /// </summary>
 [XMLElement("InStock")]
 public bool InStock;

 /// <summary>
 /// Product Id
 /// </summary>
 [XMLAttributeAttribute(AttributeName = "Id", DataType = "integer")]
 public string Id;

 /// <summary>
 /// Initializes a new instance of the <see cref="Product"/> class.
 /// </summary>
 public Product()
 {
 }

 /// <summary>
 /// Initializes a new instance of the <see cref="Product"/> class.
 /// </summary>
 /// <param name="productName">Name of the product.</param>
 /// <param name="productPrice">The product price.</param>
 public Product(string productName, decimal productPrice)
 {
 this.ProductName = productName;
 this.ProductPrice = productPrice;
 }

 /// <summary>
 /// Converts to XML.
 /// </summary>
 /// <returns></returns>
 public String ToXML()
 {
 StringBuilder output = new StringBuilder();

 // no name space
 XmlSerializerNamespaces ns = new XMLSerializerNamespaces();
 ns.Add("", "");

 // settings to omit XML declaration
 XmlWriterSettings settings = new XMLWriterSettings();
 settings.OmitXMLDeclaration = true;

 // finally serialize to string
 XmlWriter writer = XMLTextWriter.Create(output, settings);
 XmlSerializer serializer = new XMLSerializer(typeof(Product));
 serializer.Serialize(writer, this, ns);

 // return string containing XML document
 return output.ToString();
 }
}
接下來,發送 XML 消息。用於 Amazon SQS 的 Amazon C# API 在功能上類似於 Java API。清單 5 中的代碼顯示了如何使用 C# 發送消息。
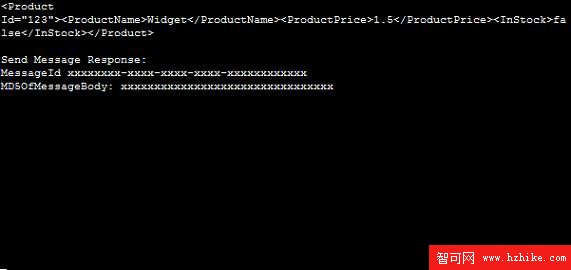
清單 5. 使用 C# 發送消息
Product prod = new Product("Widget", 1.5M);
string accessKeyId = ConfigurationSettings.APPSettings["AmazonAccessKeyID"];
string secretAccessKey = ConfigurationSettings.APPSettings["AmazonSecretAccessKey"];

AmazonSQS service = new AmazonSQSClIEnt(accessKeyId, secretAccessKey);
SendMessageRequest request = new SendMessageRequest();
request.MessageBody = prod.ToXML();
request.QueueName = "TestQueue";

SendMessageResponse response = service.SendMessage(request);
if (response.IsSetSendMessageResult())
{
 Console.WriteLine("Send Message Response: ");
 SendMessageResult sendMessageResult = response.SendMessageResult;
 if (sendMessageResult.IsSetMessageId())
 {
 Console.WriteLine(String.Format("MessageId {0}",
  sendMessageResult.MessageId));
 }
 if (sendMessageResult.IsSetMD5OfMessageBody())
 {
 Console.WriteLine(String.Format("MD5OfMessageBody: {0}",
  sendMessageResult.MD5OfMessageBody));
 }
}
圖 1 顯示了 清單 5 的輸出結果。
圖 1. 發送 XML 消息的輸出
圖片看不清楚?請點擊這裡查看原圖(大圖)。
最後一步是從隊列接收 XML 消息,並反系列化實例。清單 6 顯示了將 XML 消息反系列化到 Product 實例的代碼。
清單 6. 反序列化 XML 消息
Product prod = null;
string accessKeyId = ConfigurationSettings.APPSettings["AmazonAccessKeyID"];
string secretAccessKey = ConfigurationSettings.APPSettings["AmazonSecretAccessKey"];
AmazonSQS service = new AmazonSQSClIEnt(accessKeyId, secretAccessKey);
ReceiveMessageRequest request = new ReceiveMessageRequest();
request.QueueName = "TestQueue";
ReceiveMessageResponse response = service.ReceiveMessage(request);
if (response.IsSetReceiveMessageResult())
{
Console.WriteLine("Receive Message Result:");
ReceiveMessageResult receiveMessageResult = response.ReceiveMessageResult;
List<Message> messageList = receiveMessageResult.Message;
foreach (Message message in messageList)
{
if (message.IsSetMessageId())
{
Console.WriteLine(String.Format("MessageId: {0}",
message.MessageId));
}
if (message.IsSetBody())
{
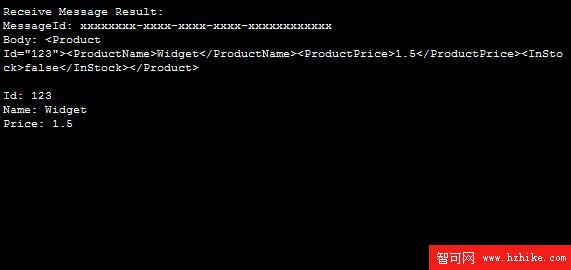
Console.WriteLine(string.Format("Body: {0}", message.Body));
String XML = message.Body;
StringReader sr = new StringReader(XML);
XmlSerializer serializer = new XMLSerializer(typeof(Product));
prod = (Product) serializer.Deserialize(sr);
Console.WriteLine(string.Format("Id: {0}", prod.Id));
Console.WriteLine(string.Format("Name: {0}", prod.ProductName));
Console.WriteLine(string.Format("Price: {0}", prod.ProductPrice));
}
}
}
圖 2 顯示了 清單 6 的輸出結果。
圖 2. 接收 XML 消息輸出
圖片看不清楚?請點擊這裡查看原圖(大圖)。
盡管以上的例子非常簡單,但是它們是非常強大的,因為您可以系列化一個對象,並向另一個不局限於本地物理網絡的應用程序發送消息。這裡沒有復雜的防火牆限制或安全性考慮事項。此外,不需要用相同的語言編寫消息的發送器和接收器,甚至不需要使用相同的平台。
技術概述和設計
這個示例解決方案包含需要集成業務流程的分銷商和制造商。分銷商 從制造商 處購買商品並出售給客戶。
當客戶需要商品時,分銷商使用 C# WinForm 客戶端提交一個客戶訂單。訂單提交程序將訂單細節存儲在一個本地 MySQL 數據庫中。該客戶端還允許用戶浏覽庫存、查看訂單和 Amazon SQS 隊列。
一般而言,分銷商的庫存能夠滿足客戶的訂購需求。如果庫存不足的話,分銷商會及時向制造商發送一個購買訂單。然後,當物品已經發出時,制造商發送回一個訂單匯總。所有這些通信都使用 Amazon SQS 來完成。
分銷商的 Order Fulfillment 和 Inventory Management 服務也是使用 C# 構建的,它輪詢進入的商品和待處理的客戶訂單。當處理客戶訂單時發現商品庫存少於訂購數量,那麼將使用 Amazon SQS 向制造商發送一個購買訂單。隊列項的消息體是一個包含購買訂單的 XML 文檔。
制造商的 Order Processing Service 是基於 Java 平台構建的,它處理購買訂單隊列。當物品已經發出時,它將使用 Amazon SQS 向分銷商回復一條消息。該消息的消息體是包含訂單匯總的 XML 文檔。
圖 3 顯示了涉及到的系統。
圖 3. 解決方案概圖

創建 XML 模式
第一步是為在分銷商和制造商之間發送的消息定義 XML 模式。您需要兩個模式:一個購買訂單和一個訂單匯總。
清單 7 顯示了購買訂單的模式。
清單 7. 購買訂單模式
<?XML version="1.0" encoding="utf-8"?>
<xs:schema xmlns:xs="http://www.w3.org/2001/XMLSchema">
 <xs:element name="PurchaSEOrder">
  <xs:complexType>
   <xs:sequence>
    <xs:element name="Id" type="xs:string" minOccurs="0" />
    <xs:element name="OrderDate" type="xs:string" minOccurs="0" />
    <xs:element name="Company" minOccurs="0" maxOccurs="unbounded">
     <xs:complexType>
      <xs:sequence>
       <xs:element name="CompanyName" type="xs:string" minOccurs="0" />
       <xs:element name="StreetAddress" type="xs:string" minOccurs="0" />
       <xs:element name="City" type="xs:string" minOccurs="0" />
       <xs:element name="State" type="xs:string" minOccurs="0" />
       <xs:element name="ZipCode" type="xs:string" minOccurs="0" />
      </xs:sequence>
     </xs:complexType>
    </xs:element>
    <xs:element name="Vendor" minOccurs="0" maxOccurs="unbounded">
     <xs:complexType>
      <xs:sequence>
       <xs:element name="CompanyName" type="xs:string" minOccurs="0" />
       <xs:element name="StreetAddress" type="xs:string" minOccurs="0" />
       <xs:element name="City" type="xs:string" minOccurs="0" />
       <xs:element name="State" type="xs:string" minOccurs="0" />
       <xs:element name="ZipCode" type="xs:string" minOccurs="0" />
      </xs:sequence>
     </xs:complexType>
    </xs:element>
    <xs:element name="Items" minOccurs="0" maxOccurs="unbounded">
     <xs:complexType>
      <xs:sequence>
       <xs:element name="Item" minOccurs="0" maxOccurs="unbounded">
        <xs:complexType>
         <xs:attribute name="Id" type="xs:string" />
         <xs:attribute name="Name" type="xs:string" />
         <xs:attribute name="Quantity" type="xs:string" />
        </xs:complexType>
       </xs:element>
      </xs:sequence>
     </xs:complexType>
    </xs:element>
   </xs:sequence>
  </xs:complexType>
 </xs:element>
</xs:schema>
Purchase Order XML 模式包含下列關鍵元素:
表 1. 購買訂單模式中的關鍵元素
關鍵元素 描述 Id 包含 Purchase Order 的唯一標識符的字符串 OrderDate 包含 Purchase Order 日期的字符串 Company 包含分銷商的關鍵地址信息,包括公司名稱、街道地址、城市、州和郵政編碼 Vendor 包含制造商的關鍵地址信息,包括公司名稱、街道地址、城市、州和郵政編碼 Items 包含訂購商品的所有信息,包括商品 ID、商品名稱和數量清單 8 顯示了訂單匯總的模式。
清單 8. 訂單匯總模式
<?XML version="1.0" encoding="utf-8"?>
<xs:schema xmlns:xs="http://www.w3.org/2001/XMLSchema">
 <xs:element name="OrderSummary">
  <xs:complexType>
   <xs:sequence>
    <xs:element name="OrderId" type="xs:string" minOccurs="0" />
    <xs:element name="ReferenceId" type="xs:string" minOccurs="0" />
    <xs:element name="OrderDate" type="xs:string" minOccurs="0" />
    <xs:element name="CompanyAddress" minOccurs="0" maxOccurs="unbounded">
     <xs:complexType>
      <xs:sequence>
       <xs:element name="CompanyName" type="xs:string" minOccurs="0" />
       <xs:element name="StreetAddress" type="xs:string" minOccurs="0" />
       <xs:element name="City" type="xs:string" minOccurs="0" />
       <xs:element name="State" type="xs:string" minOccurs="0" />
       <xs:element name="ZipCode" type="xs:string" minOccurs="0" />
      </xs:sequence>
     </xs:complexType>
    </xs:element>
    <xs:element name="CustomerAddress" minOccurs="0" maxOccurs="unbounded">
     <xs:complexType>
      <xs:sequence>
       <xs:element name="CompanyName" type="xs:string" minOccurs="0" />
       <xs:element name="StreetAddress" type="xs:string" minOccurs="0" />
       <xs:element name="City" type="xs:string" minOccurs="0" />
       <xs:element name="State" type="xs:string" minOccurs="0" />
       <xs:element name="ZipCode" type="xs:string" minOccurs="0" />
      </xs:sequence>
     </xs:complexType>
    </xs:element>
    <xs:element name="Items" minOccurs="0" maxOccurs="unbounded">
     <xs:complexType>
      <xs:sequence>
       <xs:element name="Item" minOccurs="0" maxOccurs="unbounded">
        <xs:complexType>
         <xs:attribute name="ItemId" type="xs:string" />
         <xs:attribute name="ItemName" type="xs:string" />
         <xs:attribute name="Quantity" type="xs:string" />
        </xs:complexType>
       </xs:element>
      </xs:sequence>
     </xs:complexType>
    </xs:element>
   </xs:sequence>
  </xs:complexType>
 </xs:element>
</xs:schema>
Order Summary XML 模式包含下列關鍵元素:
表 2. 訂單匯總模式中的關鍵元素
Id 包含 Order Summary 的唯一標識符的字符串 ReferenceId 包含初始 Purchase Order 的 ID 的字符串 OrderDate 包含 Order Summary 日期的字符串 CustomerAddress 包含分銷商的關鍵地址信息,包括公司名稱、街道地址、城市、州和郵政編碼 VendorAddress 包含制造商的關鍵地址信息,包括公司名稱、街道地址、城市、州和郵政編碼 Items 包含訂購商品的所有信息,包括商品 ID、商品名稱和數量定義數據庫實體模型
接下來,我們定義數據庫模式。圖 4 顯示了數據庫實體模型。
圖 4. 數據庫實體模型
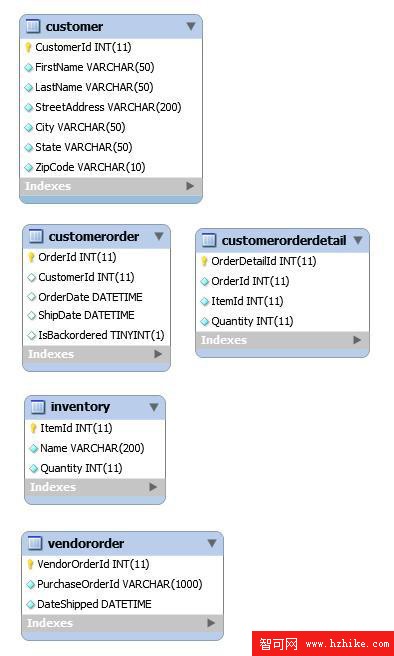
Reseller 數據實體包括以下內容:
Customer 包含訂單的客戶聯系信息。
CustomerOrder 包含客戶訂單的訂單信息。
CustomerOrderDetail 包含客戶訂單的商品細節。
Inventory 包含分銷商的庫存。
Manufacturer 數據實體為:
VendorOrder 跟蹤由制造商的 Order Processing Service 處理的購買訂單。
定義消息隊列
最後需要定義的組建是消息隊列。表 3 顯示了這個解決方案的消息隊列。
表 3. Amazon SMS 消息隊列
隊列名 可見性超時 描述 POQueue 30 秒 從分銷商發送給制造商的購買訂單消息 OSQueue 30 秒 從制造商發送給分銷商的訂單匯總消息