HTML頁面彈出居中可拖拽的自定義窗口層
編輯:JQuery特效代碼
使用DIV彈出窗口來動態顯示內容的原理:首先采用CSS和HTML隱藏彈窗中的內容,然後利用JavaScript(本教程中是JQuery)來動態顯示它們。這種效果不僅能夠充分利用有限的版面空間,而且能夠提高用戶體驗;更重要的是,它並不影響SEO效果(因為它實際存在於頁面中,只是初始為不可見狀態)
1、在html頁面中定義一個div,並在div實現我們需要展示的內容。
. 代碼如下:
<body>
<div id="login">
<h2><img src="images/close.png" alt="" class="close" />網站登錄</h2>
<form id="loginForm" >
<div class="info"></div>
<div class="user">帳 號:<input type="text" name="user" class="text" /></div>
<div class="pass">密 碼:<input type="password" name="pass" class="text" /></div>
<div class="button"><input type="button" name="sub" class="submit" value="" /></div>
</form>
<div class="other">注冊新用戶 | 忘記密碼?</div>
</div>
</body>
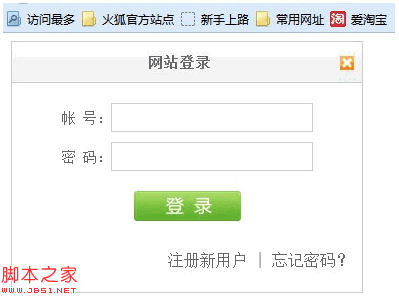
一圖抵千言。讓我們看看這個DIV彈出窗口的效果截圖:
2、我所用的CSS樣式
. 代碼如下:
#login {
width:350px;
height:250px;
border:1px solid #ccc;
position:absolute;
display:block;
z-index:9999;
background:#fff;
}
#login h2 {
height:40px;
line-height:40px;
text-align:center;
font-size:14px;
letter-spacing:1px;
color:#666;
background:url(images/login_header.png) repeat-x;
margin:0;
padding:0;
border-bottom:1px solid #ccc;
cursor:move;
}
#login h2 img {
float:right;
position:relative;
top:14px;
right:8px;
cursor:pointer;
}
#login div.info {
padding:10px 0 5px 0;
text-align:center;
color:maroon;
}
#login div.user, #login div.pass {
font-size:14px;
color:#666;
padding:5px 0;
text-align:center;
}
#login input.text {
width:200px;
height:25px;
border:1px solid #ccc;
background:#fff;
font-size:14px;
}
#login .button {
text-align:center;
padding:15px 0;
}
#login input.submit {
width:107px;
height:30px;
background:url(images/login_button.png) no-repeat;
border:none;
cursor:pointer;
}
#login .other {
text-align:right;
padding:15px 10px;
color:#666;
}
這裡面主要注意的是關於div樣式的定義,因為需要居中展示我們使用絕對定位position:absolute;其次因為是彈出層,div必須在最外圍,所以通常把z-index設置的非常大,這裡我們設置為z-index:9999;還有一點是關於div本身是隱藏的需要設置為display:none,但這裡我們需要直接看效果所以直接讓它展現使用display:block;
3、我們需要讓它居中展示,那麼首先就必須獲取浏覽器的高度和寬度,如果有滾動條的水平或者豎向偏移,還需要獲取那個長度,通過計算獲取div應該浏覽器的位置。
. 代碼如下:
$(document).ready(function()
{
jQuery.fn.extend({
center:function(width,height)
{
return $(this).css("left", ($(window).width()-width)/2+$(window).scrollLeft()).
css("top", ($(window).height()-height)/2+$(window).scrollTop()).
css("width",width).
css("height",height);
}
});
});
通過點擊按鈕讓它展現
. 代碼如下:
$(".login").click(function ()
{
$("#login").show().center(350,250);//展現登陸框
});
效果圖
4、能對彈出框進行拖拽
代碼實現
. 代碼如下:
$(document).ready(function()
{
jQuery.fn.extend({
//拖拽功能
drag:function(){
var $tar = $(this);
return $(this).mousedown(function(e){
if(e.target.tagName =="H2"){
var diffX = e.clientX - $tar.offset().left;
var diffY = e.clientY - $tar.offset().top;
$(document).mousemove(function(e){
var left = e.clientX - diffX;
var top = e.clientY - diffY;
if (left < 0){
left = 0;
}
else if (left <= $(window).scrollLeft()){
left = $(window).scrollLeft();
}
else if (left > $(window).width() +$(window).scrollLeft() - $tar.width()){
left = $(window).width() +$(window).scrollLeft() -$tar.width();
}
if (top < 0){
top = 0;
}
else if (top <= $(window).scrollTop()){
top = $(window).scrollTop();
}
else if (top > $(window).height() +$(window).scrollTop() - $tar.height()){
top = $(window).height() +$(window).scrollTop() - $tar.height();
}
$tar.css("left",left + 'px').css("top",top + 'px');
});
}
$(document).mouseup(function(){
$(this).unbind("mousemove");
$(this).unbind("mouseup")
});
});
}
});
});
這裡我們只針對div內容中的H2元素可供點擊拖拽,如果需要全局div可進行修改,拖拽原理:當鼠標在指定元素上的按下時,獲取該鼠標點坐標,通過計算,把圖片也移動到相對應的位置,一旦鼠標點擊取消,相對應的按下事件也隨之取消,頁面靜止。
調用拖拽方法
. 代碼如下:
$("#login").drag();
現在我們可以點擊彈出框的標題欄隨意對其在浏覽器中拖拽了。
1、在html頁面中定義一個div,並在div實現我們需要展示的內容。
. 代碼如下:
<body>
<div id="login">
<h2><img src="images/close.png" alt="" class="close" />網站登錄</h2>
<form id="loginForm" >
<div class="info"></div>
<div class="user">帳 號:<input type="text" name="user" class="text" /></div>
<div class="pass">密 碼:<input type="password" name="pass" class="text" /></div>
<div class="button"><input type="button" name="sub" class="submit" value="" /></div>
</form>
<div class="other">注冊新用戶 | 忘記密碼?</div>
</div>
</body>
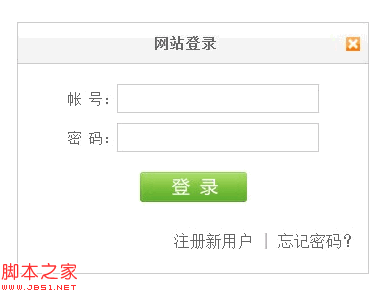
一圖抵千言。讓我們看看這個DIV彈出窗口的效果截圖:
2、我所用的CSS樣式
. 代碼如下:
#login {
width:350px;
height:250px;
border:1px solid #ccc;
position:absolute;
display:block;
z-index:9999;
background:#fff;
}
#login h2 {
height:40px;
line-height:40px;
text-align:center;
font-size:14px;
letter-spacing:1px;
color:#666;
background:url(images/login_header.png) repeat-x;
margin:0;
padding:0;
border-bottom:1px solid #ccc;
cursor:move;
}
#login h2 img {
float:right;
position:relative;
top:14px;
right:8px;
cursor:pointer;
}
#login div.info {
padding:10px 0 5px 0;
text-align:center;
color:maroon;
}
#login div.user, #login div.pass {
font-size:14px;
color:#666;
padding:5px 0;
text-align:center;
}
#login input.text {
width:200px;
height:25px;
border:1px solid #ccc;
background:#fff;
font-size:14px;
}
#login .button {
text-align:center;
padding:15px 0;
}
#login input.submit {
width:107px;
height:30px;
background:url(images/login_button.png) no-repeat;
border:none;
cursor:pointer;
}
#login .other {
text-align:right;
padding:15px 10px;
color:#666;
}
這裡面主要注意的是關於div樣式的定義,因為需要居中展示我們使用絕對定位position:absolute;其次因為是彈出層,div必須在最外圍,所以通常把z-index設置的非常大,這裡我們設置為z-index:9999;還有一點是關於div本身是隱藏的需要設置為display:none,但這裡我們需要直接看效果所以直接讓它展現使用display:block;
3、我們需要讓它居中展示,那麼首先就必須獲取浏覽器的高度和寬度,如果有滾動條的水平或者豎向偏移,還需要獲取那個長度,通過計算獲取div應該浏覽器的位置。
. 代碼如下:
$(document).ready(function()
{
jQuery.fn.extend({
center:function(width,height)
{
return $(this).css("left", ($(window).width()-width)/2+$(window).scrollLeft()).
css("top", ($(window).height()-height)/2+$(window).scrollTop()).
css("width",width).
css("height",height);
}
});
});
通過點擊按鈕讓它展現
. 代碼如下:
$(".login").click(function ()
{
$("#login").show().center(350,250);//展現登陸框
});
效果圖
4、能對彈出框進行拖拽
代碼實現
. 代碼如下:
$(document).ready(function()
{
jQuery.fn.extend({
//拖拽功能
drag:function(){
var $tar = $(this);
return $(this).mousedown(function(e){
if(e.target.tagName =="H2"){
var diffX = e.clientX - $tar.offset().left;
var diffY = e.clientY - $tar.offset().top;
$(document).mousemove(function(e){
var left = e.clientX - diffX;
var top = e.clientY - diffY;
if (left < 0){
left = 0;
}
else if (left <= $(window).scrollLeft()){
left = $(window).scrollLeft();
}
else if (left > $(window).width() +$(window).scrollLeft() - $tar.width()){
left = $(window).width() +$(window).scrollLeft() -$tar.width();
}
if (top < 0){
top = 0;
}
else if (top <= $(window).scrollTop()){
top = $(window).scrollTop();
}
else if (top > $(window).height() +$(window).scrollTop() - $tar.height()){
top = $(window).height() +$(window).scrollTop() - $tar.height();
}
$tar.css("left",left + 'px').css("top",top + 'px');
});
}
$(document).mouseup(function(){
$(this).unbind("mousemove");
$(this).unbind("mouseup")
});
});
}
});
});
這裡我們只針對div內容中的H2元素可供點擊拖拽,如果需要全局div可進行修改,拖拽原理:當鼠標在指定元素上的按下時,獲取該鼠標點坐標,通過計算,把圖片也移動到相對應的位置,一旦鼠標點擊取消,相對應的按下事件也隨之取消,頁面靜止。
調用拖拽方法
. 代碼如下:
$("#login").drag();
現在我們可以點擊彈出框的標題欄隨意對其在浏覽器中拖拽了。
小編推薦
熱門推薦