使用ajax實現分頁技術
編輯:AJAX基礎知識
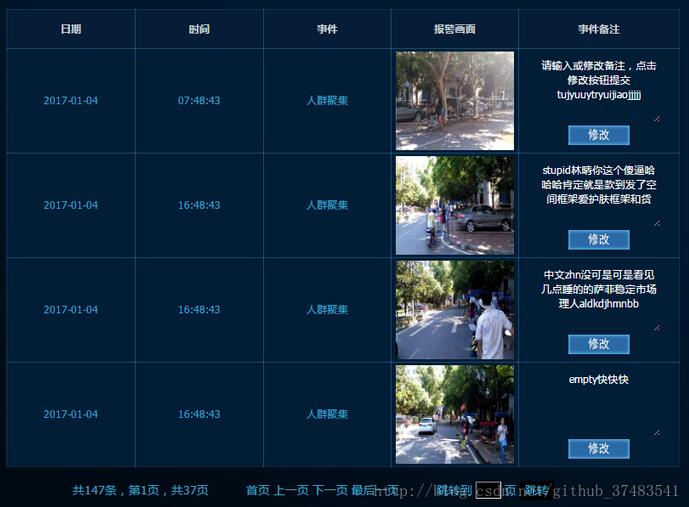
ajax分頁效果圖如下:
首先,先看 HTML 代碼和 CSS 代碼,我們需要一個 table 和一個 footer:
<div id="global">
<div id="table">
 <table>
 <col width="19%">
 <col width="19%">
 <col width="19%">
 <col width="19%">
 <col width="24%">
 <tr>
 <th>日期</th>
 <th>時間</th>
 <th>事件</th>
 <th>報警畫面</th>
 <th>事件備注</th>
 </tr>
 </table>
 </div>
 <div id="footer">
 <span id="summary"></span>
 <ul id="pagination">
 <li id="01">首頁</li>
 <li id="02">上一頁</li>
 <li id="03">下一頁</li>
 <li id="04">最後一頁</li>
 </ul>
 <div id="select">
 <span>跳轉到 </span>
 <input type="text" name="page_num">
 <span> 頁 </span>
 <input type="button" name="go_btn" value="跳轉">
 </div>
 </div>
</div>
下面是 css 代碼:
#global{
 position: relative;
}
#table{
 position: absolute;
 top:19%;
 left:1.6%;
 width: 55%;
}
#table textarea{
 width: 10vw;
 height: 10vh;
 background-color: transparent;
 color: #fff;
 border-width: 0;
 text-align: center;
}
table, th, td {
 border: 0.2px solid rgba(60,166,206,0.2);
 border-collapse: collapse;
 color:rgba(60,166,206,1);
}
th, td {
 padding: 3px;
 text-align: center;
 font-size: 1.6vmin;
}
td{
 background: rgba(2,29,54,1);
}
th{
 background: rgba(20,29,54,1);
 padding: 1.8% 0;
 color: rgba(255,255,255,0.8);
}
#footer{
 position: absolute;
 bottom:5vh;
 left:7vw;
 text-align: center;
 color: rgba(60,166,206,1);
}
#pagination{
 display: inline-block;
}
#pagination li{
 display: inline;
}
#select{
 display: inline-block;
 margin-left: 40px;
}
#select input[type="text"]{
 width: 30px;
 height: 20px;
 background-color: #000;
 border-width: 1px;
}
#select input[type="button"]{
 width: 40px;
 height: 23px;
 background: #000;
 border:none;
}
ul li{
 cursor: pointer;
}
初始化開始日期,結束日期,請求的頁數,請求的每頁數量,總共有多少頁數據,並通過 ajax 將這些數據傳給後台提供的 API 數據接口,進而從數據庫中獲取到數據,然後可以在前端展示:
var start_date = "2017-01-01", end_date = "2017-01-08";
var pageNo = 1;
var pageSize = 4;
var pages = 0;
如何獲取表格的數據並將其 append 到前端?如何獲取分頁的數據並將其 append 到前端?使用下面我們定義的函數:
loadData(pageNo, pageSize);
接下來看這個函數如何跟 API 數據接口溝通:
function loadData(pageNo, pageSize){
 $(".detail").remove(); //每次重新從 API 數據接口獲取數據都要先清除原先表格 `<tr>` 的內容
 $.ajax({
 url: "/history_alarm",
 type: "POST",
 data: JSON.stringify({date:date, page_num:pageNo, page_size:pageSize}),
 success:function(result){
 var results = JSON.parse(result);
 var list = results.alarm;
 var totalCount = results.alarm_count;
 pages = results.page_count;
 if(list.length != 0){
  for(var i=0; i<list.length; i++){
  var alarm_id = list[i].alarm_id;
  var alarm_pic = list[i].alarm_pic;
  var date = list[i].date;
  var event = list[i].event;
  var time = list[i].time;
  var remark = list[i].remark;
  appendData(alarm_id, alarm_pic, date, event, time, remark);
  addEvent(alarm_id);
  }
  $("#table").show();
  $("#footer").show();
  displayFooter(totalCount, pages, pageNo);
 } else{
  $("#table").hide();
  $("#footer").hide();
 }
 },
 error:function(){
 //error handle function
 }
 });
 }
在 loadData 這個函數中我們還定義了另外3個函數,接下來我們先來看 appendData:
//注意到我們將 `alarm_id` 作為 `<textarea>` 'class` 的值,也作為提交按鈕 `id` 的值,這是因為我們要通過 ajax 將用戶輸入到某一個 `<textarea>` 的值作為參數傳給後台 API 接口,由其寫入數據庫。
function appendData(alarm_id, alarm_pic, date, event, time, remark){
 var text = '<tr class="detail"><td>'+date+'</td><td>'+time+'</td<td>'+event+'</td>'+
  '<td><img class="img01" src=data:image/jpeg;base64,' + alarm_pic + '</td>'+
  '<td class="modity_btn"><textarea cols="5" rows="3"
  class='+alarm_id+'>'+remark+'</textarea>'+'<img id='+alarm_id+' src="{{
  static_url("slice/modify.png") }}"></td></tr>';;

 $("#table table").append(text);
 }
//該函數定義了如何通過 ajax 將用戶輸入到某一個 `<textarea>` 的值作為參數傳給後台 API 接口,並寫入數據庫
function addEvent(alarm_id){
 $("#"+alarm_id).click(function(){
 var remark = $("."+alarm_id).val();
 if(remark != ""){
 $.ajax({
  url:"/history_alarm",
  type:"POST",
  data:JSON.stringify({alarm_id:alarm_id, note:remark}),
  success:function(result){
  var results = JSON.parse(result);
  if(results.status == "ok"){
  console.log('ok');
  }
  }
 })
 }
 })
 }
function displayFooter(totalCount, pages, pageNo){
 var newText = '共' + totalCount + '條,' + '第' + pageNo + '頁,' + '共' + pages + '頁';
 $("#summary").text(newText);
 }
獲取數據的函數寫好了,接下來就要點擊分頁的“首頁、上一頁、下一頁、最後一頁、跳轉”時候所對應的事件了。思路是這樣的:用戶點擊分頁的每一個項目,都要重新判斷 pageNo,然後將 pageNo 作為參數,再次調用獲取數據的 API 接口:
$("input[name='page_num']").keydown(function(e){ if(e.keyCode == 13){ $("input[name='go_btn']").click(); } });

$("input[name='go_btn']").click(function(){
 var goPage = $("input[name='page_num']").val();
 if(goPage >= 1 && goPage <=pages && goPage != pageNo){
  pageNo = goPage;
  loadData(pageNo, pageSize);
 } else{
  return false;
 }
});

$("#01").click(function(){
 pageNo = 1;
 loadData(pageNo, pageSize);
});

$("#04").click(function(){
 pageNo = pages;
 loadData(pageNo, pageSize);
});

$("#02").click(function(){
 if(pageNo == 1){
  return false;
 } else{
  pageNo--;
  loadData(pageNo, pageSize);
 }
});

$("#03").click(function(){
 if(pageNo == pages){
  return false;
 } else{
  pageNo++;
  loadData(pageNo, pageSize);
 }
});
以上就是本文的全部內容,希望對大家的學習有所幫助,也希望大家多多支持。
- 上一頁:ajax無刷新評論功能
- 下一頁:Ajax入門學習教程(一)
小編推薦
熱門推薦