jQuery插件pagewalkthrough實現引導頁效果
編輯:JavaScript綜合知識
這篇文章主要介紹了jQuery插件pagewalkthrough實現引導頁效果的方法和示例代碼,十分的詳細和實用,有需要的小伙伴可以參考下。
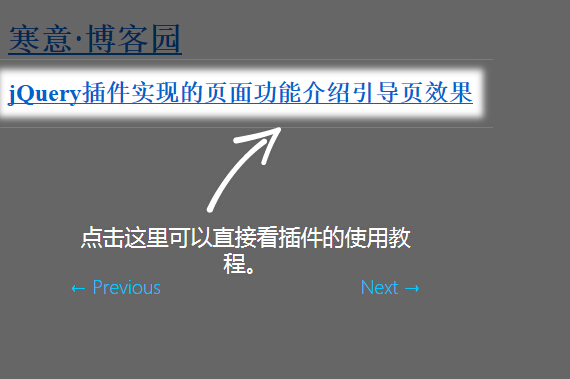
現在很多網站不僅是介紹,更多的是有一些功能,怎麼樣讓客戶快速的知道網站有哪些功能呢?這裡pagewalkthrough.js插件能幫我們實現,它是一個輕量級的jQuery插件,它可以幫助我們創建一個遮罩引導層,實現頁面功能引導功能,引導完成顯示頁面內容。
html代碼:
?
1 2 3 4 5 6 7 8 9 10 11 12 13 14 15 16 17 18 19 20 21 22 23 24 <div id="walkthrough-content"> <div id="walkthrough-1"> <h3>歡迎來到網頁引導示例DEMO演示頁</h3> <p>頁面功能介紹引導頁的效果是通過一款叫做<a href="https://github.com/jwarby/jquery-pagewalkthrough" target="_blank">pagewalkthrough.js</a>的jQuery插件實現的。</p> <p>點擊下一步了解更多...</p> </div> <div id="walkthrough-2"> 這裡是網站LOGO,點擊這裡可以直通網站首頁。 </div> <div id="walkthrough-3"> 點擊這裡可以直接看插件的使用教程。 </div> <div id="walkthrough-4"> 點擊這裡去下載源碼,免費的哦。。 </div> <div id="walkthrough-5"> 這是頁腳和版權信息。 </div> </div>js文件和代碼:
?
1 2 3 4 5 6 7 8 9 10 11 12 13 14 15 16 17 18 19 <script type="text/javascript" src="jquery.min.js"></script> <script type="text/javascript" src="jquery.pagewalkthrough.min.js"></script> <script> $(function() { // Set up tour $('body').pagewalkthrough({ name: 'introduction', steps: [ { popup: {content: '#walkthrough-1',type: 'modal' } }, {wrapper: '#logo',popup: {content: '#walkthrough-2',type: 'tooltip',position: 'bottom'} }, {wrapper: 'h2.top_title a',popup: {content: '#walkthrough-3',type: 'tooltip',position: 'bottom'} }, {wrapper: 'a[href="http://files.cnblogs.com/files/hnyei/jq_zhezhaoyd.rar"]', popup: {content: '#walkthrough-4',type: 'tooltip',position: 'right'} }, {wrapper: '#footer p',popup: {content: '#walkthrough-5',type: 'tooltip',position: 'top'} }] }); // Show the tour $('body').pagewalkthrough('show'); }); </script>css文件:
?
1 2 3 4 5 6 7 8 9 10 11 12 13 14 15 16 17 <link rel="stylesheet" href="css/jquery.pagewalkthrough.css"> <!--[if lt IE 9]> <script src="html5.js"></script> <![endif]--> <style type="text/css"> .demo{text-align:center} .button {display: inline-block;outline: none;cursor: pointer;text-align: center;text-decoration: none;font: 22px/100% 'Microsoft yahei',Arial, Helvetica, sans-serif;padding: .5em 2em .55em;text-shadow: 0 1px 1px rgba(0,0,0,.3);-webkit-border-radius: .5em; -moz-border-radius: .5em;border-radius: .5em;-webkit-box-shadow: 0 1px 2px rgba(0,0,0,.2);-moz-box-shadow: 0 1px 2px rgba(0,0,0,.2);box-shadow: 0 1px 2px rgba(0,0,0,.2); } .button:hover {text-decoration: none;} .button:active {position: relative;top: 1px;} /* green */ .green {color: #e8f0de;border: solid 1px #538312;background: #64991e;background: -webkit-gradient(linear, left top, left bottom, from(#7db72f), to(#4e7d0e));background: -moz-linear-gradient(top, #7db72f, #4e7d0e);filter: progid:DXImageTransform.Microsoft.gradient(startColorstr='#7db72f', endColorstr='#4e7d0e');} .green:hover {background: #538018;background: -webkit-gradient(linear, left top, left bottom, from(#6b9d28), to(#436b0c));background: -moz-linear-gradient(top, #6b9d28, #436b0c);filter: progid:DXImageTransform.Microsoft.gradient(startColorstr='#6b9d28', endColorstr='#436b0c');color:#fff} .green:active {color: #a9c08c;background: -webkit-gradient(linear, left top, left bottom, from(#4e7d0e), to(#7db72f));background: -moz-linear-gradient(top, #4e7d0e, #7db72f);filter: progid:DXImageTransform.Microsoft.gradient(startColorstr='#4e7d0e', endColorstr='#7db72f');} #walkthrough-content{display:none} #walkthrough-content h3{height:30px; line-height:30px} #walkthrough-content p{line-height:28px} </style>以上所述就是本文的全部內容了,希望大家能夠喜歡。
小編推薦
熱門推薦